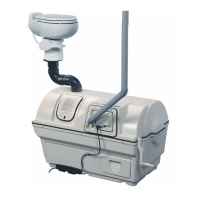
Vent
Piping
Installation
(Cont’d)
Leading the
vent
through the
roof
The Diffusor
Electrical
Considerat-
ions
(Electric and
AC/DC)
vent pipe being blocked by condensation which would cause a urine smell in your bathroom.
iii) All connectors in the vent pipe should be sealed.
Use
silicone
for
the
connection
of
the
vent
stack
to
the
toilet
in
case
the
composting
unit
has
to
be
moved
or
you
have
to
access
the
fan
. PVC cement
may be used in the rest of the stack installation if desired.
iv) All exposed 2” vent pipe should be insulated with the foam insulation. This is especially important
for winter or residential use.
v) The Sun-Mar 12 Volt fan is fitted inside a 11” (280mm) length of 4”(100mm) vent pipe for easy
installation, should it be needed. It is installed by either cutting out a section of the vent immediately
above the composting unit, or by raising the vent stack off of the composting unit and inserting the
fan section. The fan can be used with a solar panel and 12 volt battery, or by purchasing a 12 volt
adapter from your local hardware store and simply plugging it into the wall.
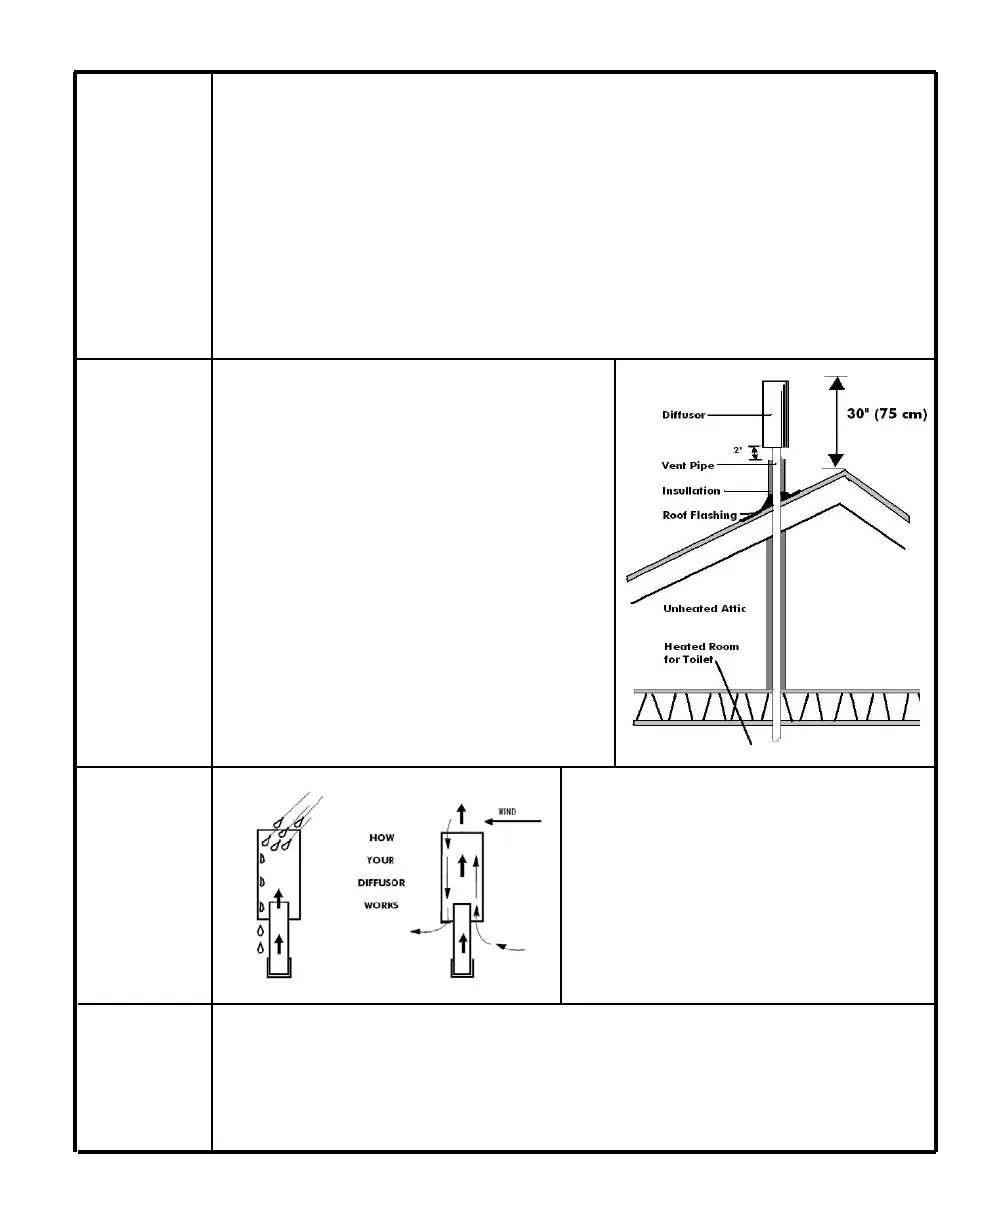
As shown in the installation, the vent stack should end
about 30” (75mm)above the peak of the roof so that it is
less subject to downdraft. Where the piping is taken
through the roof, the roof flashing provided should be
used to seal the installation. Insert the vent into the bell
of the roof flashing and slide the roof flashing down until
it lays evenly on the roof. Slip the upper edge or the roof
flashing flange under the shingles. Outline the flashing on
the roof. Raise the roof flashing and apply silicone
sealant or roofing tar inside the outline. Slide the flashing
back into place and firmly press onto the sealant. The
flashing is properly placed when the top part of the roof
flashing flange is tucked under the shingles and the lower
portion is sealed on top of the shingles so that water
sheds easily. Secure the flashing with corrosion resistant
nails at each corner and along sides. Any exposed nails
should be sealed with silicone caulking.
The diffusor provided with the unit is a simple device to
be installed at the top of the vent stack with the larger
pipe protruding above the smaller. To install, simply
glue the diffusor on the topmost section of vent pipe.
The diffusor design encourages updraft, and discour-
ages wind and weather from going down the vent
stack. Unlike wind turbines, diffusors are less likely to
freeze up in winter, and are more effective in calm
weather.
A ground fault interrupter (GFI) circuit is recommended to protect your composting unit from electrical
problems. This may be installed directly on the wall socket or at the circuit breaker.
Symptom Cause Remedial Action Prevention
Waste not
Breaking
Down at all
(cont'd’)
Lumps
If many large
lumps have
formed in drum,
you will need to
remove them or
break them up
with the rake
tool. Follow the
prevention col-
umn to ensure
this does not
happen.
Drum Too
Full
Note: The drum
is too full when it
is over 1/2 full,
and the door is
not closing prop-
erly.
Antibiotics being
used for more than
a few weeks on a
continuous basis
may kill bacteria
Compost Too Dry
Over-Rotation of
Drum
Peat moss used as
bulking material
with no wood shav-
ings.
Compost not emp-
tied into finishing
drawer in a timely
fashion.
Kitchen/Garden
Waste added
When used normally, antibiotics will
only slightly slow compost. Add
Sun-Mar Microbe Mix and/or
Compost Quick during this period to
accelerate compost action.
Urinating elsewhere during this
period will also help minimize the
damage to the compost.
Follow recommendations for check-
ing and adding moisture in “PERI-
ODIC CHECKUP”.
Drum should be turned every sec-
ond day (when in use), 6 rotations
of the drum (36-40 of handle)
each time.
Use proper bulking material.
When drum is 1/2 full, remove
some compost to the finishing
drawer by rotating the drum back-
wards, to avoid surprise over-filling
of drum. Do NOT let drum get
above 1/2 full. (The drum is 1/2 full
when the level of the compost
reaches 4-6 inches(100-150mm)
below where the drum door hangs)
This will lead to lack of aeration,
and anaerobic compost, and the
inconvenience of having to remove
more than one drawer.
Do Not add kitchen or garden
waste.
Empty drum. Rinse out inside of drum, being
careful that liquid does not overflow out of the
drawer opening. Restart compost according to
“Initial System Startups”.
Follow instructions for “Compost Too Dry” on
page 17. And also add 1/2 gallon (2 liters) of
warm water.
Follow “ONGOING TOILET MAINTENANCE” on page
15, and also add 1/2 gallon(2 liters) of wood
shavings.
Begin using 100% wood shavings, as bulking
material.
1. Remove compost until drum is only half full or
less. Rotate compost thoroughly to aerate,
and add compost accelerants (Compost Quick
and Microbe Mix) if available.
2. If you need to dump more than one drawer of
compost, and you do not already have a suit-
able backyard compost heap, you may try an
open-slatted wooden crate (such as the kind
used to pack age fruits and vegetables).
Layer compost with bulking material and
leave crate outside for around 2 months to
finish composting.
- 11 -
- 18 -