- 2 - - 27 -
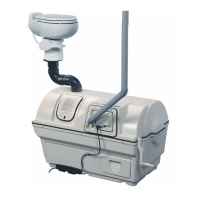
The key to the success of the “CENTREX 2000 Family” lies in it’s three chamber design. Each of the three cham-
bers; composting, compost finishing, and evaporation have their own independent environments for optimum effi-
ciency.
Introduction
HOW YOUR COMPOSTING TOILET WORKS
Composting is a natural recycling process where human
waste and toilet paper are broken down by microbes
into minerals and converted back to earth. Heat, oxy-
gen, organic material and moisture are needed to
transform this waste into good fertilizing soil, perfect for
your flower beds.
Oxygen is provided by the ventilation system, and by
tumbling the composting drum. Additional organic
material is introduced by adding “Compost Sure Blue”
(or 100% non-antibacterial wood shavings). The waste
entering the toilet is approximately 90% water content.
Any excess liquid which is not absorbed will collect on
the floor of the unit (evaporation chamber) where it
may be evaporated into water vapor and carried back
to the atmosphere through the venting system. The
remaining waste material is transformed into an inof-
fensive earth-like substance.
The Composting Chamber
The composting chamber is in the form of a Bio-drum
which holds the natural compost heat, provides the nec-
essary mass to maintain a good compost, and is rotat-
ed by turning the handle to achieve perfect mixing and
aeration.
During mixing, both the input door and the output doors
will remain closed. When the drum returns to the top
dead centre position ready to receive more waste, the
input doors remains open.
Compost is removed from the drum periodically, by
pulling the white drum locker button (on the handle side
of the composting unit)out, and turning the handle
counter-clockwise so that the drum rotates clockwise.
When this is done, the output door stays open, and
compost falls into the second chamber;-the compost
finishing drawer.
To ensure that the compost remains moist, but does not
get too wet (between 40 and 60% moisture content is
ideal), any excess liquid which the compost cannot
absorb drains through a screen in the rear of the drum
directly onto an evaporating tray beneath the screen,
and from there, overflows into the evaporating chamber.
The evaporating tray can be removed periodically to
remove peat moss debris that has accumulated.
Compost Finishing Drawer
The compost finishing drawer is at the extreme right of
the unit below the composting drum, and just above the
evaporating chamber. Compost from the drum is isolat-
ed in the drawer where it is allowed to ‘finish’ compost-
ing. For seasonally used units, several drawers of fin-
ished compost are normally removed at the beginning
of the season. Otherwise some composted material can
be extracted into the drawer and left there for 3-4
weeks until it is time to remove more compost from the
drum.
BBaassiicc
MMaaiinntteennaannccee
IInnssttrruuccttiioonnss
Sealand toilet and 'Centrex Family' Central Units
The toilet is porcelain and should be cleaned with hot water or bio-degradable products to avoid damage
to the compost. If required 'Compost Quick' or Baking Soda can be used diluted in hot water.
Three
times
a
week
weekly
maintenance
(every
second
day):
Turn drum to reveal waste inlet hole through access port and add compost mix at the rate of @ 1 cupful
(250ml) per person per day. (Scoop provided is 2 cups or 500ml)
Rotate handle clockwise to mix contents of Bio-drum and give 6 complete revolutions of the drum - (36-
40 rotations of the handle). Ensure that the drum door opening is in the vertical position at the end
after hearing the 'click' of the catch.
Spray 'Compost Quick' into the drum before and after mixing.
Check
compost
volume
and
co
ndition
in
Bio-ddrum
and:
If the waste in the Bio-drum is too wet add wood shavings and check your drum screen for blockages to
improve aeration.
To speed up composting, add one scoop of Microbe Mix every second week, and ensure that the drum is
not more than 1/2 full. If the drum is too full, follow the instructions to extract compost (page 15).
Monthly
maintenance
and
emptying
cycle:
Rake out evaporation chamber with rake provided (the area below the finishing drawer). The black evap-
orating tray should be removed, solid matter tipped into the finishing tray and then replaced beneath the
drum screen.
Clean the drum screen. Remove the finishing drawer, the drum screen is to the left of the drawer on the
bottom of the drum. Spray the drum screen with Compost Quick and let sit for 15 minutes (this will help
to loosen the debris if the screen is not too encrusted). Scrub the screen vigorously with the wire brush.
If brushing the screen does not clear it and liquid is still not draining through the screen, use a screw-
driver or nail to puncture each hole in the drum screen.
Attention:
the
composti
ng
unit
must
remain
plugged
in
to
an
electrical
outlet
continuously
to
function
odorlessly
.
The
AC/DC
units
should
have
both
fans
running
while
used
in
electric
mode
to
prevent
recircu-
lation
between
vent
stacks.
If
you
will
be
away
from
the
residence
where
the
composting
unit
is
installed
for
longer
than
three
days,
the
power
may
be
disconnected
while
the
composting
unit
lays
dormant.