Included
In Your Kit
Installing the
“1 Pint” Low
Flush Toilet
- 8 -
- 21 -
Symptom Cause Remedial Action Prevention
Occasional
Urine Odor
Outside
Strong
Sewage
Odor
Present
when drum
turns
Fan Noisy
(Electric
and AC/DC)
Fan Not
Working
(Electric
and AC/DC)
1. Vent stack not
installed even
with peak of roof.
2. If vent stack is
installed above
roofline, natural
obstructions,
such as tall
trees, being
located in a
valley or close to
a hill may be
causing down-
draft.
Compost is
anaerobic
Fan damaged in
shipping, or bear-
ings are beginning
to wear if it is rat-
tling.
Fan vibrations res-
onating in vent pipe
(12 Volt Fan)
Debris in fan or
Mechanical Failure.
1. Check that the vent is installed 2-3 feet (600-
900mm) above the peak of the roof. If not,
extend the vent.
Guide wires may be necessary.
2. Add lime to the evaporation chamber; as
much as you think necessary. You will have
to rake more often if you do this. You can
also add lime to the compost if desired, but
no more than 1/2 cup(250ml) per week as it
may upset the PH balance in larger amounts.
3. Sun-Mar has a filter box available which will
filter the ammonia out of the vented air in a
downdraft situation. Call Sun-Mar for details.
Drum too full.
Handle not turned enough.
Incorrect bulking mixture used
1. If it is rattling, it may need to be cleaned or
the bearings are worn and the fan needs to
be replaced.
2. A hum is the normal sound the fan will make.
If you are in a very quiet setting it will be
more noticeable. If this is the case, consider
purchasing a fan speed control so that the
fan may be turned down when the noise
bothers you.
3. If it is a vibration noise, you may need to tie
down the top of the stack with guide wires and
bracket the pipe that runs up the side of
the structure.
Use pipe clamps to secure vent pipe or install fan
with rubberized couplings to help absorb vibra-
tions.
Have your serial number ready and call Sun-Mar.
Downdraft is dependent on wind
direction, as well as natural
obstructions, etc.
Initially, install the vent 2-3 feet
(600-900mm)above the peak of
the roof. If symptoms occur, add
lime or a filter box.
Ideally, drum should be maintained
at 1/2 full.
Drum should be turned every sec-
ond day, 6 complete turns of the
drum (36-40 turns of the handle)
Use Compost Sure Blue or 100%
non-antibacterial wood shavings
Clean the fan with a small brush
and/or compressed air nozzle once
every 2-3 years in cottage use, or
once a year residentially. To do
this, remove the fan assembly by
taking off the snap cap covers and
unscrewing the screws which hold it
in.
The entire assembly will then simply
slide out. This will prevent wear
and lengthen the life of your fan.
The fan is a continuously moving
part which will eventually have to be
changed. Do Not turn on and off
daily.
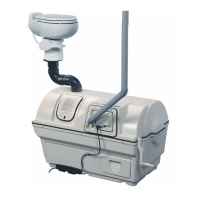
1- Owners Manual 1- 1 1/2” (38mm)Roof Flashing (Electric & AC/DC)
1- Warranty Card 1- 4” (100mm)Roof Flashing (NE & AC/DC)
1- Evaporation Tray 6- 2” x 30” (50760mm)PVC Pipe (Electric & AC/DC)
1- 8’ 4” (254cm)Drain Pipe 2- Compost Sure
1- Rake 1- 4” Diffusor (100mm)(Electric & AC/DC)
1- 3” (76mm)Centrex 2000 Inlet 1- 6” (150mm) Diffusor (NE & AC/DC)
5- 4” x30” (100x 700mm)ABS Pipe (NE & AC/DC) 1- Centrex 2000 Hardware Kit
1- 12 Volt 2.4 Watt Fan (NE & AC/DC) 1- Centrex NE Hardware Kit (NE & AC/DC)
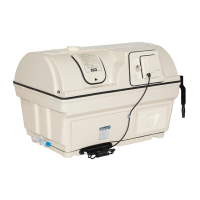
1. Make sure the center of the floor flange is at least 11 inches
(280mm) from the back wall.
2. When Installing a new floor flange, make certain that the toilet
mounting bolts align properly with Sealand Traveler toilet mount-
ing pattern.
3. Secure flange to floor using flat head screws through counter-
sunk holes in flange. Insert bolts into slotted holes in flange
(Fig. A)
4. If toilet is being installed in a shower stall, apply a 1/4”(6mm) thick
by 3/4”(19mm) wide bead of glazing compound around the
circumference of the floor flange (Fig B).
5. Position floor seal by pressing the floor bolts up through the
holes in the seal.
6. Set toilet in place with bolts protruding up through mounting holes
in base (Fig C).
7. Install washers and hex nuts provided with toilet. Tighten nuts
down equally with standard 7/17” (12mm) open end wrench.
Remove excess Glazing compound from around base.
8. Connect water supply line to water valve (1/2” or 13mm MPT) inlet
using appropriate fittings (Fig D)
9. Turn on water supply and flush toilet to test for leaks.
10. Attach pedestal and pedal covers to toilet base. See instructions
below.