31
Chapter 2: Installation
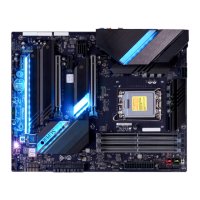
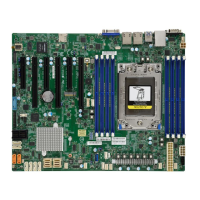
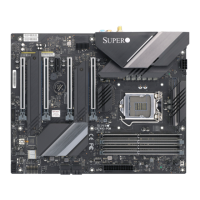
PCH
PLX
Super I/O
LAN Controller
SW1
(CLEAR CMOS)
10G LAN
Controller
+
+
3
1
DESIGNED IN USA
C9Z490-PGW
REV:1.01
BIOS
LICENSE
MAC CODE
MAC CODE
BAR CODE
MH14
JRLED1
MH11
MH10
MH12
MH13
MH15
JSTBY1
JTPM1
HD AUDIO
B1
SP1
JD1
JSD1
SYS_FAN3
USB10/11 (3.2(5Gb))
JPW1
LED18
LED17
LED3
LED2
LED1
JPW2
JI2C2
JI2C1
JL1
LED4
JPAC1
JLED1
JWD1
JPME2
12V_PUMP_PWR1
USB9 (3.2(20Gb))
USB8 (3.2(10Gb))
USB2/3
JF1
BOOT LED
VGA LED
DIMM LED
CPU LED
DP/HDMI
LAN1
AUDIO FP
COM1
USB0/1
PCIE M.2-M1
CPU SLOT1 PCI-E 3.0 X8 (IN X16)
CPU SLOT3 PCI-E 3.0 X16
PCH SLOT4 PCI-E 3.0 X1
CPU SLOT5 PCI-E 3.0 X8 (IN X 16)
I-SATA1
I-SATA0
I-SATA3
I-SATA2
CPU SLOT7 PCI-E 3.0 X16
SYS_FAN2
PCIE M.2-M2
USB12 (3.2(10Gb))
USB6/7 (3.2(10Gb)) USB4/5 (3.2(5Gb))
POWER
BUTTON
DIMMB1
DIMMB2
DIMMA1
DIMMA2
RESET
BUTTON
SYS_FAN1
CPU_FAN1
CLEAR CMOS
CPU_FAN2
LAN2
PCIE M.2-E1
WiFi+BT
DIMM Installation
1. Insert DIMM modules in the following
rder: DIMMA2, DIMMB2, then DIMMA1,
DIMMB1. For the system to work properly,
use memory modules of the same type
and speed.
2. Align the DIMM module key with the
receptive point on the single-latch DIMM
slot.
3. Push the release tab outwards to unlock
the slot.
4. Align the notch on the end of the module
against the receptive point on the end of
the slot.
5. Press both ends of the module straight
down into the slot until the module snaps
into place.
6. Push the release tab to the lock position to
secure the module into the slot.
DIMM Removal
Reverse the steps above to remove the DIMM
modules from the motherboard.
Receptive Point
Release Tab
Notch
Push both ends straight
down into the memory slot.
 Loading...