45
Chapter 2: Installation
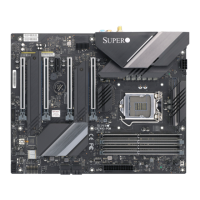
1. JL1
2. JD1
PCH
PLX
Super I/O
LAN Controller
SW1
(CLEAR CMOS)
10G LAN
Controller
+
+
3
1
DESIGNED IN USA
C9Z490-PGW
REV:1.01
BIOS
LICENSE
MAC CODE
MAC CODE
BAR CODE
MH14
JRLED1
MH11
MH10
MH12
MH13
MH15
JSTBY1
JTPM1
HD AUDIO
B1
SP1
JD1
JSD1
SYS_FAN3
USB10/11 (3.2(5Gb))
JPW1
LED18
LED17
LED3
LED2
LED1
JPW2
JI2C2
JI2C1
JL1
LED4
JPAC1
JLED1
JWD1
JPME2
12V_PUMP_PWR1
USB9 (3.2(20Gb))
USB8 (3.2(10Gb))
USB2/3
JF1
BOOT LED
VGA LED
DIMM LED
CPU LED
DP/HDMI
LAN1
AUDIO FP
COM1
USB0/1
PCIE M.2-M1
CPU SLOT1 PCI-E 3.0 X8 (IN X16)
CPU SLOT3 PCI-E 3.0 X16
PCH SLOT4 PCI-E 3.0 X1
CPU SLOT5 PCI-E 3.0 X8 (IN X 16)
I-SATA1
I-SATA0
I-SATA3
I-SATA2
CPU SLOT7 PCI-E 3.0 X16
SYS_FAN2
PCIE M.2-M2
USB12 (3.2(10Gb))
USB6/7 (3.2(10Gb)) USB4/5 (3.2(5Gb))
POWER
BUTTON
DIMMB1
DIMMB2
DIMMA1
DIMMA2
RESET
BUTTON
SYS_FAN1
CPU_FAN1
CLEAR CMOS
CPU_FAN2
LAN2
PCIE M.2-E1
WiFi+BT
2
1
Chassis Intrusion Header
A Chassis Intrusion header is located at JL1 on the motherboard. Attach the appropriate cable
from the chassis to inform you of a chassis intrusion when the chassis is opened.
Chassis Intrusion Header
Pin Denitions
Pin# Denition
1 Intrusion Input
2 Ground
Speaker Header
On JD1 Header, pins 3 and 4 are used for the internal speaker. Close pins 3 and 4 with a
cap to use the onboard speaker. If you wish to use an external speaker, close pins 1-4 with
a cable. Refer to the table below for pin denitions.
Speaker Header
Pin Denitions
Pin# Denition
3-4 Internal Speaker
1-4 External Speaker
 Loading...