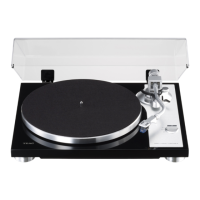
Keep it closed whenever possible to keep dust out. По возможности держите её закрытой для защиты от пыли
Removing the dust cover Снятие пылезащитной крышки
Hold both edges of the dust cover and lift it slowly to remove it along with the hinges from the unit. Then, remove the hinges from the
dust cover. Возьмитесь за оба края пылезащитной крышки и медленно поднимите её, чтобы снять вместе с петлями с устройства.
Затем снимите петли с пылезащитной крышки
Opening and closing the dust cover Открытие и закрытие пылезащитной крышки
Open. Открыть
Opening Открытие
Hold the front edge of the dust cover and gently lift it open completely until it stops. The dust cover will stay open in this position.
Возьмитесь за передний край пылезащитной крышки и осторожно полностью откройте ее до упора. В этом положении
пылезащитная крышка останется открытой
Closing Закрытие
Gently lower the dust cover until it is closed. Аккуратно опускайте пылезащитную крышку, пока она не закроется
Be careful not to pinch your fingers, for example, when opening and closing the dust cover. Будьте осторожны, чтобы не
прищемить пальцы, например, при открывании и закрывании пылезащитной крышки
Changing the cartridge Замена картриджа
To change the cartridge, first remove the headshell from the tone arm. Чтобы заменить картридж, сначала снимите шелл с тонарма
A Sumiko Oyster MM type cartridge is installed in the unit. В аппарате установлен картридж типа Sumiko Oyster MM
When using an Oyster, always remove the cartridge stylus before detaching the cartridge itself from the head shell and before attaching
the cartridge to the head shell. Pull the stylus knob down at a slight angle from the front of the cartridge to remove the cartridge stylus.
Be careful not to touch the cantilever or stylus itself. При использовании Oyster всегда удаляйте иглу картриджа перед тем, как
отсоединить сам картридж от корпуса головки и перед тем, как прикрепить картридж к корпусу головки. Потяните ручку иглы
вниз под небольшим углом от передней части картриджа, чтобы извлечь иглу картриджа. Будьте осторожны, чтобы не коснуться
кронштейна (консоли) или самого стилуса.
Headshell. Корпус головки
Stylus knob. Головка иглы
Shell leads Шелл ведет (Жилы шелла)
Cartridge. Картридж (кассета, патрон)
Screws. Винты
Nuts. Гайки и болты
Stylus, cantilever. Стилус, кронштейн
1. Disconnect the shell lead terminals from the cartridge. Отсоедините клеммы выводов оболочки от картриджа
2. Loosen the screws and remove the cartridge. Ослабьте винты и снимите картридж
3. Attach the new cartridge and tighten the screws. Установите новый картридж и затяните винты
See the illustration below for the position of the screws when attached. На рисунке ниже показано положение винтов при их установке
52.8±0.5 mm.
4. Connect the shell lead terminals to the cartridge. Подсоедините выводы оболочки к картриджу
The signals and colors of the shell leads are shown below. Сигналы и цвета выводов оболочки показаны ниже
Signal Color Цвет сигнала
Left channel + White Левый канал + белый
Left channel − Blue Левый канал — синий
Right channel + Red Правый канал + красный
Right channel – Green Правый канал – зеленый
5. Balance the tone arm and adjust the tracking force. Сбалансируйте тонарм и отрегулируйте прижимную силу
Follow the procedures in “Balancing the tone arm and adjusting the tracking force” on page 15. Выполните процедуры, описанные в
разделе «Балансировка тонарма и регулировка прижимной силы» на стр. 15
Precautions when changing the cartridge Меры предосторожности при замене картриджа
The weight of cartridges that can be used with this unit is limited. See “Tone arm” on page 20. Also check the acceptable cartridge weight
(with the included head shell) shown on the same page when changing the head shell. Вес картриджей, которые можно использовать с
данным устройством, ограничен. Также проверьте допустимый вес картриджа (с включенным корпусом головки), указанный на той
же странице, при замене корпуса головки
Using MC cartridges Использование картриджей MC
The equalizer amplifier built into this unit is for MM cartridges. It does not support MC cartridges. Усилитель-эквалайзер, встроенный
в этот аппарат, предназначен для картриджей ММ. Он не поддерживает картриджи MC

 Loading...