Follow the steps below to assemble your Technics piano. Make sure you are using the correct parts and that they are in the
correct direction.
• At least 2 people are required for assembly.
• To disassemble the piano, reverse the procedure.
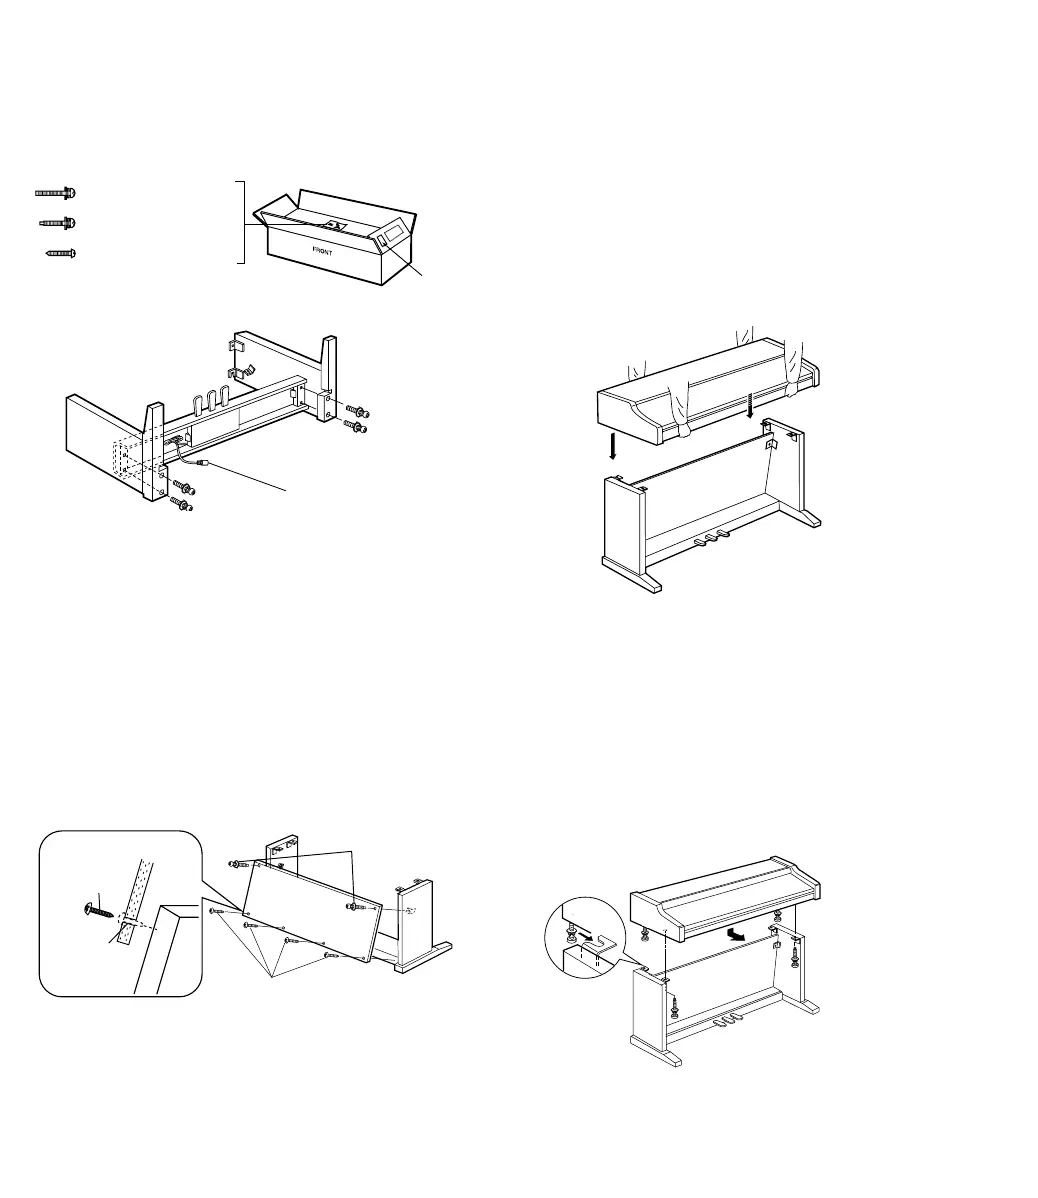
1.Remove the packing and take the parts out of the carton.
Confirm that all the parts on the printed list are present.
2.Affix the right and left side planks to the pedal box.
(1) Use the 4 brass-colored screws to secure the planks.
(2) Be sure to insert the screws straight.
• If a screw is inserted crookedly, it may be damaged.
(3) Insert each of the 4 screws partway, lightly securing each
one little by little. After confirming that the screws are all
correctly inserted, tighten each one securely.
• If each screw is tightened securely before all the screws
are inserted, the last screw may be very difficult to insert.
(4) Extend the pedal cord on the inner side of the pedal box.
3.Affix the rear panel.
• For the brown wood grain model: affix the rear panel so
that the wood grain suface is facing rhe front.
(1) Insert the 2 black screws (A) partway in the upper part of
the rear panel, securing them only lightly. Do not tighten
the screws completely at this time.
• If the screws are tightened securely at this time, it may
be difficult to affix the lower part of the rear panel.
(2) Insert the 4 black screws (B) through the mounting holes
in the lower part of the rear panel and tighten the screws
fully.
• Run the screws directly into the pedal box as there are
no rough holes in the pedal box.
(3) Tighten the 2 black screws (A) in the upper part of the
rear panel completely.
4.Place the piano body on the stand.
WARNING:
Avoid pinching your fingers.
Note 1
Holding the piano body at least 10 cm in from the
edge, place it on the stand so that it does not fall off.
Note 2
If the piano body is placed too far to the right or left, or
to the front or back, it will become unstable.
5.Secure the piano body to the stand.
(1) Insert 2 black screws (A) in the 2 rear screw holes on the
underside of the piano body, and turn each screw 5 or 6
times. Push the piano body forward so that the screws
are fully inserted in the cutout of the metal piece on either
side plank. (This enables you to easily position the piano
body on the stand.)
List
Brass-colored
screw ..................4
Black screw (A).....6
Black screw (B).....4
Pedal cord
Black screw (B)
Black screw (A)
Screw (B)
Rear panel
Pedal
box
Mounting
hole
 Loading...