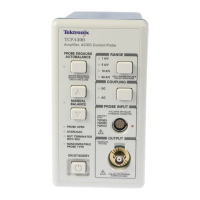
Control Summary
NOT TERMINATED
When lit, this i
ndicator informs you that the TEKPROBE interface cable or BNC
cable from the OUTPUT of the amplifier is not connected to a 50 Ω input on the
oscilloscope. Yo u need to switch the termination setting on the oscilloscope to
50 Ω,orusea50Ω termination on the oscilloscope input.
NOTE. NOT TERMINATED INTO 50 Ω is only detected during the DEGAUSS
AUTOBALANCE operation.
NONCOMPAT
IBLE
When lit, this indicator informs you that the probe that is connected to the
amplifier is not designed to work with the amplifier. TCP3XX probes only work
with the TCPA300 Amplifier, and the TCP404XL probe only works with the
TCPA400 A
mplifier.
ON/STANDBY Button
Use this button to power on the amplifier. When the amplifier is in STANDBY
mode, the amplifier is in a limited-power mode. Most of the secondary circuitry is
disabl
ed, but the line voltage remains connected to the a mplifier power supply.
RANGE Button
Press the RANGE button to toggle between the scale factors (sensitivity settings)
of the probe attached to the TCPA300. If no RANGE LEDs are lit, this indicates a
probe
is not connected to the amplifier.
COUPLING Button and
Indicators
The COUPLING button determines the coupling between the TCPA300/TCPA400
and the oscilloscope. Press the COUPLING button to toggle between AC and
DC c
oupling. To couple the amplifierforDCplusACmeasurements,useDC
coupling. For AC measurements only, use AC coupling. When the amplifier is set
to AC coupling, the Manual Balance adjustment is disabled since the DC offset
component is n ot visible on the output waveform.
NOTE. Even when making AC current measurements, leave the oscilloscope
coupling on DC. Change only the amplifier coupling to AC. Using the oscilloscope
A
C coupling may cause the amplifier to exceed its output dynamic range.
Under normal operation, the AC and DC COUPLING LEDs indicate the coupling
mode of the amplifier. If they alternately flash after a d egauss operation, this
indicates the amplifier is displaying an error code with the four status LEDs on
the lower-left front panel. (See page 43, Displaying Error Codes with the Probe
Degauss Autobalance Button.)
PROBE INPUT Connector
All current probes compatible with the TCPA300 and TCPA400 attach at the
PROBE INPUT connector, which is a multi-pin female connector. Information
18 TCPA300/400 Amplifiers and TCP300/400 Series Current Probes User Manual
 Loading...