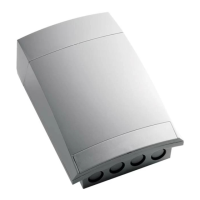
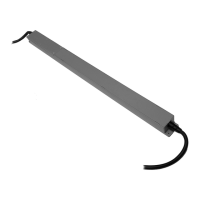
This document describes a two-output radio receiver designed for controlling 110/230V loads. It is available in two models: TVRCL868A02F6 (868.3 MHz) and TVRCL916A02F6 (916 MHz).
Function Description
The device is a radio receiver with two outputs, enabling remote control of 110/230V equipment. Each output can handle a maximum resistive load of 3000W at 230Vac, or 1500W at 110Vac. The relay function is programmable and can operate in impulsive, ON/OFF, or timed modes, with timing configurable up to 8 hours, 59 minutes, and 59 seconds.
A critical warning is provided: the outputs are NOT PROTECTED against short circuits and overcurrents, which can damage the electronic board. The system must be configured considering the characteristics of the connected loads, paying particular attention to peak currents. If necessary, appropriate safety measures should be evaluated and implemented in the power supply line.
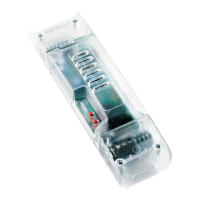
The device features LEDs to indicate hours, minutes, seconds, ON/OFF status, and impulsive mode. A selector switch allows choosing between output L1 and L2 for configuration. Terminal blocks are provided for power supply (110/230Vac - 28A), ground, and outputs L1 and L2 (110/230Vac - 13A each). An antenna connection terminal is also present.
Important Technical Specifications
- Power Supply: 110-230Vac (28A)
- Output (cos φ = 1): 110-230Vac (13A)
- Max. Output Power per Relay: 3000W (@ 230Vac), 1500W (@ 110Vac)
- Operating Temperature Range: -20°C to +50°C
- Reception Frequency:
- 868.3 MHz (TVRCL868A02F6)
- 916 MHz (TVRCL916A02F6)
- Radio Memory Capability (Transmitters): 42
- Dimensions (Box): 205 x 145 x 85 mm
- IP Rating: 54
Usage Features
The device offers flexible programming for its relay functions:
Setting Relay Function (Impulsive, ON/OFF, Timer):
Before programming, select the desired output (L1 or L2) using the selector switch. The configuration will only apply to the selected output. Settings are automatically saved 5 seconds after button release.
- Impulsive Function: Press the SET button once and hold it until the IMP LED turns ON. Release the button and wait for the LED to turn off to confirm memorization.
- ON/OFF Function: Press the SET button twice and hold it on the second press until the ON-OFF LED turns ON. Release the button and wait for the LED to turn off to confirm memorization.
- Timer Function:
- Setting Seconds (1 to 59): Press the SET button three times and hold it on the third press until the SEC LED turns ON. Adjust seconds using the MEM button (increase) or DEL button (decrease). Each press corresponds to a unit change. Wait for the procedure to save data or proceed to the next setting.
- Setting Minutes (1 to 59): Press the SET button again (within five seconds) and hold it until the MIN LED turns ON. Adjust minutes using MEM (increase) or DEL (decrease).
- Setting Hours (1 to 8): Press the SET button again (within five seconds) and hold it until the HOU LED turns ON. Adjust hours using MEM (increase) or DEL (decrease).
- Note: Once the maximum or minimum limit is reached, the LED will turn off, and the value will no longer increase or decrease.
Transmitter Memorization:
Similar to relay function setting, select L1 or L2 first. The memorization applies only to the selected output. Both outputs can be assigned a single channel or a channel pair by repeating the procedure.
- Memorizing a Single Channel: Press and hold the MEM button once. The buzzer will beep once and then emit a continuous tone. While the continuous tone is active, press the button of the transmitter to be memorized. Successful memorization is indicated by rapid beeps.
- Memorizing a Double Channel (CH1-2, CH3-4, CH6-7) with ON/OFF Function: Press the MEM button twice and hold it on the second press. The buzzer will beep twice and then emit a continuous tone. While the continuous tone is active, press the button of the transmitter to be memorized. Successful memorization is indicated by rapid beeps.
- Note: If a double channel is associated with an output configured with a timer function, the output can be deactivated before the programmed time using CH2, CH4, or CH7 buttons.
- Copying a Transmitter Function to a New Transmitter:
- Press the P3 button inside the already memorized transmitter. The receiver's buzzer will emit a continuous tone.
- Within 5 seconds, press the button of the memorized transmitter whose function you want to copy. The buzzer will interrupt the sound for 1 second and then resume for another 5 seconds.
- Press the button of the new transmitter to be memorized. Successful memorization is indicated by rapid beeps.
Deleting Transmitters:
- Deleting a Single/Double Radio Code: Press and hold the DEL button once. The buzzer will emit a slow intermittent tone. While the intermittent tone is active, press the button of the transmitter to be deleted. Deletion is indicated by a continuous buzzer tone.
- Deleting All Transmitters: Press and hold the DEL button twice for 10 seconds on the second press. The buzzer will emit a fast intermittent tone, then a continuous tone, indicating that the memory has been completely cleared.
- Deleting a Single/Double Radio Code Using the Transmitter: Press the P3 button three times inside the memorized transmitter. The buzzer will emit a slow intermittent tone. While the intermittent tone is active, press the button of the radio code to be deleted. Once deleted, the buzzer will emit a continuous tone.
Maintenance Features
- Installation: The product must be installed, commissioned, and periodically checked only by qualified technical personnel in compliance with electrical regulations. Improper installation, adjustment, or alteration can lead to fire, electric shock, or severe personal injury. The manufacturer disclaims responsibility for damages resulting from incorrect installation or use.
- Mounting Location: The device must be fixed on a surface that is not damaged by high temperatures and placed in a well-ventilated area. It cannot be hermetically sealed. It must be mounted vertically with cable glands facing downwards. Connection cables must be protected against accidental impacts using appropriate conduits. Do not cover the product or use/store flammable materials near it.
- Electrical Connections: All connections require a single-phase 110/230Vac power supply with an Earth connection. An all-pole switch with a contact opening of at least 3.5mm must be used for disconnection from the mains. All necessary safety devices and materials must comply with electrical installation standards. Signal and power voltage wiring (110/230Vac) must be kept separate. Cables must have an adequate cross-section for the connected load and a nominal temperature rating (T) up to 90°C. A table is provided for approximate resistance values and maximum current of copper wires based on their cross-section.
- Safety Information: The appliance is not intended for use by persons (including children) with reduced physical, sensory, or mental capabilities, or lack of knowledge about its characteristics or potential hazards. Children should be supervised. Do not touch the electronic board with wet hands or metallic/flammable objects. Do not operate in high-voltage areas of the board when powered. Use the product only with devices that ensure safe, extended operation. Radio signal reception may be disturbed by electromagnetic emissions from other devices operating on the same frequency or if the product is shielded by metal parts.
- Product Disposal: At the end of its useful life, the appliance must not be disposed of as domestic waste. It must be taken to a collection center for waste electrical and electronic equipment. The user is responsible for proper disposal according to applicable laws. Non-compliance may result in penalties.
- Compliance: Teleco Automation s.r.l. declares that the product complies with the essential requirements and other relevant provisions of Directive 2014/53/UE. The full text of the EU Declaration of Conformity is available at www.telecoautomation.com/ce.
- Manufacturer's Right to Modify: The manufacturer reserves the right to change technical data and features without prior notice for continuous product development.