38
6. Test Execution ‘TERRATEST 5000 BLU’ (for ‘TERRATEST 4000 USB’ see page 32)
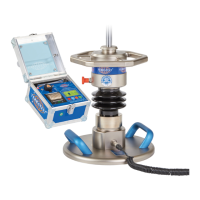
6.1 Preparing the Testing Point
Place the load plate on the ground, ensuring full and even contact between
the load plate and the ground. Create a smooth and level surface on the area
where the load plate will be placed. This can be done by moving the load
plate back and forth, or by using appropriate tools (such as a trowel). Remove
any loose soil from the area. In case of soil irregularities, spread a thin
levelling layer of fine-grained quartz sand. Make sure to add only a few
millimetres; it should compensate only for uneven patches under the load
plate. Next, place the load plate on top and move it back and forth to reduce
the thickness of the sand layer. Full contact between the load plate and the
test area is essential.
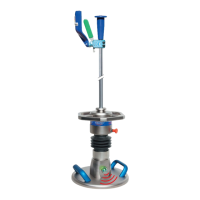
6.2 Test Execution / Data Input Function
After preparing the testing point and placing the Bluetooth
®
load plate on the ground, turn on the
Bluetooth
®
sensor dome by pressing the green button on the Bluetooth
®
sensor dome. The Bluetooth® sen-
sor dome will perform a quick self-test. This will be shown by changing LED colours of the ‘magic eye’. At
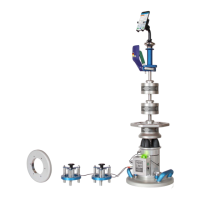
the end of the self-test the LED will turn red. Place the loading device in the centre of the Bluetooth
®
sen-
sor dome on the load plate.
To establish the Bluetooth
®
connection, ALWAYS turn on the Bluetooth
®
sensor dome first, before turning on
the testing computer. During the test the ‘magic eye’ (the transparent hemisphere), which protects the antenna
of the Bluetooth
®
transmitter, must always face the testing computer.
Press and hold the ‘START’ button to turn on the testing computer. To activate the backlight of the graphic
display, press the ‘START’ button for approximately three seconds, when turning on the device, until the start
screen switches automatically to ‘STATUS REQUEST’. An audio sonar signal announces the setup of the
Bluetooth
®
connection to the Bluetooth
®
load plate. Once established, you will hear the voice instruction:
‘Bluetooth OK, start test.’ The ‘magic eye’ on the Bluetooth
®
sensor dome will show blue.
DI 30/06/13 15:50:22
OK
OK
OK
GPS
6,3V
100
DI 30/06/13 15:50:22
?
?
?
GPS
6,3V
100
Welcome to TERRATEST
0.27
TERRATEST5000
DATA INPUT ?
YES NO
When turning on the testing computer with the backlight off, the start
screen will show the ‘TERRATEST 5000 BLU’ logo as well as the version
number of the firmware for approximately three seconds, before
progressing automatically to ‘STATUS REQUEST’.
During ‘STATUS REQUEST’ the computer checks the sensor connection,
USB stick, GPS, and the current battery charge and confirms that
everything is working correctly by showing ‘OK’. If one of these features
is unavailable, a ‘ ? ‘ will be shown instead. Checking the GPS connection
can take 2-3 minutes. If the sensor connection is not established, the
computer will not progress to the measuring mode and no test can be
performed. The current battery charge of the Bluetooth
®
sensor dome will
be shown as a percentage below the icon showing the current battery
charge of the testing computer.
If the USB stick is not recognised, turn the device off, insert the USB stick
again and turn the device back on. If the USB stick is still not recognised,
check that it has been formatted correctly. The USB stick can be format-
ted on a PC by choosing ‘format...’ from the context menu which appe-
ars when right-clicking on the drive icon. By pressing the start button
again the computer will progress to the text input function and ‘DATA
INPUT?’ will appear on the screen.
You can now choose to perform the test with or without data input.
DATA INPUT FUNCTION
STATUS DISPLAY