First steps 11
deenfresitptsvnl????
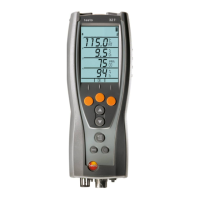
3 Select the required function using / and confirm entry with the OK
function key.
Functions
1. Displ. seq: selects parameters and units of measurement and assigns a position number for the
display/protocol printouts.
2. Date/Time: sets the date and time
3. Language: sets the language.
4. Printer: sets the printer to be used.
- The selected function is opened and the position number
(Displ. seq function only) or parameter which can be set flashes.
5. Bluetooth (327-2 with option Bluetooth only): activate/ deactivate interface.
4 Set the position number (Displ. seq function only)/parameter:
❯ For Displ. seq function only: Select the position number to be changed
using / and confirm with the Change function key.
Alternatively: Delete the position number with Del. and insert a new
position number using Ins..
Displ. seq function: Only parameters and units of measurement which are
assigned to a position number appear in the display and on printouts.
A maximum of 20 position numbers can be activated.
Key functions
· : Change parameters.
· For Date / Time function: changes between hours, minutes, day, month and year.
· For Displ. seq function: changes between parameter and unit of measurement (only available if
there are several units of measurement for the selected parameter).
· OK for Displ. seq function and a flashing position number: confirms setting and moves to next display
position.
· OK for Displ. seq and Finish flashing: confirms settings and leaves the function.
· OK for Date / Time, Language, and Printer: functions: confirms setting and leaves the function.
· esc: leaves the parameter or function without applying the changes.
Example: "Change display position"
✓ The position number to be changed has been selected.
1 Press / several times until the required parameter flashes.
2 Press the or function key to go to the menu for selecting the unit of measurement.
3 Press / several times until the required unit of measurement flashes.
4 Press the OK function key to confirm the setting and move to the next display position.
5 At the end of performing the settings: Press / several times until Finish flashes
(appears after the last position number) and confirm entry with OK.