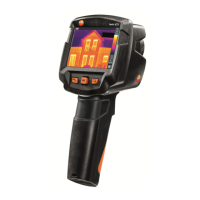
5 First steps
20
Manually focusing the image
Caution! testo 880-3: Possible damage of the auto
mechanism.
> Only use Rotating ring with the autofocus switched
off.
> testo 880-3: Slide [Autofocus switch] towards the lens
(position:
).
> Turn Rotating ring of the lens until the image is in focus.
Record (freeze/save) image
1. Press [Trigger].
- The image is frozen (fixed image).
If the image is to be saved, the desired storage location can be
set using the left [Folder] quick select button, see Select the
storage location (folder): page 35.
The image that is shown on the display is always the one that is
saved:
• Infrared image is shown: Infrared image is saved.
• Real image is shown (testo 880-1/-3 only): Real image is
saved.
• Infrared/real image is shown (testo 880-1/-3 only): Infrared
image is saved, real image is saved in the same file as an
attachment to the infrared image.
2. Save image: Press [Trigger] again, or: Press [OK].
or
Discard image: Press [ESC].
Getting to know the quick select buttons
The quick select buttons can be assigned functions that are
required often so that you can call them up directly.
Factory settings:
• Left quick select button: [Scale].
• Right quick select button: [Laser] (testo 880-2) or [Image
type] (testo 880-1/-3).
Warning! Eye damage due to laser beam!
> Do not look into the laser beam.
> Do not point the laser beam at people.