ONE YEAR LIMITED WARRANTY: If this product fails because of a manufacturing defect within one year after purchase, we will, at our option, either repair or
replace it at no charge. Our warranty does not cover damage caused by accident, abuse or misuse. We assume no further liability with respect to the sale or
use of this product. THIS WARRANTY IS IN LIEU OF ALL OTHER WARRANTIES, EXPRESSED OR IMPLIED, INCLUDING THE WARRANTY OF MERCHANTABILITY.
We make no warranty with respect to the fitness of any goods for the users particular application. This warranty gives you specific legal rights, and you also may
have other rights which vary from state to state.
It is our intent to provide accurate and current specification information. However, in the interest of product improvement, TORK may alter the specifications or
constructional details without prior notice.
NSi INDUSTRIES, LLC • 877.230.7874 • www.nsiindustries.com
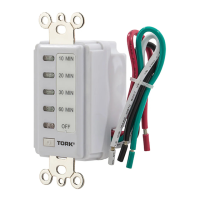
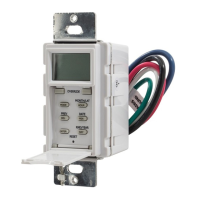
IN-WALL COUNTDOWN TIMER
®
MODEL#: D1060MW, D1060M, D1060LA,
D212HW, D212H, D212HA
DESCRIPTION:
IN-WALL COUNTDOWN TIMER
CONTACT RATINGS:
120VAC, 60Hz
1000W TUNGSTEN, 15A GENERAL PURPOSE
1000 VA BALLAST, 1/4 HP MOTOR
IMPORTANT SAFETY NOTES
WARNING: TO AVOID FIRE, SHOCK, OR DEATH, TURN OFF POWER AT CIRCUIT BREAKER AND TEST THAT POWER IS OFF
BEFORE WIRING.
WARNING: TO AVOID OVERHEATING, USE ONLY 14AWG, 600V, 105˚C WIRE TO CONNECT THIS TIMER
PROGRAMMING & OPERATING YOUR TIME SWITCH MECHANISM
INSTALLATION INSTRUCTIONS:
Remove existing wall plate and switch , if applicable.1.
Connect wires per WIRING DIAGRAM as shown.2.
Mount timer into box with mounting screws and attach wall 3.
plate into position.
Restore power at circuit breaker. Installation is complete.4.
OPERATING INSTRUCTIONS:
TIME SETTING1.
To set timer, press the push button repeatedly to select one
of the four time settings.
- FOR D1060M: 10min - 20min - 30min - 60min
- FOR D212H: 2hr - 4hr - 8hr - 12hr
The illuminated LED indicates which time setting is selected.
Timer starts counting down until time out is reached and
OFF LED is illuminated.
MANUAL OFF2.
To turn timer OFF manually, press the push button
repeatedly until OFF LED is illuminated.
A DIVISION OF
NSi INDUSTRIES, LLC
LINE
NEUTRAL
GROUND
LOAD
RED
WHITE
BLACK
GREEN
120VAC
WIRING DIAGRAM
LI-834
FOR TECHNICAL SUPPORT: SOUTIEN TECHNIQUE : PARA COMUNICARSE CON EL SERVICIO TÉCNICO: techsupport@nsiindustries.com 877.230.7874