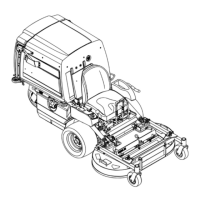
Figure32
1.Oildipstick
3.Engine-oillevel
2.Fillertube
6.Removethedipstickandchecktheoillevel(Figure32).
Note:Theoillevelshouldbeupto,butnotover,the
Fmarkonthedipstick.
7.Ifthelevelislow ,addoilofthepropertype,uptothe
Fmarkonthedipstick.
Note:Alwayscheckthelevelwiththedipstickbefore
addingmoreoil.
Note:Topreventextensiveenginewearordamage,
alwaysmaintaintheproperoillevelinthecrankcase.
Neveroperatetheenginewiththeoillevelbelowthe
“L”markoroverthe“F”markonthedipstick.
ChangingtheEngineOilandthe
Engine-oilFilter
ServiceInterval:Every100hours—Changetheengineoil
andtheengine-oillter.
FillwithserviceclassSG,SH,SJorhigheroilasspeciedin
the“ViscosityGrades”table.
Changetheengineoilandtheengine-oillterwhilethe
engineisstillwarm.Theoilwillowmorefreelyandcarry
awaymoreimpurities.Makesuretheengineislevelwhen
lling,checking,orchangingtheoil.
Changetheoilandoillterasfollows:
1.Parkthemachine,sothatthedrainsideisslightly
lowerthantheoppositeside,toassuretheoildrains
completely.
2.Disengagetheblade-controlswitchandmovethe
motioncontrolsoutwardtotheparkposition.
3.Stoptheengine,removethekey,andwaitforallmoving
partstostopbeforeleavingtheoperatingposition.
4.Cleantheareaaroundthedrainvalveandonthe
machineframe.
5.Locatetheoil-drainhose,andslideitoverthedrain
valve(Figure33).
Figure33
1.Oil-drainhose3.Endoftheframe
2.Drainvalve
4.Engine-oillter
6.Placetheoppositeendoftheoil-drainhoseoverthe
endoftheframe(
Figure33).
7.Placeapanunderneaththemachinedirectlybelowthe
drainhose(
Figure34).
29