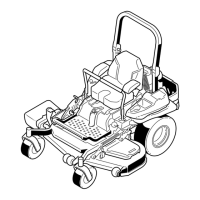
ReplacingtheGrassDeector
WARNING
Anuncovereddischargeopeningcouldallowthe
lawnmowertothrowobjectsatyouorbystanders,
resultinginseriousinjury.Also,contactwiththe
bladecouldoccur.
Donotoperatethelawnmowerunlessyouinstalla
coverplate,mulchplate,grassdeector,orbagger.
1.Removethelocknut,bolt,spring,andspacerholding
thedeectortothepivotbrackets(Figure104).
2.Removethedamagedorworngrassdeector(Figure
104).
Figure104
1.Bolt
5.Springinstalled
2.Spacer6.Grassdeector
3.Locknut
7.J-hookendofspring
4.Spring
3.Placethespacerandthespringontograssdeector.
4.Place1J-hookendofthespringbehindthedeckedge.
Note:Makesurethat1J-hookendofthespringis
installedbehindthedeckedgebeforeinstallingthebolt
asshowninFigure104.
5.Installtheboltandthenut.
6.Place1J-hookendofthespringaroundthegrass
deector(Figure104).
Important:Thegrassdeectormustbeable
torotate.Liftthedeectoruptothefullyopen
positionandensurethatitrotatesintothefully
downposition.
Cleaning
CleaningundertheMower
ServiceInterval:Beforeeachuseordaily
1.Disengagetheblade-controlswitch(PTO),movethe
motion-controlleverstotheNEUTRAL-LOCKposition,
andsettheparkingbrake.
2.Shutofftheengine,removethekey,andwaitforall
movingpartstostopbeforeleavingtheoperating
position.
3.RaisethemowertotheTRANSPORTposition.
CleaningtheSuspension
System
Note:Donotcleantheshockassemblieswithpressurized
water(Figure105).
Figure105
DisposingofWaste
Engineoil,batteries,hydraulicuid,andenginecoolantare
pollutantstotheenvironment.Disposeoftheseaccordingto
yourstateandlocalregulations.
67