6
m–4356
1
2
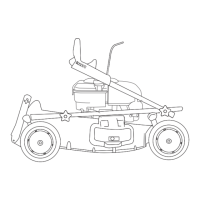
Figure
4
1. Traction
cable spring
2. T
ransmission bracket
Before
Starting
Oil
Initially,
the crankcase must be filled with 20 ounces
(0.6 liters) of SAE 30 oil; 10W
-30 oil may be substituted
if SAE 30 is not available. Use any high quality deter
gent
oil having the American Petroleum Institute (API)
“service classification”—SF
, SG, SH or SJ.
Before each use, ensure that the oil level is between the
FULL and ADD marks on the dipstick (Fig. 5). Add oil if
the level is low
.
1.
Position the mower on a level surface and clean
around the dipstick (Fig. 5).
2.
Remove the dipstick by rotating the cap
counterclockwise 1/4 turn.
3. W
ipe the dipstick clean.
4.
Insert the dipstick into the filler neck and rotate the
cap clockwise 1/4 turn.
5.
Remove the dipstick and check the level of the oil on
the side of the dipstick with the FULL and ADD marks
(Fig. 5).
1626
1
Figure
5
1. Dipstick
6. If
the level is low
, add enough oil to raise the level to
the FULL mark on the dipstick.
IMPORTANT
: Do not fill above the FULL mark
because the engine could be damaged when started.
Pour the oil slowly
.
Gasoline
Do not use gasoline that has been stored from one season
to the next. Use fresh, clean,
unleaded
regular grade
gasoline. Unleaded gasoline burns cleaner
, extends engine
life, and promotes good starting. Leaded gasoline can be
used if unleaded is not available.
T
oro also recommends that T
oro Stabilizer/Conditioner be
used regularly during operation and storage. T
oro
Stabilizer/Conditioner cleans the engine during operation
and prevents gum-like varnish deposits from forming
during periods of storage.
DANGER
POTENTIAL HAZARD
•
When fueling, under certain cir
cumstances, a
static charge can develop, igniting the gasoline.
WHA
T CAN HAPPEN
•
A fir
e or explosion fr
om gasoline can burn you
and others and cause pr
operty damage.
HOW T
O A
V
OID THE HAZARD
•
Always place gasoline containers on the gr
ound
away from your vehicle befor
e filling.
•
Do not fill gasoline containers inside a vehicle
or on a truck or trailer bed because interior
carpets or plastic truck bed liners may insulate
the container and slow the loss of any static
charge.
•
When practical, r
emove gas–power
ed
equipment fr
om the truck or trailer and r
efuel
the equipment with its wheels on the r
ound.
•
If this is not possible, then refuel such
equipment on a truck or trailer fr
om a portable
container
, rather than fr
om a gasoline
dispenser nozzle.
•
If a gasoline dispenser nozzle must be used,
keep the nozzle in contact with the rim of the
fuel tank or container opening at all times until
fueling is complete.
 Loading...