Lubrication
Lubricate the mac hine when sho wn on the Chec k
Ser vice R eference Aid decal ( Figure 18 ) located
beneath the seat. Grease more frequently when
operating conditions are extremely dusty or sandy .
Grease with No . 2 g eneral pur pose lithium base or
molybden um base g rease .
How to Grease
1. Diseng ag e the blade control switc h and mo v e
the control lev ers to the neutral loc k ed position
and apply the parking brak e .
2. Stop the engine , remo v e the k ey , and w ait for
all mo ving par ts to stop before lea ving the
operating position.
3. Clean the g rease fittings with a rag . Mak e sure
to scrape any paint off of the front of the
fitting(s).
4. Connect a g rease gun to the fitting . Pump
g rease into the fittings until g rease begins to
ooze out of the bearings .
5. Wipe up any ex cess g rease .
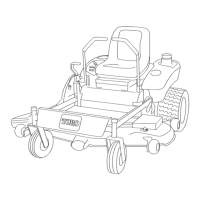
Where to Add Grease
Lubricate the g rease fittings as sho wn on the Chec k
Ser vice R eference Aid decal ( Figure 18 ) located
beneath the seat and the mo w er ( Figure 19 ).
Figure 18
Figure 19
Top View
Engine Maintenance
Servicing the Air Cleaner
F oam Element: Clean after ev er y 25 operating
hours , or yearly , whic hev er occurs first.
P aper Element: R e place after ev er y 100 operating
hours or yearly , whic hev er occurs first.
Note: Ser vice the air cleaner more frequently
(ev er y few hours) if operating conditions are
extremely dusty or sandy .
Removing the Foam and Paper
Elements
1. P ark the mac hine on a lev el surface and
diseng ag e the blade control (PTO).
2. Mo v e the motion control lev ers to the brak e
position, stop the engine , remo v e the k ey , and
w ait for all mo ving par ts to stop before lea ving
the operating position.
3. Clean around the air cleaner to prev ent dir t
from g etting into the engine and causing
damag e . R emo v e the air cleaner co v er knobs
( Figure 20 ) and lift up the co v er . R emo v e the
air cleaner co v er .
21
 Loading...