31
Settings for hot water supply
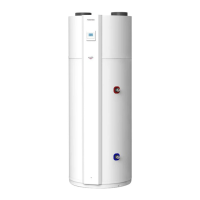
• Prepare the optional hot water cylinder.
• Procure a motorized 3-way (diverter) valve locally and perform piping. Connect the valve cables (as described in
Electrical connection section).
• Set DIP SW12-1 on the Hydro Unit board to OFF.
• Connect the power supply unit for the hot water cylinder heater to terminals TB03 L and N of the Hydro Unit.
• Connect cables between the Hydro Unit and the hot water cylinder as follows:
Hydro Unit terminals TB03 (1), (2), and earth — Hot water cylinder (1), (2), and earth
TB06 A, B, and earth — Hot water cylinder A, B, and earth
Settings for 2-zone temperature control
• Procure a motorized mixing valve locally and perform piping. Connect the valve cables (as described in Electrical
section).
• Procure a buffer tank locally.
• Procure a water pump locally, and connect its cables (as described in Electrical section).
• To inhibit interlocking the water pump with the internal pump of the Hydro Unit, set DIP SW10-3 on the Hydro
Unit board to OFF.
• Set DIP SW12-3 on the Hydro Unit board to ON.
Attach the temperature sensor (TFI) connected to terminals TB06 C and D of the Hydro Unit near the hot water
inlet of the Hydro Unit.
• Fix TFI sensor on the room heating supply pipe by using the connector procured in locally.
• Cover the cables with insulation tube (minimum 1 mm) or conduit so that the user cannot touch them directly.
• Cover the TFI sensor's cables and sensor with insulation tube (minimum 1 mm) shown in the diagram on the
right.
Test Run
Once you have competed the installation and system configuration conduct a test run (see below). Since the
protection setting is disabled in the TEST mode, do not continue a test run longer than 10 minutes.
• Press the TEST button on the remote controller. An indication “TEST” appears on the remote controller.
• Press the ZONE1, 2 button and select “heating” with the OPERATE MODE button.
The pump is activated in 30 seconds.
If air is not released completely, the flow switch is activated to stop operation. Release air again according to the
piping procedure. Little air bite is discharged from the purge valve.
• Check that the air bite sound disappears.
• Check that the hydraulic pressure has become the predetermined pressure 0.1 to 0.2 MPa (1 to 2 bar). If the
hydraulic pressure is insufficient, replenish water.
• Heating operation starts. Check that the hydro unit starts heating.
• Press the OPERATE MODE
button and select “cooling.”
• Cooling operation starts. Check that the hydro unit starts cooling and that the floor heating system is not cooled.
• Press the ZONE1, 2
button to stop operation.
• Press the HOT WATER
button to start hot water supply operation.
• Check that there is no air bite.
• Check that hot water is present at the connection port of the hot water cylinder.
• Press the HOT WATER
button to stop the hot water supply operation.
• Press the TEST button to exit the test mode.
 Loading...