6 of 12
Installation procedure
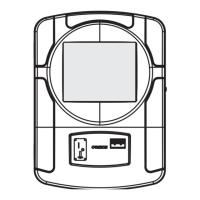
Refer to the illustrations on page 5 as you install the jukebox:
1 Attach the wall bracket
The top of the wall bracket must be mounted 65 inches (5' 5") from
the floor. Use a level to ensure that the bracket is level. Secure the
bracket to the wall using lag bolts and washers.
2 Hang the jukebox on the wall bracket
Hang the jukebox on the wall bracket using the flange hooks on the
rear. Allow the weight of the jukebox to set it into position.
3 Open the jukebox
The lock is located on the right side of the unit.
4 Turn off the power
Ensure that the system power switch is in the ‘0’ position.
5 Replace the lock (optional)
All Ovation jukeboxes are keyed alike. Therefore, for security
reasons, you may want to replace the lock. The lock is a tubular cam
lock. If you replace the lock, transfer the cam to the new lock
assembly.
6 Install the wall bracket screws
Install the wall bracket screws to lock the jukebox to the wall bracket.
7 Install the hard drive
Insert the hard drive into the slot labelled REMOVABLE HARD DISK
and push gently until it is fully seated. Hand tighten the thumb screw.
8 Remove the wire strain-relief bracket
Locate the wire strain-relief bracket. Loosen the two screws and
remove the bracket. This is the opening that all cables pass through.
This includes phone line, audio input/output, microphone, and
optional external light show cable.
9 Connect the phone line
Connect the phone line to the connector labelled TELCO. Route the
cable through the strain-relief bracket and either up or down the
cable channels on the back of the unit. Plug this cable into the
modular phone jack you installed earlier.
10 Connect external speakers
Ovation does not contain internal speakers. Therefore, you must
connect external speakers for the jukebox to play.
By default audio out 1 and 2 (on the connector panel) are connected
to amplifier zone A and B respectively.
Connect external speakers to zone A and B using the supplied
Euroblock connectors.
Route the cables through the strain-relief bracket and either up or
down the cable channels on the back of the unit.
11 Connect to an external sound system (optional)
If required, use audio out 3 (on the connector panel) to connect to an
external audio system.
Route the cable through the strain-relief bracket and either up or
down the cable channels on the back of the unit.
12 Connect the power cord
Plug the power cord into a properly grounded wall outlet.
13 Tighten the wire strength-relief bracket
14 Turn on the power
Toggle the system power switch to the ‘1’ position.
15 Close the jukebox
Make sure that the unit is locked and the key is removed.
16 Turn on the screen
Press the Night Mode button on the rear of the unit to activate the
screen.
CAUTION: Ovation components are heavy and represent a
serious safety hazard if their mounting system should fail.
Therefore, installation should only be performed by an
experienced installer or licensed contractor that is familiar
with standard rigging, mounting, and hanging practices,
as recognized by a licensed engineer or governmental
agency in your area.
CAUTION: The jukebox is NOT secure until these screws
are installed.