Do you have a question about the TP-Link Omada EAP615-Wall V1 and is the answer not in the manual?
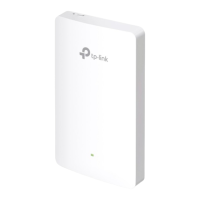
Diagram showing the front and rear panels of the Wireless Wall Plate Access Point.
Details the states and meanings of the LED on the device.
Describes the port for data transmission and power input via PoE.
Configure and manage EAPs individually for small networks.
Configure and manage EAPs in batches using a central platform.
This document describes a Wireless Wall Plate Access Point, designed for network connectivity in various environments, particularly suitable for in-wall installations. The device functions as an access point, providing wireless network coverage, and also includes Ethernet ports for wired client connections, with one port offering Power over Ethernet (PoE) passthrough capabilities.
The primary function of this device is to extend and manage a wireless network. It integrates seamlessly into existing wall junction boxes, offering a discreet and professional installation. The access point supports both standalone operation for smaller networks and controller-managed operation for larger, more complex deployments via the Omada Controller (either software-based or hardware-based).
For network connectivity, the device features an ETH0 (PoE IN) port, which serves as the primary uplink. This port receives both data and power from a Power Sourcing Equipment (PSE), such as a PoE switch, adhering to 802.3af/at standards. This single-cable solution simplifies installation by eliminating the need for a separate power adapter.
In addition to wireless connectivity, the device provides three Ethernet ports for wired client connections: ETH1, ETH2, and ETH3. ETH1 and ETH2 are standard data transmission ports. ETH3 is a unique port that not only transmits data but also supplies power (PoE OUT) to a connected client device. This PoE passthrough feature requires an 802.3at PoE+ input to the ETH0 port, allowing the access point to power an 802.3af-compliant device in the LAN. This is particularly useful for powering IP phones, cameras, or other PoE-enabled devices directly from the wall plate, reducing cable clutter.
The device includes an LED indicator on the front panel that provides visual feedback on its operational status. Different flash patterns indicate various states such as normal operation, initialization, upgrading, resetting, or when the Omada controller is locating the device. An LED button allows users to manually turn the LED on or off, which can be useful in environments where light emission is undesirable.
The device offers flexible configuration and management options to suit different network sizes and user preferences.
Installation: The access point is designed for easy installation into standard wall junction boxes, including 86 mm, standard EU, and standard US types. The installation process involves detaching the faceplate of the junction box, connecting an Ethernet cable (terminated with an RJ45 plug) from the PoE switch to the ETH0 (PoE IN) port, and then attaching the access point to the mounting bracket. The design ensures a secure fit and proper cable management within the junction box.
Standalone Mode: For small networks with only a few devices, the access point can be configured and managed individually in Standalone Mode. This can be done via the Omada App or a web browser.
http://tplinkeap.net. After setting up a secure username and password, the EAP can be configured through its web interface, which offers more advanced settings than the app.Controller Mode: For larger networks requiring centralized management of multiple EAPs, the device can be managed using an Omada Controller. This mode allows for batch configuration, monitoring, and troubleshooting of all connected EAPs from a single platform.
Remote Management: Both software and hardware controllers support remote management via Omada Cloud Service. This feature allows administrators to access and manage their network from anywhere with an internet connection, using either the Omada App or a web browser. Cloud Access needs to be enabled on the controller and bound to a TP-Link ID. The Omada App or web browser can then be used to log in with the TP-Link ID and manage the controllers and connected devices.
PoE Passthrough: The ETH3 (PoE OUT) port is a significant usage feature, enabling the access point to power another PoE-enabled device. This simplifies deployments by reducing the number of power outlets and cables required, making it ideal for powering devices like IP phones or surveillance cameras directly from the wall plate.
The device incorporates several features to facilitate maintenance and ensure long-term reliability.
RESET Button: A physical RESET button is available on the device. By pressing and holding this button for approximately 5 seconds until the LED flashes, the device will restore to its factory default settings. This is a crucial feature for troubleshooting or reconfiguring the device from scratch.
LED Indicator for Status Monitoring: The LED indicator provides immediate visual feedback on the device's operational status. This allows administrators to quickly ascertain if the device is working normally, initializing, upgrading, or if there's an issue. Specific flash patterns help diagnose problems without needing to access the management interface. For instance, a quick flash can indicate the device is resetting or being located by the Omada controller, aiding in physical identification.
LED Button for Discreet Operation: The LED button allows users to turn the LED indicator on or off. This is a useful maintenance feature in environments where the LED light might be distracting or undesirable, such as in hotel rooms or offices.
Firmware Upgrades: While not explicitly detailed as a separate feature, the "Flash once per second: The EAP is upgrading" LED status indicates that the device supports firmware upgrades. Regular firmware updates are essential for security patches, bug fixes, and new feature introductions, ensuring the device remains secure and performs optimally over time.
Troubleshooting and Support: The manual directs users to the TP-Link support website for setup videos, user guides, and other technical information. It also encourages users to visit the TP-Link Community for questions and interaction with other users and engineers. This comprehensive support ecosystem aids in troubleshooting and maintenance.
Safety Information: The manual includes important safety information, such as keeping the device away from water, fire, humidity, and hot environments, and not attempting to disassemble or repair it. This guidance helps prevent damage to the device and ensures safe operation, contributing to its longevity and reducing the need for maintenance.
In summary, this Wireless Wall Plate Access Point is a versatile networking device designed for seamless integration into various environments. Its robust functionality, flexible management options, and user-friendly maintenance features make it a reliable choice for extending wireless and wired network connectivity.
| Frequency | 2.4 GHz and 5 GHz |
|---|---|
| Operating Humidity | 10% to 90% non-condensing |
| Certifications | CE, FCC, RoHS |
| Wireless Standards | IEEE 802.11ax/ac/n/g/b/a |
| Maximum Speed | 1775 Mbps |
| PoE Support | 802.3af/at |
| Antenna Type | Internal |
| Mounting | Wall Mount |
| Management | Omada SDN |
| Security | WPA3 |
| Operating Temperature | 0°C to 40°C (32°F to 104°F) |
| Wireless Speed | 2.4 GHz: 574 Mbps, 5 GHz: 1201 Mbps |