Set Up
4
Safety Information
• Keep the device away from water, re, humidity or hot environments.
• Do not attempt to disassemble, repair, or modify the device. If you
need service, please contact us.
• Do not use the device where wireless devices are not allowed.
• The PoE ports shall not be used to charge lithium batteries or devices
supplied by lithium batteries.
EU Declaration of Conformity
TP-Link hereby declares that the device is in compliance with the essential
requirements and other relevant provisions of directives 2014/53/EU, 2011
/65/EU and (EU) 2015/863.
The original EU Declaration of Conformity may be found at
https://www.tp-link.com/en/support/ce/
UK Declaration of Conformity
TP-Link hereby declares that the device is in compliance with the essential
requirements and other relevant provisions of the Radio Equipment
Regulations 2017.
The original UK Declaration of Conformity may be found at
https://www.tp-link.com/support/ukca/
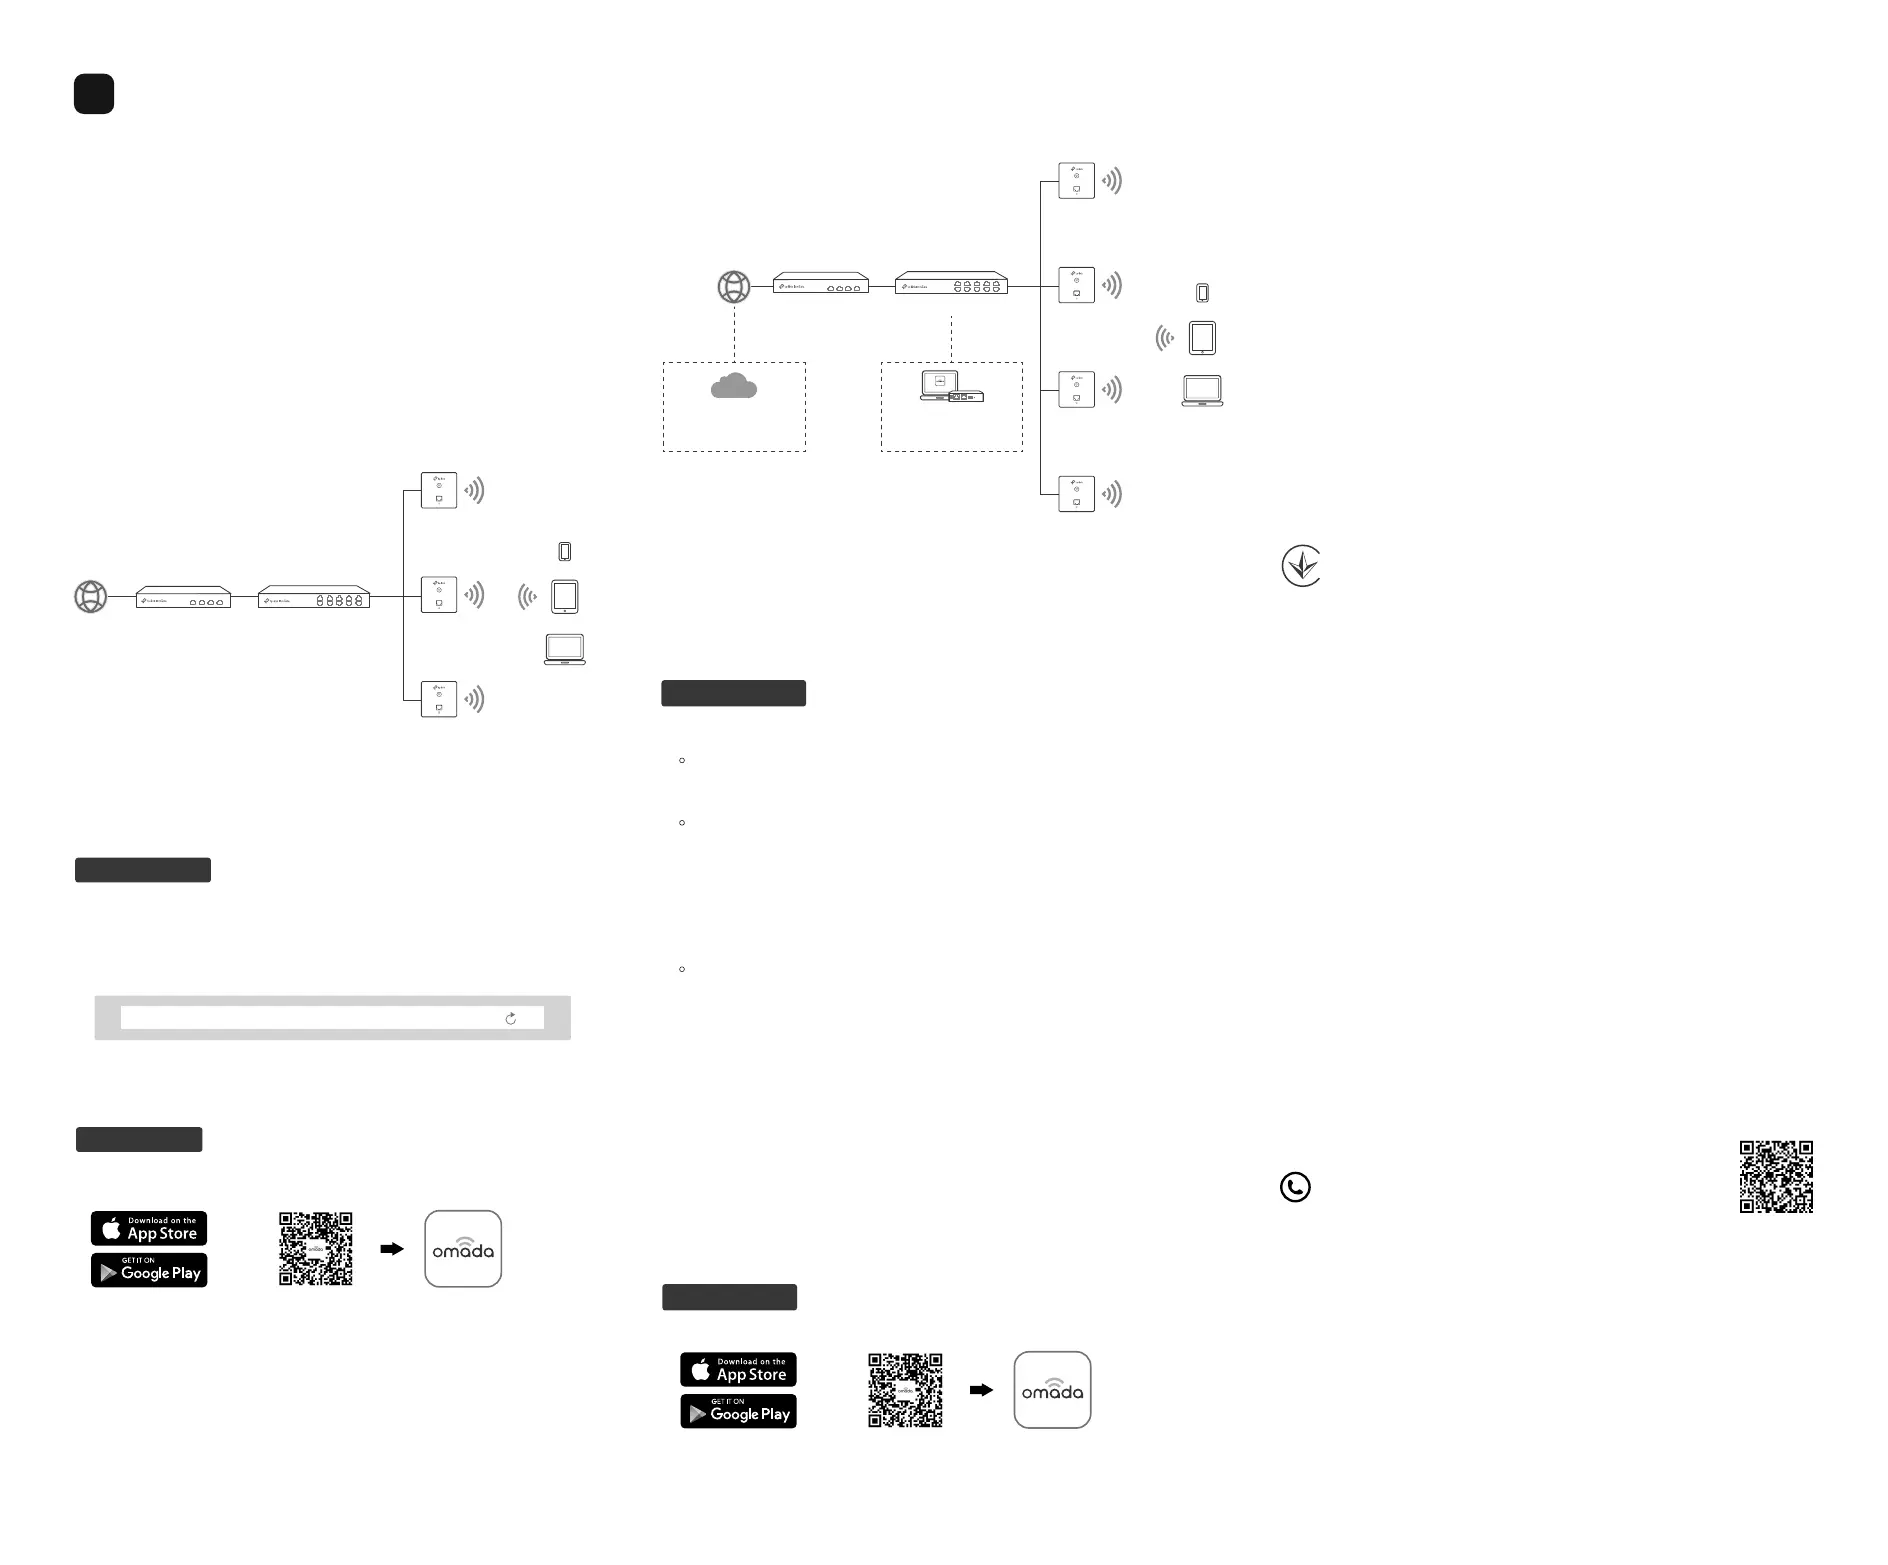
Choose a method to set up your EAPs:
• Method 1: Standalone Mode
Congure and manage EAPs separately (Convenient for a small network
with only a few devices)
• Method 2: Controller Mode
Congure and manage EAPs in batches on a central platform, namely
Omada Controller.
Method 2: Controller Mode
Notes:
• A DHCP server (typically a gateway/router with the DHCP function enabled) is required to
assign IP addresses to the EAPs and clients in your local network.
• The Omada Controller must have network access to your Omada devices (the
gateways/routers, switches, and EAPs) in order to nd, adopt, and manage them.
Omada Controller integrates Omada gateways/routers, switches, access
points, and more for centralized management.
Clients
SwitchGateway/Router
EAP
EAP
EAP
EAP
Omada
Hardware/Software
Controller
Omada
Cloud-Based
Controller
Or
Controller
1. Get an Omada Controller ready.
•
Option 1: Omada Hardware Controller
Obtain a Hardware Controller and refer to its Installation Guide to set it up.
•
Option 2: Omada Software Controller
On a PC with Windows or Linux OS, download the Software Controller from
https://www.tp-link.com/support/download/omada-software-controller/.
Then run the file and follow the wizard to set up the Controller.
Note: To manage your devices, the Software Controller needs to keep running on your
PC.
• Option 3: Omada Cloud-Based Controller
Go to the Omada Portal (https://omada.tplinkcloud.com) and log in with
your TP-Link ID. Then click + Add Controller to add a Cloud-Based
Controller and set it up.
2. Launch the Controller, access your site, and go to the Devices page.
3. Now you can adopt and manage the EAPs.
Tip:
For the Omada Hardware/Software Controller, you are recommended to enable Cloud
Access and bind it to your TP-Link ID. This enables you to remotely access and manage
the Controller and Omada devices via Omada Portal (https://omada.tplinkcloud.com).
For detailed configurations, refer to the User Guide of the Controller at our
official website: https://www.tp-link.com/support/download/?type=smb
Via Web Browser
2. Add the Controller with local access or cloud access.
• Local Access
Note: Local access applies to the Hardware Controller and Software Controller only.
a. Connect your mobile device to the EAP by using the default SSIDs printed
on the label of the product.
b. Launch the Omada App and go to Controller - Local Access. Tap the +
button on the upper-right corner to add the Controller.
• Cloud Access
a. Launch the Omada App and go to Controller - Cloud Access.
b. Log in with your TP-Link ID. A list of Controllers that have been bound with
your TP-Link ID will appear.
3. Launch the Controller, access your site, and go to the Devices page.
4. Now you can adopt and manage the EAPs.
The Omada App is designed to help you quickly configure common settings.
If you want to configure advanced settings, use the web page of your
Controller.
1. Download and install the TP-Link Omada App from App Store or Google Play.
Scan for Omada Omada
or
Via Omada App
Via Web Browser
1. Connect your device to the EAP by using the default SSIDs printed
on the label of the product.
2. Launch a web browser and enter https://tplinkeap.net in the address
bar. Use admin for both Username and Password to log in.
3. Set up a new Username and Password for secure management. Then
you can configure the AP.
1. Download and install the TP-Link Omada App from App Store or Google
Play.
2. Connect your mobile device to the EAP by using the default SSIDs
printed on the label of the product.
3. Launch the Omada App, go to the Standalone Mode > EAPs page, and
wait for the EAP to appear. Tap on the EAP to configure it.
The Omada App is designed to help you quickly configure common
settings. If you want to configure advanced settings, use the web page of
your EAP.
Scan for Omada Omada
or
Via Omada App
Method 1: Standalone Mode
Notes:
• Before you start, be sure to power up and connect your devices according to the
topology gure.
• A DHCP server (typically a gateway/router with the DHCP function enabled) is
required to assign IP addresses to the EAPs and clients in your local network.
If your network has only a few devices, you can congure and manage
EAPs separately on their web pages.
Note: The EAP web page is inaccessible while the EAP is managed by a Controller.
https://tplinkeap.net
Clients
SwitchGateway/Router
EAP
EAP
EAP
For technical support, the user guide and other information,
please visit https://www.tp-link.com/support/?type=smb, or
simply scan the QR code.
For detailed configurations, refer to the user guides of the controller and
EAPs. The guides can be found on the download center of our official
website: https://www.tp-link.com/support/download/?type=smb.
 Loading...