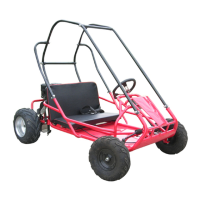
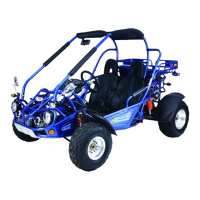
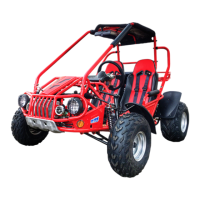
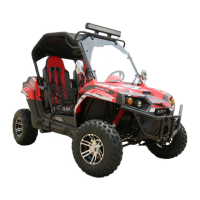
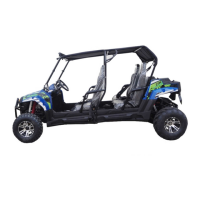
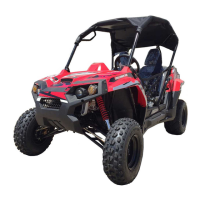
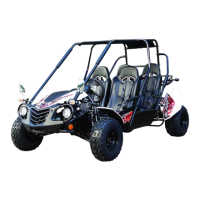
This document is an assembly manual for the TrailMaster MID XRX and MID XRX-R go-karts, produced by "The Go-Kart Masters." It provides step-by-step instructions for assembling the go-kart from its crated state, covering various components from the frame and engine to the wheels and steering.
Function Description:
The TrailMaster MID XRX and MID XRX-R are recreational go-karts designed for off-road use. The manual guides users through the process of unpacking, assembling, and performing initial setup tasks to make the go-kart operational. This includes installing structural components, connecting the fuel system, mounting wheels, setting up the steering, and performing essential pre-drive checks.
Important Technical Specifications (Derived from assembly steps):
- Frame Assembly: The go-kart features a metal frame that requires assembly of multiple bars, including top cage bars, side bars, and a rear bar. These components are secured with bolts, nuts, and washers.
- Fasteners:
- Bolts: Various sizes of bolts are used, including long bolts and large bolts, often accompanied by chrome cup washers.
- Nuts: Castle nuts are specifically used for axle installations, requiring cotter pins for secure fastening.
- Wrenches/Sockets: Common sizes mentioned include 9/16", 10mm, 12mm, 17mm, and 19mm. A 6mm Allen wrench is also specified for brake caliper bolts.
- Battery: The go-kart uses a battery (YTX9A-BS is visible in an image) that requires a "Battery Fill Procedure Instruction Sheet" for initial setup. It is installed in a battery tray behind the passenger's seat, secured with a rubber strap, and covered with a gray plastic cover. The positive cable (red) connects to '+' and the negative cable (black or green) to '-'.
- Fuel System:
- Fuel Tank: The fuel tank is placed on the rear rack with the decal facing the rear and secured with four bolts and nuts. On some models, it may be pre-installed on the engine.
- Fuel Hose: Connects to the engine from a fuel filter already attached to the fuel tank. A fuel hose clamp is used to secure the hose to the filter.
- Fuel Valve: A fuel valve needs to be turned to the 'ON' position before operation.
- Fuel Type: Requires premium high octane fuel, filled 3/4 full.
- Suspension:
- Rear Shocks: Two rear shocks are installed, one on each side. They are secured with bolts and nuts, and the top shock eye is placed into a bracket with the spring up.
- Wheels and Tires:
- Rear Wheels: Larger wheels, with tread pointing towards the front of the go-kart and the air valve stem facing outwards. Secured with a large washer, castle nut, and cotter pin. A rubber hubcap covers the axle nut.
- Front Wheels: Also secured with castle nuts and cotter pins. Tread should point forward with the air valve stem to the outside.
- Tire Pressure: All four tires should be set to 10 PSI.
- Brake System:
- Brake Caliper: Located on the rear axle, secured with two bolts using a 6mm Allen wrench.
- Brake Fluid: The brake master cylinder reservoir should have fluid between 'MIN' and 'MAX' levels. DOT2 or DOT3 brake fluid is recommended.
- Brake Rod Jam Nut: Located at the master cylinder, tightened with a 10mm wrench.
- Parking Brake: Needs to be engaged before starting the go-kart.
- Steering System:
- Steering Box: Clamps are tightened with 8mm & 10mm wrenches.
- Steering Wheel: Installed with the center spoke facing down and the front wheels straight forward. A plastic steering wheel cap snaps into place.
- Steering Shaft Nut: Secured with a 17mm socket.
- Tie Rods: Adjustable for front-end alignment. Requires 10mm wrenches for jam nuts.
- Engine Controls:
- Throttle Cable Mount: Secured with two 10mm wrenches.
- Throttle Stop: Adjustable via a jam nut to restrict top speed.
- Choke Control: Pulled out firmly to start the engine.
- Start Button: Used to start the engine.
- Ignition Key: Inserted and turned to 'ON' position to start.
- Stop Button/Key Turn: Used to turn off the engine.
- Air Filter: Requires removal of a nut and cover for tightening the inner air filter nut.
- Shift Cam (MID XRX-R ONLY): Cables are tightened with a 12mm wrench.
- Oil Level: Checked via a dipstick on the front of the engine. Should be at the top of the threads when the go-kart is on level ground. Requires 10W30 oil if low.
Usage Features:
- Assembly Process: The manual emphasizes a methodical approach, starting with unpacking and inventorying parts. It advises moving the carton to a clean location with ample space.
- Safety during Assembly: Instructions include warnings like "DO NOT TIGHTEN AT THIS TIME" for certain fasteners until later steps, and "Be safe. Use caution" when lifting the go-kart.
- Front-End Alignment: A detailed procedure is provided for aligning the front wheels, involving standing 10 feet in front of the go-kart, adjusting tie rods, and measuring tire positions. The target alignment is for front wheels to turn toward each other approximately 1/4" to 1/2".
- Pre-Drive Checks: Before riding, users must perform several checks:
- Ensure someone is seated in the driver's seat.
- Engage the parking brake.
- Turn the fuel valve to 'ON'.
- Insert the ignition key and turn to 'ON'.
- Pull the choke control (and hold) for starting.
- Push the start button.
- Warm up the engine for 30 seconds to 1 minute using choke or partial choke.
- Passenger Safety: If no passenger is present, the seat belt should be buckled to prevent it from dragging or being run over by the rear tire.
Maintenance Features (Initial Setup & Ongoing):
- Hardware Inventory: Users are instructed to lay out all hardware and take inventory against a hardware list to check for proper quantities, missing, or damaged parts.
- Battery Filling: Requires a separate "Battery Fill Procedure Instruction Sheet."
- Fastener Tightening: Specific torque or tightness instructions are given for various bolts and nuts, often specifying "securely" or "gently."
- Cotter Pin Installation: Cotter pins are installed on axle nuts and spindle nuts, with instructions to bend one end and clip off excess.
- Tire Pressure Check: Regular checking of tire pressure (10 PSI) is required.
- Brake Fluid Check/Addition: Regularly check brake fluid levels and add DOT2 or DOT3 fluid as needed.
- Oil Level Check: Regularly check engine oil level and fill with 10W30 oil if necessary.
- Fuel Additive/Stabilizer: Highly recommended to use a fuel additive or stabilizer like Seafoam or Stabil, following manufacturer instructions.
- Cleaning: Instructions to cut and remove all strings on canopy top and pad covers and dispose of them.