(1) Take the upper table 1 , 15 off.
(2) Take the LH bandway 2 off.
6 TMS, M5x8
1PC
4PC
11 HBS, M8x15
4PC 18 PW, M8 (A)
8 TMS, M6x8
12 SW, M8 4PC
2PC
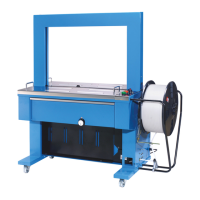
(3) Slide the the arch unit 3 into the fixing brackets 4 and fix both sides of the arch
frame with 11 12 18 .
* Please noto that is imperative to open the flaps of RH bandway 5 to
protect them when installing the arch unit in. (open the flaps, before inserting the arch
unit in)
(4) Set the LH bandway 2 , with 6 and 8 .
a. Please note that the arch bandway (refer Fig. A) should be positioned between LH
bandway and its fixing bracket.
b. Please set the LH bandway 2 closely to 17 corner guide (PART NO. T6-2-21260).
c. Push the 16 Band guide Spring Bracket backward to check if B will be
automatically turned open. If so, the installation is OK.
(5) Position the upper table 1 15 onto the machine body.
-15-
10. Installation of Arch Unit