-11-
CRT/MK3
Mounting Table to
Workbench or Workboard
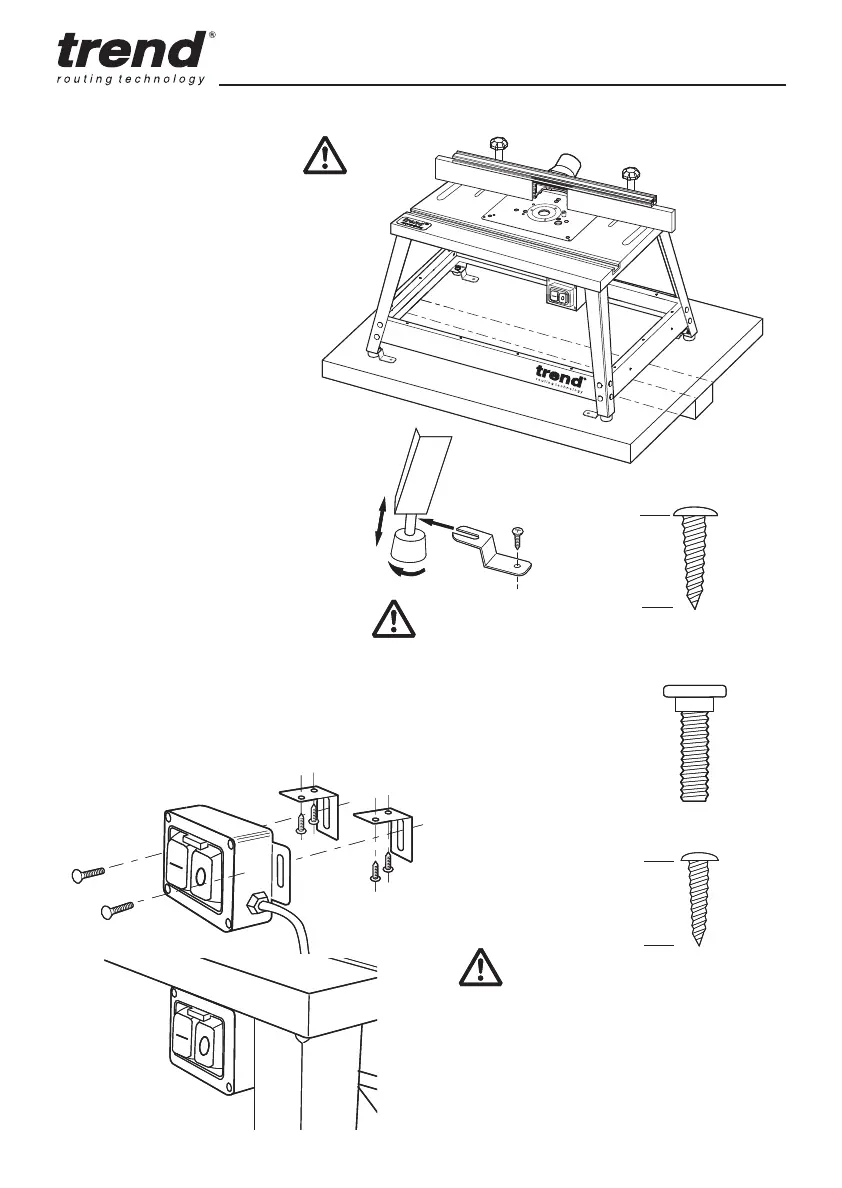
The router table can be mounted onto a
suitable workbench or workboard. Ensure
the legs of the table are supported and do
not overhang.
A recommended working height is 900mm
from table top to floor.
Each table leg has an adjustable foot.
Firmly secure the table assembly to
a workbench or workboard using the
brackets and the self-tapping
screws. Use a Phillips
®
No.2 screwdriver.
3ODFHWKH¶8·RIWKHEUDFNHWEHWZHHQWKH
base of the leg and the adjustable foot.
If a workboard is used, this will allow quick
mounting and removal from a workbench
by using cramps.
If a Workmate
®
is to be used then a batten
can be fitted to allow securing in the
:RUNPDWH·V
®
jaws.
CRT
CRAFTPRO
ROUTER
TABL
E
MK3
Mounting No Volt Release Switch
The switch can be positioned at the front of
the table or on the right hand side.
Fit brackets to underside of table top first using the
self tapping screws and a Phillips
®
No.2 screwdriver.
Then mount switch to brackets, fit the left hand bolt
assembly first.
Use Phillips
®
No.2
screwdriver.
Use Phillips
®
No.2
screwdriver.
x4
x4
x2
CAUTION: Ensure working position
is comfortable and that the table is
secured to a work bench.
Ensure workbench is stable and
secure.
Max.
16mm
Max.
19mm
-11-
CRT/MK3CRT/MK3
Mounting Table to
Workbench or Workboard
The router table can be mounted onto a
suitable workbench or workboard. Ensure
the legs of the table are supported and do
not overhang.
A recommended working height is 900mm
from table top to floor.
Each table leg has an adjustable foot.
Firmly secure the table assembly to
a workbench or workboard using the
brackets and the self-tapping
screws. Use a Phillips
®
No.2 screwdriver.
3ODFHWKH¶8·RIWKHEUDFNHWEHWZHHQWKH
base of the leg and the adjustable foot.
If a workboard is used, this will allow quick
mounting and removal from a workbench
by using cramps.
If a Workmate
®
is to be used then a batten
can be fitted to allow securing in the
:RUNPDWH·V
®
jaws.
CRT
CRAFTPRO
ROUTER
TABL
E
MK3
Mounting No Volt Release Switch
The switch can be positioned at the front of
the table or on the right hand side.
Fit brackets to underside of table top first using the
self tapping screws and a Phillips
®
No.2 screwdriver.
Then mount switch to brackets, fit the left hand bolt
assembly first.
Use Phillips
®
No.2
screwdriver.
Use Phillips
®
No.2
screwdriver.
x4
x4
x2
CAUTION: Ensure working position
is comfortable and that the table is
secured to a work bench.
Ensure workbench is stable and
secure.
Max.
16mm
Max.
19mm
 Loading...