FMS-2000M
LIT-12013578
8
Mounting the FMS-2000M monitor for a retrot application
Before you begin, make sure you have the following tools:
• a drywall saw or an oscillating tool with a drywall saw blade
•
• a #2 Phillips head screwdriver
•
1. Choose the location where you want to place the FMS-2000M monitor.
2.
choose to use landscape orientation.
3. Mark both screw holes and the corners of the rectangular section.
4. Use a drywall saw or oscillating tool to cut out the entire rectangular section inside the marked opening and drill the screw holes.
5.
6.
7.
8.
to secure both the box and the bracket.
Note: Do not overtighten the screws because the mounting bracket could warp.
9. Connect the wires to the back of the monitor. Refer to Figure 11 for more information.
10. Align the two slots on the back of the monitor with the tabs on the bracket, then swing the monitor towards the wall so that the
single tab on the bracket slots into the back of the monitor.
11.
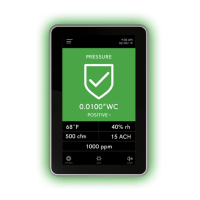
After you mount the FMS-2000M monitor, apply power to the monitor. The initial splash screen displays the Triatek logo and the Safety
Halo bezel lights up green to represent the current system status.
Location considerations
location that you need. Place the sensors away from any moving air source like ceiling air registers, because this can cause unstable
sensor behavior.
The FMS-2000M monitor includes a pre-wired 10-ft (3.04-m) interface cable to connect the monitor to the sensor network. The monitor
adjust the interface orientation to landscape mode during the initial setup.