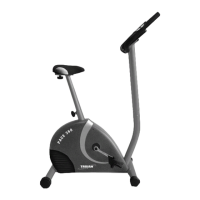
STEP 7
• Insertbatteriesintoconsol.(Seepage12).
• WhileasecondpersonholdstheConsol(16)
near the Upright (13) connect the consol wire to the
ExtensionWires(23,64).
• PushtheexcesswireintotheUpright(13).
• AttachtheConsol(16)totheUpright(13)andsecure
with4M5x15mmRoundHeadBolt(46).
STEP 8
• IdentifytheLeftPedal(24),whichismarkedwitha“Left”
sticker.Usinganadjustablewrench,rmlytightenthe
LeftPedal(24)counterclockwiseontoleftCrank(55L).
TightentheRightPedal(26)clockwiseontotheright
Crank.
Note:Therightpedal“R”shouldbethreadedonclockwise.
Theleftpedal“L”shouldbethreadedoncounter-
clockwise
• Important:TightenbothPedalsasrmlyaspossible.
Afterusingtheexercisecycleforoneweek,retightenthe
Pedals.
• AdjustthePedalStraps(3)tothedesiredposition,and
press the end of the Pedal Strap onto the tab on the side
of the Left and Right Pedal (24/26).
Note: The end with 4 adjustable holes must be set
outwards.
ASSEMBLY STEPS
Recheck
all bolts and nuts are
tightened securely
before using the machine
Caution: Ensure that cables are not damaged
during assembly or when tightening screws