Do you have a question about the Trojan POWER RACK 400 and is the answer not in the manual?
Consult physician before exercise. Stop if feeling faint or experiencing pain. Warm-up/cool-down recommended.
Ensure equipment is in a supervised, access-controlled area. Children require close supervision if present.
Set up on a solid, level surface indoors, ensuring ventilation and sufficient clearance for safe operation.
Use equipment as intended. Avoid injury by maintaining balance, not adjusting while on machine, and ensuring pins are secure.
Check for damaged or worn parts. Ensure all bolts are tight. Inspect cables and clips regularly for wear.
Instruct all users on proper procedures. Keep children away from moving parts. Avoid loose clothing and jewelry.
Use only TROJAN pins. Ensure pins are fully inserted. Never release suspended weights or pins.
Maximum user weight is 110kg. The Power Rack cage cannot be loaded with more than 60kg.
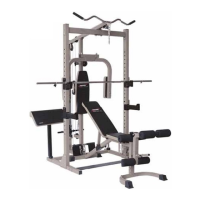
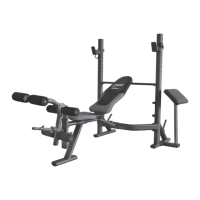
Attach Bell Tube to Right Base Tube with bolt/washer. Install Rubber Bumper. Attach Base Tubes to Connect Frame with bolts/washers/nuts.
Attach Support Frames to Base Tubes. Attach Vertical Frames to Base Tubes and Support Frames using bolts/washers/nuts.
Attach Upright Frame and Back Base Tube to the Connect Frame using bolts, washers, and locknuts.
Attach Back Beam to Back Base Tube. Install Spring Clips to Slide Frame and slide onto Back Beam.
Attach U Connect Tube to Vertical Frames. Attach Connect Plates to Vertical Frames using screws, washers, and locknuts.
Attach Top Cross Frame to Back Beam/Upright Frame/U Connect Tube. Attach Butterfly Extension to Upright Frame.
Attach Butterfly Arms to Butterfly Extension. Attach Single Pulley Brackets to Upright Frame using bolts, washers, and locknut.
Install Pulleys into Top Cross Frame and Adjust Pulley Bracket. Attach Upper Cable to Slide Frame and Lat Bar.
Attach Butterfly Cable to Butterfly Arms. Install Pulleys into Turn Pulley Bracket and Single Pulley Bracket.
Install Pulleys into Upright Frame and Back Base Tube. Attach Lower Cable to Single Pulley Bracket and Lower Bar.
Attach Curl Cushions to Butterfly Arms. Attach Backrest Cushion to Upright Frame using bolts and washers.
Place Short/Long Barbell Frames onto Vertical Frames. Place Barbell Rod onto Barbell Frame with Spring Clips.
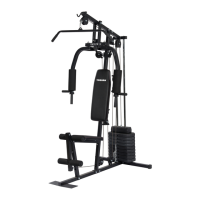
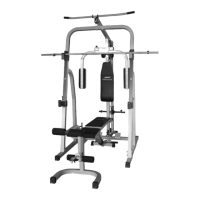
Slide Slide Frame onto Main Frame. Attach Front and Back Base Tubes to Main Frame using specified hardware.
Attach Leg Extension Frame, Backrest Adjust Tubes, and Adjust Frame to Main Frame and Slide Frame components.
Insert Foam Rods into Leg Extension and Main Frame. Slide Foam Rolls onto Foam Rods for comfort.
Attach Seat Cushion and Backrest Cushion. Install Hook to Leg Extension Frame using bolts and washers.
Sustained physical activity improving cardiovascular health. Utilizes large muscle groups for increased heart rate.
Essential for muscle toning, building, and strengthening. Aids in fat loss and overall body composition.
Diagram illustrating upper and lower body muscle groups targeted by exercises on the home gym.
Maximize exercise benefits by maintaining target heart rate zone (65-85% of max HR) during workouts.
Each workout should include a 5-10 min warm-up, 20-30 min training, and 5-10 min cool-down with stretching.
Begin with 3 workouts per week, increasing to 5 if desired. Consistency is key for maintaining fitness.
Instructions for 5 basic stretches to improve flexibility and prevent post-exercise issues.
Gradually adjust workload for the first 2-4 weeks. Perform one set initially, increasing sets later.
A balanced diet is crucial for supporting exercise goals and achieving desired weight outcomes.
Covers proper hand grips, breathing during lifts, and maintaining a controlled exercise style to prevent injury.
Emphasizes thorough warm-ups to minimize injury risk and suggests a weekly routine for weight training.
Defines Repetitions (Reps) and Sets. Provides recommended rep ranges for strength, hypertrophy, and endurance goals.
Guidelines for safe barbell use, emphasizing spotting, proper technique, and weight management.
Key recommendations for safe exercise: check weights, get medical advice, start slow, maintain posture, breathe.
Ensure pulleys move freely and cables are correctly aligned on pulleys before each workout.
Avoid over-tightening any bolt or nut that connects to bushes and movable components.
Apply a light coating of grease to the guide tubes to reduce friction and improve movement.
Yes, if the area is permanent and the floors are not tiled.
Ensure all bolts are tight, end caps are on legs, and the gym is set up on a flat, level surface.
No, this equipment is designed and intended for domestic use only.
Contact Trojan Customer Service to log faults. Service team will arrange collection and professional repair.
Under warranty repairs are free. Out-of-warranty repairs require quote approval. Call for details.