EasyManua.ls Logo

Troy-Bilt 11a-bobl.765 User Manual

Troy-Bilt 11a-bobl.765
2 pages
To Next Page IconTo Next Page
Page #1 background imageLoading...
Page #1 background image
778-12364A© 2013 11A-B06
Starter
Rope Handle
Blade Control Handle
Wing Nuts
T-Bolts
A. Remove the wing nuts and carriage bolts
securing the upper handle to the lower
handle.
A
Pivot the upper handle
upward.
B. Remove T-bolts from
the handle brackets.
A. Pull upward on
the handle until
the holes in lower
handle line up
with the holes
in the handle
bracket.
A
B
A. Insert the T-bolts removed in Step 1B
through the handle brackets to secure
the handle in place.
A. Hold blade control handle against upper handle.
B. Slowly pull starter rope handle from engine and
slip starter rope into the rope guide.
C. Tighten rope guide wing knob.
D. Use cable tie to secure cables to lower handle.
A
B
C
D
B. Secure upper handle
to lower handle with
wing nuts (on outside)
and carriage bolts
removed Step 1A.
A
B
B
1
4
2
5
3
READ AND UNDERSTAND ALL INSTRUCTION, WARNING, AND DANGER LABELS.
PARA INSTRUCCIONES EN ESPAÑOL, REFIÉRASE AL MANUAL DEL OPERADOR.
IMPORTANT: READ OPERATOR'S MANUAL AND ENGINE MANUAL THOROUGHLY AND
FOLLOW THE IMPORTANT SAFE OPERATION PRACTICES BEFORE OPERATING .
Need Help? Call 1-888-TO-HELP-U
Question and Answer IconNeed help?

Do you have a question about the Troy-Bilt 11a-bobl.765 and is the answer not in the manual?

Troy-Bilt 11a-bobl.765 Specifications

General IconGeneral
EngineBriggs & Stratton
Engine Type4-Cycle
Engine Displacement140cc
Cutting Width21 inches
Deck MaterialSteel
Cutting Height1.25 - 3.75 inches
Cutting Height Positions6
Mulching CapabilityYes
Bagging CapabilityYes
Side Discharge CapabilityYes
Warranty2-Year Limited

Summary

Handle Assembly and Preparation

Detaching Handle Components

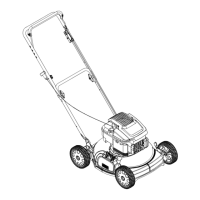
Remove wing nuts, carriage bolts, and T-bolts to detach the upper handle from the lower handle.

Pivoting and Aligning Handle

Pivot the upper handle upwards and align holes in the lower handle with bracket holes.

Securing Handle Assembly

Insert T-bolts and secure the upper handle to the lower handle with wing nuts and carriage bolts.

Finalizing Cable Setup

Secure blade control handle, guide starter rope, tighten rope guide, and secure cables with a tie.

Engine Preparation and Starting

Adding Engine Oil

Pour supplied oil into the oil fill and check the level using the dipstick.

Adding Fuel

Fill the fuel tank with clean, fresh gasoline, not above the neck base.

Priming and Starting Engine

Push the primer three times, then pull the starter rope for engine start.
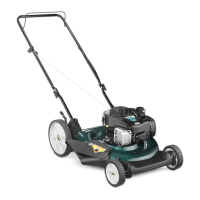
Related product manuals