Operation
Before operating your machine, care-
fully read and understand all safety
(Section 1), controls (Section 3) and
operatinginstructions(Section4) in this
Manual, in the separate EngineOwner's
Manual, and on the decals on the
machine.
Failure to follow these instructionscan
resultin seriouspersonalinjury.
INTRODUCTION
Readthis Sectionthoroughly before you
start the engine. As with any piece of
outdoor power equipment, getting the
"feel" for how your machineoperatesand
knowing the best techniques for partic-
ularjobs are important to overall good
performance.
NOTE: All references to LEFT, RIGHT,
FRONT and REAR of the machine are
determined by standing in the operator's
position.
PRE-START CHECKLIST
1. ReviewSection I: Safetyand also
Section3: Featuresand Controls.
2. Checkfor looseor missing hardware.
Tighten or replace asneeded.
3. Checkthat the engine oil levelis up to
the "FULL" mark on the oil dipstick. (See
engine manualfor instructions.)*
4. Checkthe fuel level. (Seeengine
manualandthis page for instructions.)*
5. Checkthe Trimmer HeadControl Bail
and the EngineThrottle Control Leverfor
freedom of movement.
6. Selectthe cutting height (see "Adjust
LineCutting Height" in this Section).
7. Checkhandlebarheight position.
8. Onelectric start models, checkthe
wire harness connections.
9. Carefullycheckthe areato be
trimmed and remove anydebris.
10. Install the correct diameter trimmer
line (see"Use the Correct Diameter
Trimmer Line" in this Section).
11. Check that the spark plug wire is
securelyattachedto the spark plug.
* Cleandebris from around fuel cap, oil
dipstick, and engine (see"Cleaning
Debris" in engine manual) before
checkingoil level or adding gasoline.
FILL FUEL TANK
GASOLINEIS HIGHLYFLAMMABLEAND
ITS VAPORSAREEXPLOSIVE.
Follow gasoline safety rules in this
Manual (see Section 1) and in the sepa-
rate EngineOwner'sManual.
Failure to follow gasoline safety rules
and instructions can result in serious
personalinjuryand propertydamage.
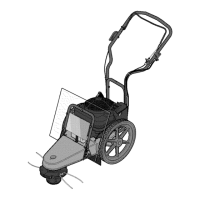
1. Lift andtilt plastic debris shield
(E,Figure3-1) forward.
2. Cleanfuel fill areaand engine each
time before fuel is added (see "Cleaning
Debris" in engine manual),
3. Add gasoline according to the direc-
tions in the engine manual. Follow all
instructions and safety rules carefully,
4. Securely replacethe fuel tank capand
thefuel container cap. Promptly wipe up
anyfuel spills.
5. Lift andtilt the debris shield back,
then push it down to secureit,
ADJUST HANDLEBARHEIGHT
Beforeadjustinghandlebar height,stop
engine and wait for all movingparts to
stop, disconnect spark plug wire and
preventit from touching sparkplug.
Failure to comply could result in per-
sonalinjury or propertydamage.
To adjust handlebarheight, referto Install
Handlebarsin the AssemblySectionof this
Manual.
ADJUST LINE CUTTING HEIGHT
Beforeadjustingthe cuttingheight,shut
offthe engine, wait for all movingparts
to stop, allow the engine to cool, dis-
connectthe sparkplugwire and prevent
it from touching the spark plug.
Removekeyon electricstart models.
Failure to comply could result in per-
sonalinjury or propertydamage.
Thecutting height of the trimmer line can
beadjusted between 1-1/2" and 4-1/2"
high. Start ata higher setting and make
adjustmentsas needed.
In general,usehigher height settings to
handletaller material and to copewith
tougher cutting conditions. Useany trim-
ming height for less demanding condi-
tions. To adjust the cutting height:
1. The cutting line height can be
changedwhen thewear cup is resting on
the ground. If necessary,tip the unit
backslightly for a better view (do not tip
unit all the way back or motor oil may
flow to the exhaust areaand theengine
may smokefor severalseconds when
restarted).
2. Usea 1/2"wrench to loosen both
bolts (A, Figure 4-1) securing the trimmer
head. Do not try to loosen the two nuts.
Figure 4=1
3. The cutting heights are stamped into
the spindle head (Figure 4-2). Move the
top of the trimmer headto the desired
setting.
4. Tighten both trimmer head bolts
securelyand equally(to 75 in/Ibs.).
 Loading...