EasyManua.ls Logo

True TRCB-48 - User Manual

True TRCB-48
19 pages
Print Icon
To Next Page IconTo Next Page
Loading...
TEC_TM_159 | REV. A | EN 07/6/2022 Page 1 of 19
TRCB
INSTALLATION MANUAL
TRUE MANUFACTURING CO., INC.
TRCB-52-HCTRCB-36-HC
TRCB-82-HC
INSTALLATION MANUAL
TRCB
Original Instructions
TRUE MANUFACTURING CO., INC.
2001 East Terra Lane • O’Fallon, Missouri 63366-4434
(636) 240-2400 • FAX: (636)-272-2408
International FAX: (636)-272-7546 • (800)-325-6152
Parts Department: (800)-424-TRUE (424-8783)
Parts Department FAX: (636)-272-9471
*975534*
North America – Canada and Caribbean
Warranty Phone: +1 855-878- 9277
Warranty Fax: +1 636-980-8510
Warranty Email: WarrantyInquiries@TrueMfg.com
Technical Phone: +1 855-372-1368
Technical Email: Service@TrueMfg.com
7:00am–6:00pm CST Monday–Friday,
8:00am12:00pm Saturday
UK, Ireland, Middle East, Africa
& India
Phone: +44 (0) 800-783-2049
Service-EMEA@TrueMfg.com
8:30am–5:00pm M–F
European Union & Commonwealth of
Independent States
Phone: +49 (0) 7622-6883-0
Service-EMEA@TrueMfg.com
8:00am–5:00pm M–F
Australia
Phone: +61 2-9618-9999
Service-Aus@TrueMfg.com
8:30am–5:00pm M–F
Mexico
Phone: +52 555-804-6343/44
Service-MexicoCity@TrueMfg.com
9:00am–5:30pm M–F
Latin America
Phone: +56 232-13-3600
ServiceLatAm@TrueMfg.com
9:00am–5:30pm M–F
Question and Answer IconNeed help?

Do you have a question about the True TRCB-48 and is the answer not in the manual?

Summary

Installation Manual for TRCB Units

Refrigerant Safety & Warning Information

Basic Safety & Warning Precautions

Prior to Installation

Clearances

Provides required minimum clearances for top, sides, and back for adequate ventilation, with a warning on insufficient ventilation.

Installation

Uncrating

Procedure for removing packaging, inspecting for damage, and removing shipping bolts, with safety warnings.

Cabinet Location

Leveling Legs and Castors

6 Leveling Leg Installation

Step-by-step guide for installing 6" leveling legs onto the unit's mounting plate.

Castor Installation

Instructions for installing castors, including verification of level and use of shims if needed.

Leveling

Sealing the Cabinet to the Floor

Electrical Installation & Safety

Use of Adapter Plugs

Prohibits the use of adapter plugs, stating it voids warranty and alters OEM plug configuration.

Use of Extension Cords

Prohibits the use of extension cords, stating it voids warranty and can cause hazards.

How to Connect Electricity

Guidance on grounding, dedicated circuits, voltage checks, and proper plug handling for safe operation.

Cabinet Setup

Cabinet Operation

Startup

Basic startup procedure, emphasizing plugging in the unit and recommending a 24-hour run-in period.

Maintenance, Care & Cleaning

Condenser Coil Cleaning

Detailed procedure for cleaning condenser coils, including safety precautions and tool requirements.

Cabinet Adjustments, Servicing, & Component Replacement

Overview

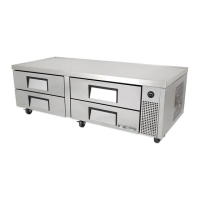
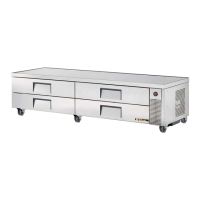
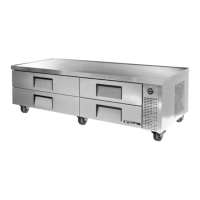
This document is an installation and operation manual for True Manufacturing Co., Inc. Chef Base Series commercial refrigerators, specifically models TRCB-36-HC, TRCB-52-HC, and TRCB-82-HC. It provides comprehensive instructions for proper installation, safe operation, and maintenance to ensure efficient and long-lasting performance.

The primary function of these devices is to provide commercial refrigeration for prepackaged or bottled food products. They are designed to support countertop cooking equipment, making them ideal for commercial kitchens where space optimization and accessibility are crucial. The Chef Base units are built to maintain consistent internal temperatures, crucial for food safety and preservation.

Usage Features:

  • Installation: The manual emphasizes the importance of professional installation by a trained refrigeration mechanic and electrician to ensure optimal performance and validate the warranty. Before installation, users are instructed to inspect the unit for freight damage and file claims immediately if found.
  • Cabinet Location: Proper placement is critical. The units are designed for indoor use and are not suitable for outdoor environments or areas where pressure washers or hoses might be used. They are tested for IEC to ISO Climate Class 5, operating efficiently in ambient temperatures between 60°F (15.5°C) and 104°F (40°C). Adequate clearances (1" open on top, 1" on sides, and 1" on back) are required for sufficient airflow and ventilation. Failure to provide these clearances voids the warranty.
  • Electrical Connection: The units require a dedicated electrical circuit with voltage and amp ratings matching the cabinet specification sheet or data plate (+/-5%). The use of adapter plugs and extension cords is strictly prohibited, as it can lead to fire hazards and voids the warranty. The manual illustrates different NEMA plug configurations (5-15R, 14-20R, 5-20R, 6-15R) for 60 Hz use and advises licensed electricians for proper outlet installation if needed. For international cabinets, specific power cord installation instructions are provided, noting that plug configurations vary by country and voltage. Users are warned not to cut or remove the ground prong and to ensure the power cord is fully seated and locked into the receptacle.
  • Leveling: For non-mobile models, proper leveling is crucial for effective condensate removal and door operation. Instructions are provided for using a level on the inside floor of the cabinet (front-to-back and side-to-side). If the cabinet has a center leveling screw, castor, or leg, it must make full contact with the floor after leveling.
  • Leveling Legs & Castors: The manual details the installation of 6" (152 mm) leveling legs and castors. Leveling legs assist in stabilizing the cabinet, while castors provide mobility. Users are instructed to install mounting plates and thread leveling legs, adjusting the bottom stem for leveling. For castor installation, users must locate anchor points, install castors with an adjustable wrench (without overtightening), and use shims if the cabinet is not level. A crucial warning states not to push the block more than 5" (127 mm) under the unit when adding shims.
  • Sealing to the Floor: For units placed on asphalt floors, which are susceptible to chemical attack, a layer of tape may be placed on the floor before applying sealant. The procedure involves positioning and leveling the cabinet, drawing an outline, raising and blocking the cabinet, and applying an NSF-approved sealant (e.g., 3M, Armstrong Cork, G.E. Silicone, Dow Corning) to the perimeter to ensure a complete seal.
  • Drawer Removal and Installation: Two methods for drawer removal and installation are described. The first method involves opening the drawer, locating and rotating roller clips upward, and lifting the drawer from the channel slot. Installation reverses these steps. The second method involves sliding the drawer out, locating the plastic drawer retainer, pushing it forward, raising the front end, and then removing the drawer. Installation involves aligning the drawer with the slide, pushing it into position, and pressing the retainer down and towards the back.
  • Startup and Operation: The compressor is ready upon purchase; users only need to plug in the cooler. It is recommended to run the unit empty for 24 hours before loading product to verify proper operation, as the factory warranty does not cover product loss. A 5-minute wait is advised before restarting if the unit is disconnected or shut off. Good airflow inside the unit is critical, so product should not press against sides or the back wall, or come within 4" (101.6 mm) of the evaporator housing.
  • Temperature Control: The manual shows the location of the light symbol, indicating the approximate location of the light switch. For electronic temperature controls with digital displays (located on the front grill), the up arrow acts as a light switch. Mechanical temperature controls are located inside the top ceiling or right wall. The temperature control/thermostat senses either evaporator coil or air temperature, not product temperature. The most accurate way to determine cabinet operation is to verify product temperature.
  • General Sequence of Operation: When plugged in, interior lights (on glass door models) and electronic controls (if installed) illuminate. There may be a short delay before the compressor and/or evaporator fan(s) start, possibly due to an initial defrost event. The temperature control/thermostat cycles the compressor and evaporator fan(s). All cabinets require defrost events to clear frost and ice buildup, initiated by a defrost timer or electronic control. Refrigerators with mechanical controls defrost during compressor off-cycles, while freezers defrost by time initiation. Electronic controls display "dEF" during defrost. Evaporator fans clear coils in refrigerators during defrost, while freezers use heaters.

Maintenance Features:

  • Condenser Coil Cleaning: This is a critical maintenance task not covered by warranty. Condenser coils accumulate dirt and require cleaning every 30 days or as needed. A dirty coil can lead to non-warranted repairs or cabinet failure. Proper cleaning involves using a soft brush, vacuuming with a shop vac, or using CO2, nitrogen, or pressurized air to remove dust. Filters should not be placed in front of the coil. If dirt cannot be removed adequately, a licensed refrigeration service provider should be contacted.
    • Procedure for Coil Cleaning: Disconnect power. Remove the front louvered grill. Use a stiff bristle brush to clean accumulated dirt from the front condenser coil fins. Use a flashlight to verify visibility through the coil. If still blocked, remove condenser base bolts and coil brackets (if applicable). Carefully slide the condensing unit out (tubing connections are flexible). Gently blow compressed air or CO2 through the coil until clean. Vacuum dirt around and behind the condensing unit area. Reinstall brackets, slide the compressor assembly back, bolt it in place, and reinstall the louvered grill. Connect power and verify operation.
  • Stainless Steel Care & Cleaning: The manual provides extensive guidance on cleaning stainless steel surfaces.
    • Preventive Measures: Avoid using steel wool, abrasive or chlorine-based products.
    • Cleaning Frequency: Clean daily to remove food, grease, and water spots.
    • Correct Cleaning Tools: Use soft cloths, plastic scouring pads, or soft bristle brushes.
    • Polishing: Polish in the direction of the grain.
    • Alkaline-Chlorinated or Non-Chloride Cleaners: Many traditional cleaners contain chlorides, which can damage stainless steel. Use non-chloride cleaners. If using chloride-containing cleaners, rinse thoroughly and dry immediately.
    • Rinse: Rinse with clean water and dry immediately to prevent water spots and maintain equipment appearance.
    • Hydrochloric Acid: Never use hydrochloric acid (muriatic acid) on stainless steel, as it causes corrosion and stress corrosion cracking.
    • Water Treatment: Hard water can leave spots. Use a water treatment specialist if water quality is an issue.
    • Restoring Passivate Stainless Steel: Regular cleaning removes protective chromium oxides. If these oxides are removed by scouring or chemical reactions, the iron in the steel is exposed and can rust. Passivation is a process that removes free iron and other contaminants, allowing the protective chromium oxides to re-form.
  • Servicing & Replacing Components: Any cabinet adjustments should be made after the cabinet is leveled and properly supported. Component parts should be replaced with original equipment manufacturer (OEM) components. A licensed service provider should perform service to minimize ignition risk and ensure operator health and safety. The refrigerator/freezer must be unplugged before cleaning or making repairs. Setting temperature controls to "0" or powering off an electronic control may not remove power from all components (e.g., light circuits, perimeter heaters, evaporator fans).
  • Compressor Warranty (Hydrocarbon and HFC): The manual outlines specific procedures to maintain the compressor warranty. For R404A, R134A, or R290 refrigerants with polyol ester lubricant, long exposure to ambient conditions requires lubricant removal and replacement. Drier replacement is crucial when the system is opened for servicing, using an OEM exact replacement of the same capacity. Micron level vacuums (500 microns or lower) must be achieved to ensure low moisture levels.

Important Warnings and Disclaimers:

  • Refrigerant Safety: For hydrocarbon refrigeration (R290), warnings include risk of fire or explosion, not using mechanical devices to defrost, not puncturing refrigerant tubing, and following handling instructions carefully. Repairs must be done by trained service personnel. Ventilation openings must be kept clear.
  • Child Entrapment: Warnings are given about the risk of child entrapment. Before disposing of old refrigerators, doors should be removed, and shelves left in place to prevent children from climbing inside.
  • Tipping Hazard: Units may pose a tipping hazard during uncrating, installation, or movement.
  • Electrical Safety: Warnings about electrical shock or burn hazards, not cleaning with pressure washers or hoses, and using eye protection and gloves during maintenance.
  • Warranty Exclusions: The warranty does not cover product loss, standard wear parts (door gaskets, bulbs), issues from improper installation or lack of basic preventative maintenance (including condenser coil cleaning), consequential damages (economic loss, profit loss, food spoilage), non-transferable warranty, improper usage, relocation costs for repair, use of non-OEM parts without approval, alteration, neglect, abuse, misuse, accident, transit damage, installation damage, fire, flood, acts of God, or improper electrical connections (incorrect supply voltage, extension cords, low voltage, unstable supply voltage). The warranty is exclusive and in lieu of all other warranties, expressed, implied, or statutory. It applies only to units shipped from True's manufacturing facilities after November 1, 2021, for US Foodservice & Canada.

The manual also provides contact information for True Manufacturing Service Department for warranty questions and support, including phone numbers and email addresses for North America, Mexico, Latin America, UK/Ireland/Middle East/Africa/India, Australia, and the European Union/Commonwealth of Independent States. It also directs users to the True Manufacturing website for additional resources and wiring diagrams.

True TRCB-48 Specifications

General IconGeneral
BrandTrue
ModelTRCB-48
CategoryRefrigerator
LanguageEnglish

Related product manuals