9
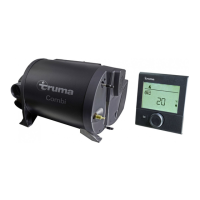
Connection with Truma control panel supplied
1. Connect control panel cable, supply line 230/240 V and
heating element cable as shown in the drawing.
1 = Control panel cable
2 = Supply line 3 x 1.5 mm²
3 = Heating element cable
4 = brown
5 = green
6 = blue
7 = yellow
8 = white
9 = yellow/green
2. Assemble the splitting box on the vehicle floor or on the
wall, in the vicinity of the appliance (observe cable length
110 cm!).
All cables must be secured with cable clips.
Conection 230/240 V with specific vehicle or
manufacturer control panels
Connect control panel cable, 230 – 240 V cable and heating
element cable as shown in the drawing.
Cables must be in accordance with the technical rules and reg-
ulations of the country in which the vehicle is to be registered,
for the first time.
Function check
After installation, check gas supply line for leaks in accordance
with the pressure drop method. Following this, check the func-
tion of the appliance as specified in the operating instructions,
check the function of the draining of the water contents, in
particular. There shall be no claims under guarantee for
damage caused by frost!
Never operate the water heater without water contents.
It is, however, possible to briefly check the electrical function
without water contents. Always observe the operating instruc-
tions prior to operation!
The operating instructions and completed guarantee card are
to be given to the owner of the vehicle.
Warning information
The installer or vehicle owner must apply the yellow sticker
with the warning information, which is enclosed with the ap-
pliance, to a place in the vehicle where it is clearly visible to
all users (e.g. on the wardrobe door)! Ask Truma to send you
stickers, if necessary.
Electrical connection 12 V
Always disconnect the appliance from the power supply prior
to working on electrical components. It is not sufficient to just
switch off at the control panel!
The appliance must be disconnected from the vehicle main
power supply when carrying out any electric welding work on
the vehicle body.
If the connections are transposed there is a risk of cable
burning. This also rules out any guarantee or liability
claims.
Unscrew cover (34) from the electronic control unit. Slide cable
connector of control panel (28) onto the p.c.b.. The electrical
connection is made at terminal (35).
Orange = Positive 12 V
Blue = Negative
To connect press with a small
screwdriver from above and
push in cable from the front.
Connect to fused vehicle mains (central electrical equipment
5 – 10 A) using a 2 x 1.5 mm² cable.
Negative cable to central earth. With lengths of over 6 m use
a cable 2 x 2.5 mm². If connecting directly to the battery, the
positive and negative cable must be fused. Screw cover (34)
back on.
There are to be no other 12 V consuming appliances connect-
ed to the supply line!
The water heater fuse (36), 1.6 A, (slow-acting) is on the
p.c.b..
When power supplies are being used, it must be noted that the
output voltage is between 11 V and 15 V and the alternating
current ripple is < 1.2 Vss.
Electrical connection 230/240 V – option –
The electrical connection is only to be carried out by a
licensed electrician. The information given here is not
intended as information for the layman, rather it is to for assist-
ing the assigned electrician, as additional information, when
connecting the appliance!
The connection to the power supply is by means of a cable
3 x 1.5 mm² (e.g. flexible sheathed cable H05VV-F) to a
splitting box (not included in scope of delivery).
Always pay attention to connect carefully with the correct
colours!
For maintenance and repair work a disconnecting device must
be provided on the vehicle for all-pole disconnection from the
power supply, with at least 3,5 mm contact clearance.
supply line
230/240 V
3 x 1.5 mm²
heating
element
splitting box
control panel
PEL
N
N’ L’

 Loading...