Page 6 of 9
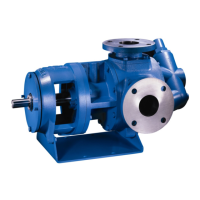
Disassembly of Pump
1. Deburr shaft especially around the keyway area.
2. Hold the pump in a vice, cover down, and remove the grub screw from the lockable shaft bearing collar. Remove collar.
3. Unscrew the 3 o 6mm bolts to remove the bearing housing (this may be tight due to the sealant used during assembly). This can
be done by holding the bearing housing and twisting the body.
4. Remove static seal plate from bearing housing, noting dowel pin in plate location face, and place to one side.
5. Undo the three grubscrews on the mechanical seal collar and gently pull o shaft, again put to one side. (Remove secondary collar
if there is one present). Press out the seal housing bearing.
6. Mark the cover and body for orientation and hold in the vice with the shaft pointing downwards. Remove the 8 o 8mm cap head
screws and remove the cover assembly by pulling upwards, place to one side.
7. Making sure there is sucient clearance underneath the pump, (to prevent damage to the rotor vanes) press the rotor out through
the body.
8. The individual parts must now be inspected for damage. The keyway in the end of the rotor must be in good condition and there
must not be any deep scratches or grooves on the following surfaces.
• The ID surface of the housing and OD of the rotor
• The end face of the rotor
• The OD of the idler
• Both faces of the idler
• The inside surfaces of the cover including surfaces on the crescent
• Areas on the shaft of the rotor were the seal seats.
Inspection
Check cover, housing, rotor and idler for wear, chipped or broken teeth. Drop o in capacity is generally caused by the abrasive action
of foreign materials in the oil, resulting in end play of the rotor.
Check for side movement in the rotor assembly, as this indicates potential bearing failure.
Reassembly of Pump
1. Clean all parts thoroughly using great care to eliminate dirt.
2. Take the body and press the rotor assembly into it’s location ensuring that the bearing is square, check that the rotor turns freely in
the body.
3. Hold unit in a vice with the shaft pointing downwards.
4. Again using a new gasket and 0-ring t the cover.
5. Make sure the rotor turns freely.
6. Turn the unit over in the vice so that the rotor is pointing upwards again.
7. Ret collar to the shaft, using a 0.002” feeler gauge between the collar and ange (if it originally had one tted). Lubricate 0-ring
inside the mechanical seal with a light oil and guide down the shaft. If the pump had a collar then push the mechanical seal down
onto the collar and retighten the three grubscrews, if the pump did not have a collar then use a 0.002” feeler gauge between the
ange and the mechanical seal to create the correct end oat. And retighten the three grub screws.
8. Apply the new bearing gasket and ret the bearing housing.
9. Press in the lockable bearing. Take the lockable collar and place over bearing ensuring that it is fully located and while holding the
collar rotate the shaft clockwise. Take a 3/16
th
pin punch and gently tap the collar counterclockwise until the grubscrew lines up with
the indentation on the shaft and then retighten.