Do you have a question about the TUYA G12 and is the answer not in the manual?
Important conditions and requirements for setting up the smart security system.
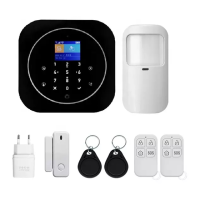
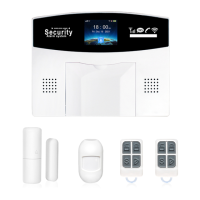
The main unit of the alarm system, featuring alarm, display, and keypad.
A sensor that detects movement when someone walks nearby.
Wireless key for quick arming, disarming, and emergency alarms.
Key fobs for quick arming and disarming of the home.
Detects when a door or window is opened.
Sounds when the alarm goes off.
Explains the sequence of events from arming to triggering an alarm and notifications.
Overview of the Smart Hub, including its display, keypad, and connectivity features.
Displays network, Wi-Fi, SMS, call, lock, and power indicators.
Shows countdown, alarm information, and the current time.
Indicates the status of the cellular network connection.
Shows the Wi-Fi connection status and signal strength.
Indicates when text messages are being sent.
Shows the status of outgoing or incoming calls.
Displays battery level and charging status.
Indicates the system is armed for when no one is home.
Indicates the system is armed for when occupants are home.
Indicates the system is not armed.
Configuration options for the system.
Adjusting exit and entry delay times.
Sets the time to leave the premises after arming.
Sets the time to disarm the system upon entering.
Sets the duration for which the siren sounds.
Enables or disables specific system features.
Controls audible beeps for arming and disarming.
Configures continuous siren activation during an alarm.
Enables SMS notifications for arming/disarming events.
Enables automatic locking of the keypad after inactivity.
Controls the keypad backlight's automatic turn-off.
Enables or disables audible chimes for keypad operations.
Enables or disables chimes for exit and entry delays.
Allows changing the main system access code.
Allows changing user-specific access codes.
Sets the display and voice prompt language for the system.
Restores the system to its original factory settings.
Configures the primary phone number for alerts.
Configures the secondary phone number for alerts.
Configures the tertiary phone number for alerts.
Configures the fourth phone number for alerts.
Configures the fifth phone number for alerts.
Displays a history of all alarm events.
Displays a history of arming and disarming events.
Manage remote tags, including pairing and deletion.
Manage wireless sensors, including pairing and editing.
Manage RFID tags, including pairing and deletion.
Process for adding new remote tags, sensors, or RFID tags.
Modify or remove existing wireless sensors from the list.
Removes all paired remote tags, sensors, or RFID tags.
Procedure to pair a wireless siren with the hub.
Connects a wireless switch to control the siren.
Automates wireless switch operation based on a schedule.
Sets automatic daily arming times.
Sets automatic daily disarming times.
Information about Wi-Fi connectivity for compatible models.
Guides connecting the hub to Wi-Fi via the mobile app.
Connects hub to Wi-Fi using the Soft AP method via the app.
Removes the hub's connection from the server.
Retrieves network identification details for the Wi-Fi module.
Displays system firmware, serial, IMEI, and MAC addresses.
Records a voice message for playback.
Plays back recorded voice messages.
Deletes recorded voice messages.
Adjusts the length of recorded voice messages.
Configures the system's date and time settings.
Synchronizes system time with Wi-Fi network time.
Synchronizes system time with cellular network time.
Use to arm the system when no one is home.
Use to arm the system when occupants are home.
Use to disarm the system when not needing security.
Use in case of emergency for alerts.
Arm or disarm the system by tapping the RFID tag on the panel.
Indicates sensor status and low battery.
Sends transmission signal for pairing or alarm.
Triggers alarm if sensor is tampered or removed.
Slides to 'ON' to power up the sensor.
Works with sensor to detect door/window status.
Indicates detector status and low battery.
The area where motion is detected by the sensor.
Sends transmission signal for pairing with the hub.
Triggers alarm if detector is tampered or removed.
Component for mounting the PIR motion detector.
Slides to 'ON' to power up the detector.
Configures pulse count for motion detection sensitivity.
Sets the detector's operational mode for testing or power saving.
Enables the LED indicator on the detector.
Guidance on optimal placement for the Smart Hub.
Ensures reliable connectivity for notifications and communication.
Recommends using an outlet not controlled by a switch for continuous power.
Placement instructions for sensors on doors.
Placement instructions for sensors on windows.
Ensures proper alignment and maximum gap for sensor detection.
Specifies the recommended height for mounting the motion detector.
Illustrates the coverage area of the motion sensor.
Important factors to consider for optimal PIR motion detector placement.
Instructions for inserting the SIM card into the hub.
Interpreting the cellular indicator for network connectivity.
Commands for arming, disarming, and two-way talk via keypad.
Procedure to set up phone numbers for alarm notifications.
Time allowed to leave after arming the system.
Steps to adjust the exit delay countdown time.
Time allowed to disarm after entering.
Steps to adjust the entry delay countdown time.
Initiates the voice message recording process.
Steps for speaking into the panel and saving, playing, or deleting messages.
Steps to add a remote tag to the hub.
How to remove specific or all remote tags.
Process for pairing door/window sensors and PIR detectors.
Explanation of Normal, 24H, Delay, and Home modes for sensors.
Assigning unique numbers to sensors for identification.
How to activate sensors to send a signal for pairing.
Modifying sensor settings or removing them.
Steps to add an RFID tag to the hub.
How to remove specific or all RFID tags.
Steps to pair a wireless siren with the hub.
Steps to pair a wireless switch with the hub.
Instructions for downloading and installing the mobile application.
App functions for arming, disarming, and managing settings.
App functions for arming, disarming, and managing settings.
Guide for creating an account and logging into the app.
Steps to connect the hub to the smartphone app.
Explains the three security levels: Away, Home, and Disarmed.
Monitors all sensors when the user is away from home.
Monitors perimeter sensors when occupants are home.
Monitors only 24-hour sensors for freedom of movement.
Allows time to leave or disarm before the alarm sounds.
Arming/disarming using the RFID tag.
Arming/disarming using the remote tag.
Arming/disarming using the main panel.
Arming/disarming using the mobile application.
Set automatic daily arming times.
Set automatic daily disarming times.
Instructions for making calls directly from the panel.
Information on the hub's backup battery functionality.
Notifications for power loss or restoration events.
Alerts for tampering or removal of the Smart Hub.
Two methods for resetting the Smart Hub to factory defaults.
Technical details for the Smart Hub unit.
Technical details for the remote tag.
Technical details for the door/window sensor.
Technical details for the PIR motion sensor.
Technical details for the RFID tag.
Technical details for the wireless siren.
| power supply | Micro USB 110/220VAC to 5V, 1000mA |
|---|---|
| backup battery | 3.7V, 500mAh Rechargeable Lithium Battery |
| consumption | <55mA@normal |
| operation temperature | 0~55℃ |
|---|---|
| radio frequency | 433Mhz |
| GSM | 850/900/1800/1900MHz |
| power supply | DC 3V (CR2025 Lithium Battery x1) |
|---|---|
| standby current | <5uA |
| alarm current | <15mA |
| operation temperature | 0~55℃ |
|---|---|
| radio frequency | 433Mhz |
| transmitting distance | <80m (Open Area and No Interference) |
| power supply | DC 3V (CR2032 Lithium Battery x1) |
|---|---|
| standby current | <8uA |
| alarm current | <15mA |
| operation temperature | 0~55℃ |
|---|---|
| radio frequency | 433Mhz |
| transmitting distance | <80m (Open Area/No Interference) |
| power supply | 1.5V AA Battery x3 |
|---|---|
| standby current | <15uA |
| alarm current | <25mA |
| operation temperature | 0~55℃ |
|---|---|
| radio frequency | 433Mhz |
| detection scope | <12m/110° |
| chip | 4100/4200 |
|---|---|
| frequency | 125KHz |
| read distance | <2cm |
| power supply | Micro USB 110/220VAC to 5V, 1000mA |
|---|---|
| backup battery | 3.7V, 300mAh Rechargeable Lithium Battery |
| standby current | <15mA |
| operation temperature | 0~55℃ |
|---|---|
| radio frequency | 433Mhz |
| volume | 100dB |