- 3 -
4
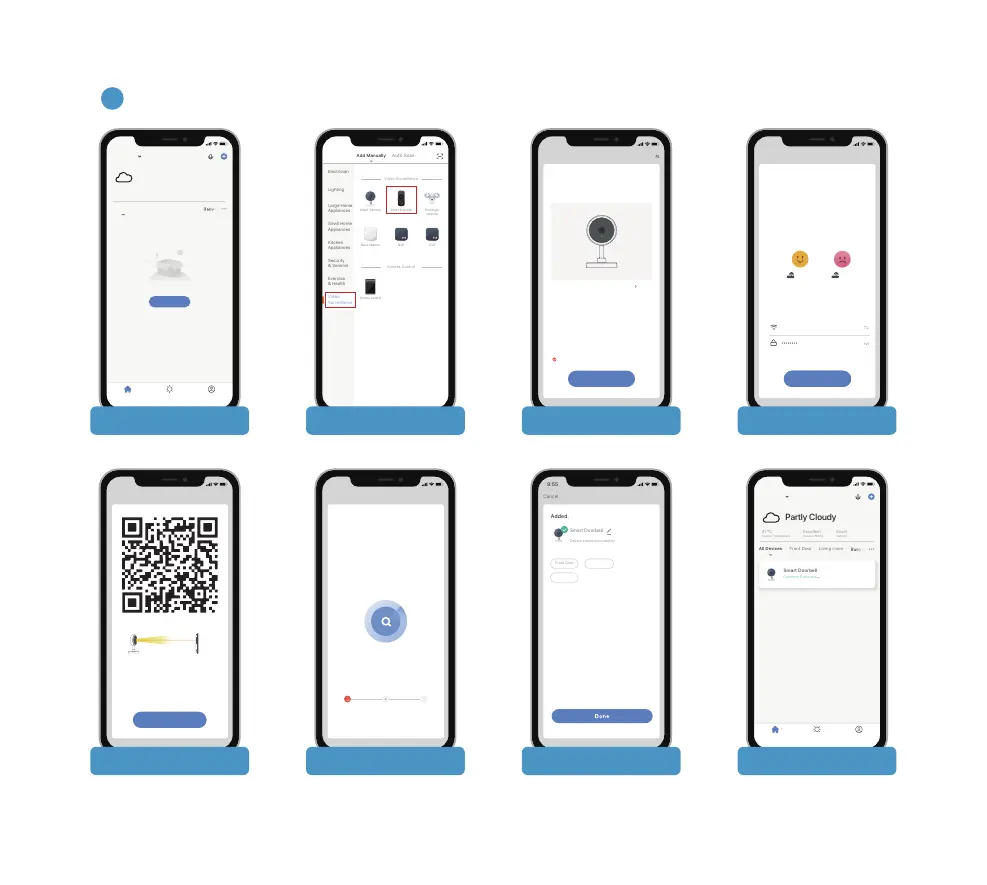
Start the Wi-Fi configuration referring to below tutorial steps.
9:55
All Devices
No devices
Home Smart Me
Add Device
Front Door Living room
31 °C
Outdoor Temperature
Excellent
Outdoor PM2.5
Excellent
Outdoor Air Quality
My Home
Partly Cloudy
9:55
Reset the device first.
Power the device on and make sure the indicator is
flashing quickly or a prompt tone is heard
Make sure the indicator is flashing quickly or
a prompt tone is heard
Perform net pairing as promoted.
Cancel
QR Code
Next
Add Manually Auto Scan
Electrician
Lighting
Large Home
Appliances
Small Home
Appliances
Kitchen
Appliances
Security
& Sensors
Exercise
& Health
Gateway
Control
Energy
Entertainme
nt
Industry &
Agriculture
Others
Video
Surveillance
Video Surveillance
Access Control
Smart Camera Smart Doorbell Floodlight
Camera
Base Station
Access Control
NVR DVR
9:55
9:55
Cancel
Next
If your Wi-Fi is 5GHz, please set it to be 2.4GHz.
Common router setting method
Home wifi
Select 2.4 GHz Wi-Fi Network and
enter password.
2.4
GHz
5
GHz
Next
9:55
Cancel
Please scan the QR code from 15 to 20
cm away
No Prompts
I Heard a Prompt
9:55
Cancel
Adding device...
Ensure that the device is powered on.
1%
Scan
devices.
Register
on Cloud.
Initialize
the device.
9:55
Cancel
Device added successfully
Front Door
Added.
Smart Doorbell
Baby room
Living room
9:55
All Devices
Home Smart Me
Front Door Living room
31 °C
Outdoor Temperature
Excellent
Outdoor PM2.5
Excellent
Outdoor Air Quality
My Home
Partly Cloudy
Smart Doorbell
Common Functions
1. Tap “Add device” 2. Select product type 3. Reset device 4. Input Wi-Fi password
5. Generate QR Code 6. Let camera scan QR code 7. Wait for connection 8. Device added