I. Normal conditions:
• The Stop Valve (B) is opened and
locked
• The Main Drain Valve (D) and System
Drain Valve (E) are closed
• The Diaphragm Supply Valve (P) and
Alarm Control Valve (H) are open
• The Manual Control Station (M) and
Alarm Test Valve (G) are closed
• Water Supply Gauge (J) reads the
upstream water pressure
• The System Gauge (L) reads zero
• The Diaphragm Gauge (K) is equal
to or greater than the Water Supply
Gauge (J)
II. Operation
When set for service, the DV-5 Dia-
phragm Chamber is pressurized from
the inlet side of the Stop Valve (B).
Opening of the Manual Control Station
(M) or the Solenoid Valve (R) upon fire
detection releases water from the Dia-
phragm Chamber faster than it can
be replenished through the Automatic
Shut-Off Valve (N). The water supply
pressure then forces the DV-5 Dia-
phragm open permitting water to flow
into the system piping, as well as to the
Waterflow Switch (C).
III. Removing system from service:
Step 1. Close the Diaphragm Supply
Valve (P).
Step 2. Close the Stop Valve (B).
Step 3. Open the Main Drain Valve (D).
IV. Placing the system back in
service:
Step 1. Close the Stop Valve (B).
Step 2. Close the Diaphragm Supply
Valve (P).
Step 3. Open the Main Drain Valve (D),
System Drain Valve (E), and all auxil-
iary drains in the system. Close the
System Drain Valve (E) and auxiliary
drain valves after water ceases to dis-
charge. Leave the Main Drain Valve (D)
open.
Step 4. Depress the plunger of the
Automatic Drain Valve (F) to verify that
it is open and that the DV-5 Valve is
completely drained.
Step 5. Clean the Diaphragm Supply
Strainer (Q).
Step 6. Reset the actuation system.
Manual Actuation — Push the operat-
ing lever up; however, do not close the
hinged cover at this time.
Electric Actuation — Reset the electric
detection system to de-energize the
Solenoid Valve (R).
Step 7. Open the Diaphragm Supply
Valve (P) to pressurize the DV-5 Dia-
phragm Chamber.
Step 8. Open and then close the
Manual Control Station (M) to vent
trapped air from the DV-5 Diaphragm
Chamber.
Step 9. Temporarily close the Dia-
phragm Supply Valve (P), and then
observe the Diaphragm Gauge (K) for
a drop in pressure.
If the Diaphragm Chamber Pressure
Gauge (K) indicates no drop in pres-
sure, re-open the Diaphragm Supply
Valve (P) and proceed to the next step.
Step 10. Partially open the Stop Valve
(B), close the Main Drain Valve (D), and
observe the Automatic Drain Valve (F)
for leaks. If there are no leaks, the DV-5
Valve is ready to be placed in service
and the Stop Valve must then be fully
opened.
V. Weekly test:
Important: Prior to closing any valves
or activating any alarms, notify local
security guards and the central alarm
station if applicable.
Step 1. Open the Alarm Test Valve (G),
verify that the alarm signal created by
the Waterflow Switch (C) is visible at
the fire panel. If applicable, check the
sound of the water motor alarm — it
must be clear and steady.
Step 2. Return the Alarm Test Valve (G)
to the normally closed position after
verifying that the alarm signal is visible
at the fire panel.
Step 3. Drain the alarm line by squeez-
ing the Automatic Drain Valve (F). If the
supply is below the normal, use the
instructions from the water supply to
obtain the usual pressure.
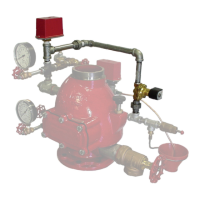
Water Motor Alarm Connection
Diaphragm Supply Connection
Stop Valve
Water Supply Gauge
Manual Control Station
Diaphragm Supply Valve
Automatic Shut-Off Valve
Diaphragm Supply Strainer
Automatic Drain Valve
Diaphragm Gauge
Solenoid Valve
System Gauge
Waterow Switch
System Drain Valve
Main Drain Valve
Alarm Test Valve
Alarm Control Valve
Description
DV-5 Valve
Item
B
D
E
C
A
G
H
K
J
M
N
R
Q
P
L
1
2
F
B
Q
P
1
C
G
2
H
F
J
D
E
L
N
A
R
M
K
Appendix C of TFP1335 (12/2016)
Summary Instructions (If problems occur, consult full document)
Deluge Valve, DV-5, DN40 thru DN200, Electric Actuation