Ungo ProSecutity
Module Programming Routine
The Module Programming Routine dictates how the unit operates. Due to the number of steps, they have been broken
up into different menus. It is possible to access and change any of the feature settings using the Valet/Override switch.
However, this process can be greatly simplified by using the ProSecurity Programmer. Any of the settings can be
changed and then assigned to a particular remote, up to four, a feature called individual remote recognition. Each time
that particular remote is used to disarm the system, the assigned feature settings will be recalled. Individual recogni-
tion is only possible when programming the unit via the ProSecurity Programmer.
If the system was programmed using the ProSecurity Programmer, the learn routine may be locked. If the siren
generates one long chirp when attempting to program the unit, the Module Programming Routine is locked and must
be unlocked using the ProSecurity Programmer.
Procedure:
1. Open a door.
2. Turn the ignition On, then back Off.
3. Press and HOLD the Valet/Override switch: (The Valet/Override switch must be plugged into the blue port.) After
three seconds the siren will chirp once indicating entry to Menu #1. If this is the menu you wish to access, release the
button and go on to Step 4. If the button is not released, you will jump to Menu #2 and the siren will chirp twice. If the
button is not released, you will jump to Menu #3 and the siren will chirp three times. Once you have selected the
desired menu, release the Valet/Override button and then proceed to Step 4.
4. Press and release the Valet/Override switch the number of times corresponding to the feature you wish to change.
Then press the switch once more and HOLD it. The siren will chirp the number of times equal to the step you have
accessed.
5. While holding the Valet/Override switch, you can toggle the feature on or off using the remote. Pressing the “LOCK”
button will select the one chirp setting. Pressing the “UNLOCK” button will select the two chirp setting.
6. Release the Valet/Override switch.
135
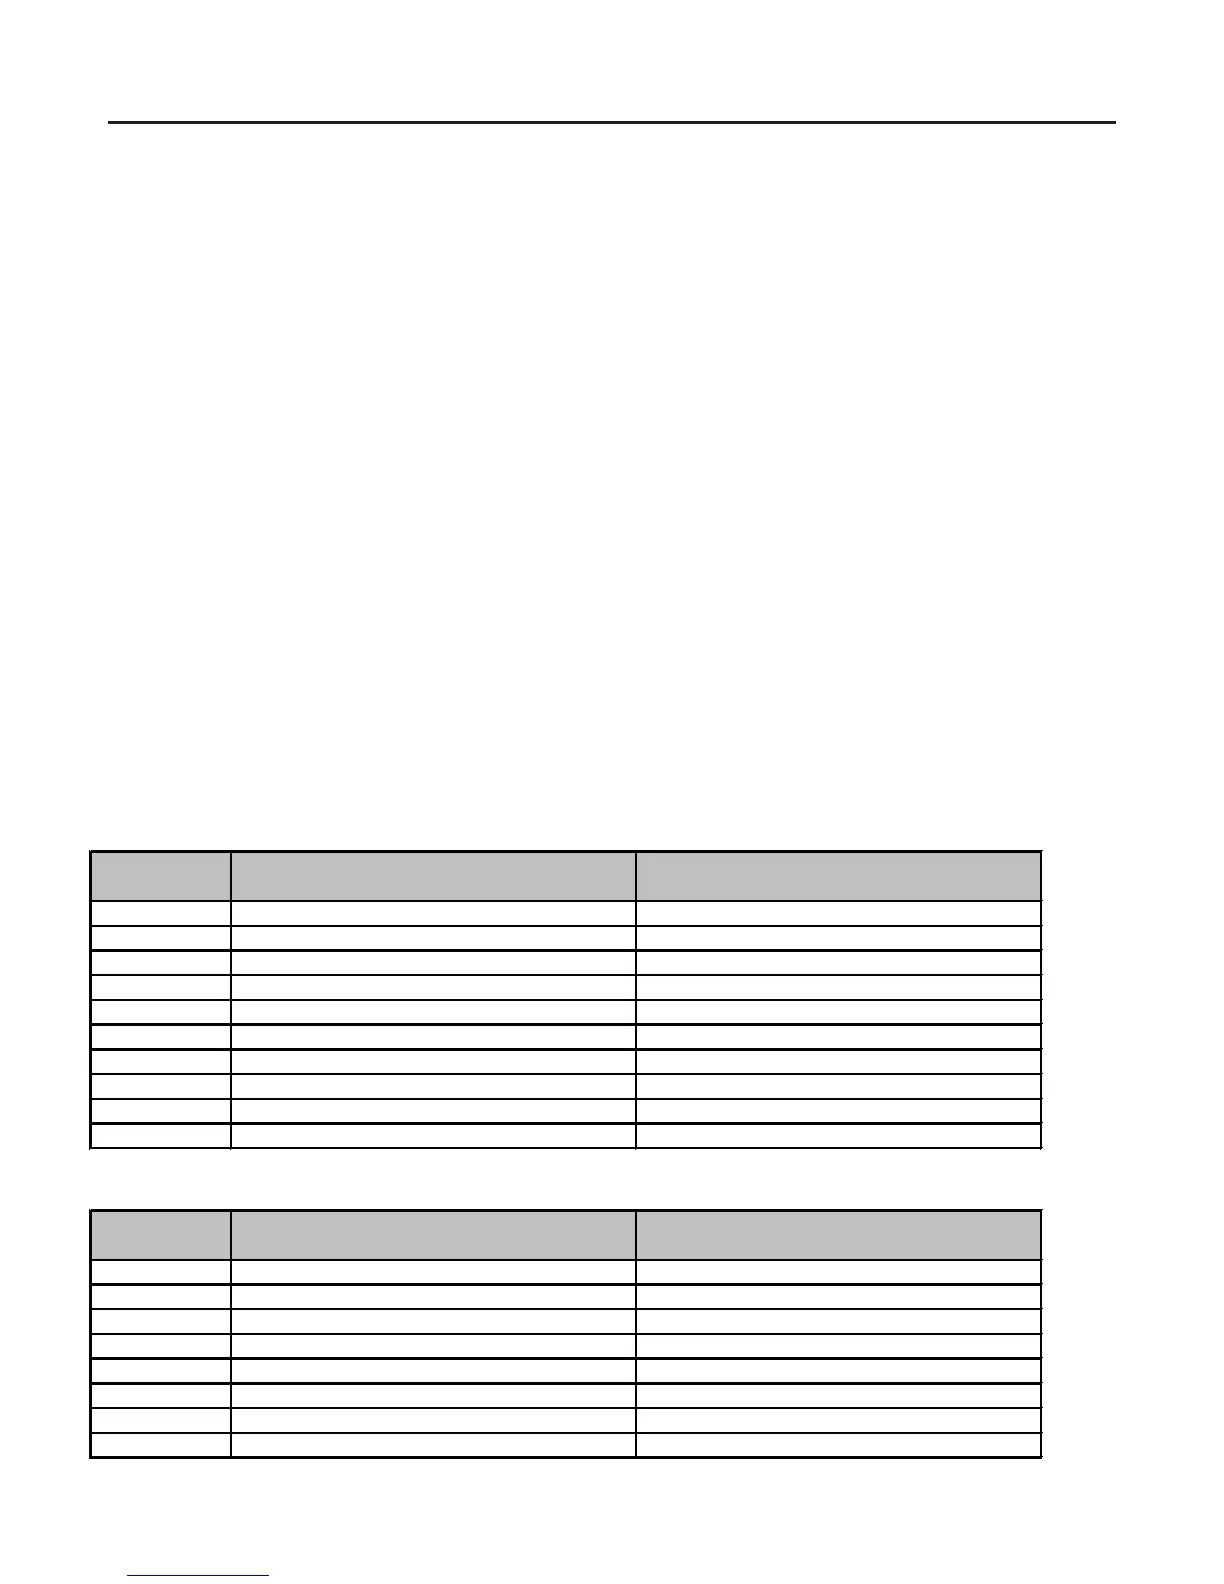
K10: Keyless Entry System
Feature Default LED ON Setting LED OFF Setting
Number (Press "LOCK" Button) (Press "UNLOCK" Button)
1 Active Arming Passive Arming
2 Chirps ON Chirps OFF
3 Ignition Controlled Door Lock ON Ignition Controlled Door Lock OFF
4 Ignition Controlled Door Unlock ON Ignition Controlled Door Unlock OFF
5 Active Locking Passive Locking
6 Ignition Controlled Domelight ON Ignition Controlled Domelight OFF
7 0.8 Second Door Lock Pulses 3.5 Second Door Lock Pulses
8 Double Pulse Unlock OFF Double Pulse Unlock ON
9 Security Features ON Securit
y Features OFF
10 Code Hopping ON Code Hopping OFF
K20: Keyless Entry System
Feature Default LED ON Setting LED OFF Setting
Number (Press "LOCK" Button) (Press "UNLOCK" Button)
1 Ignition Controlled Door Lock ON Ignition Controlled Door Lock OFF
2 Ignition Controlled Door Unlock ON Ignition Controlled Door Unlock OFF
3 Ignition Controlled Domelight ON Ignition Controlled Domelight OFF
4 0.8 Second Door Lock Pulses 3.5 Second Door Lock Pulses
5 Double Pulse Unlock OFF Double Pulse Unlock ON
6 Double Pulse Lock OFF Double Pulse Lock ON
7 Comfort Closure OFF Comfort Closure ON
8 Code Hopping ON Code
Hopping OFF
 Loading...