Installation 5
0020244339_01 eloSTOR plus, eloSTOR exclusive Installation and maintenance instructions 7
5L O 5L U
Dimen-
sion (f)
218 mm 218 mm
Dimen-
sion (g)
232 mm 232 mm
Dimen-
sion (h)
335 mm 104 mm
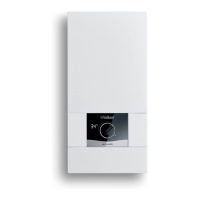
4.3 Wall-mounting the product
1. Drill the holes in the wall for the rawl plugs.
Applicability: Installation above the work surface
▶ Use the appropriate fixing material to secure the
product to the wall as shown in the illustration.
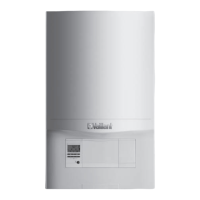
Applicability: Installation below the work surface
▶ Use the appropriate fixing material to secure the
product to the wall as shown in the illustration.
Conditions: The load-bearing capacity of the wall is sufficient, The
fixing material may be used for the wall
▶ Wall-mount the product as described.
Conditions: The load-bearing capacity of the wall is not sufficient
▶ Ensure that wall-mounting apparatus on-site has a
sufficient load-bearing capacity. Use individual stands
or primary walling, for example.
▶ Do not wall-mount the product if you cannot provide
wall-mounting apparatus with a sufficient load-bearing
capacity.
5 Installation
Danger!
Risk of scalding and/or risk of material
damage due to incorrect installation lead-
ing to escaping water.
Stresses in supply lines can cause leaks.
▶ Install the supply lines without tension.
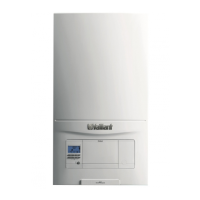
5.1 Establishing the water connection
Applicability: Installation above the work surface
1 Cold water inlet
2 Hot water flow
3 Cold water inlet
4 Power supply
▶ Check the water pressure.
◁ The water pressure is, at most, as great as the
max. permissible pressure.
– Water pressure: ≤ 0.5 MPa (≤ 5.0 bar)
▽ If the water pressure is greater than the max. per-
missible pressure, install a domestic pressure reg-
ulator.