To select an alternative date format, select Date format and press Set. You can select from 3 alternative formats.
Press Select to confirm the selection.
9. To set the time, return to the Settings menu by pressing
10. Select Time and press Set. Change the time by using the arrow buttons. Confirm the selection by pressing
OK. As a default, the time format is based on the 24-hour clock. If you want to use the 12-hour clock, select 12-
hour clock and press On.
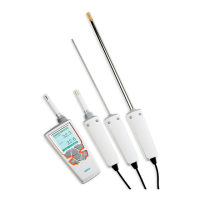
11. To ensure the best possible accuracy, set the actual pressure and temperature values to GM70 as follows:
Select the pressure setting (P: 1013 hPa, default), press Unit to select unit (hPa or bar), press Set,
set the pressure value by using the arrow buttons. Press OK to save the value.
Select the temperature setting (T: 25.0 °C, default), press Unit to select unit (°C or °F), press Set,
set the temperature value by using the arrow buttons. Press +/- to change the sign of the value. Press
OK to save the value.
12. To return to the basic display, press Exit.
Changing the rechargeable battery pack
New rechargeable battery pack
Medium-sized flat head screwdriver
In case you are installing a rechargeable battery pack in the MI70 indicator and you have a device with alkaline batteries,
remove the metal contact from the probe port end of the battery compartment before installing the battery pack.
1. Open the back plate of the indicator by opening the screw of the back plate.
2. Remove the old battery pack. Detach the black connector by carefully pulling it up from the wires.
3. Connect the black connector of the new battery pack. Make sure the position of the connector is as shown in the
following figure (red and black wires are on the upper edge of the connector). Do not push the connector with
conducting material.