Do you have a question about the Valor Ultimate and is the answer not in the manual?
Guidance on safe lifting techniques for the appliance, emphasizing proper posture and grip.
Details on RCF materials, potential irritants, and safe handling procedures during installation and servicing.
Information on where to find the appliance's data label, typically located at the base of the fire.
Installation must comply with Gas Safety regulations, CORGI standards, and relevant British Standards.
Compliance requirements for installation in England, Wales, Scotland, Northern Ireland, and the Republic of Ireland.
Guidelines for 'hole-in-the-wall' installations, including hearth requirements and distances from the opening.
Requirements for installing with a metal flue box conforming to BS715, including insulation.
Suitability for precast concrete/clay flue block systems conforming to BS1289 or BS EN 1806, with dimension requirements.
Advice against using fireplace surrounds to reduce oversized openings, to prevent cracking.
Details of suitable flues, including brick flues, insulated flues, and precast flue systems.
Specifies the minimum effective flue height required for proper operation.
Ensuring the flue is clear of obstructions and debris at its base.
Ensuring the flue is sealed and used only for one fireplace.
Details on measuring flue height and restrictions on flue application.
Handling dampers/restrictors and requirements for chimneys used with solid fuel.
Sealing underfloor draughts, hearth thickness, and fireplace face flatness requirements.
Minimum vertical clearance required from the hearth to combustible shelves based on shelf depth.
Effects of wall coverings and restrictions on room suitability for installation.
Guidelines for extractor fans and general ventilation requirements for the appliance.
Propane appliances must not be installed in rooms built entirely below ground level.
Requirements for combustible cladding removal and minimum clearances to corner surfaces.
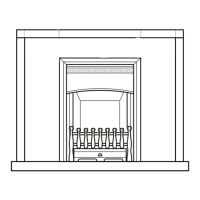
List of items included in the main fire unit package, such as convection box, burner, and base coals.
List of items included in the fire front package, such as surround, casting, and cover casting.
Checking fireplace dimensions, floor flatness, and front face condition for proper sealing.
Checking the soundness of the fireplace for fixing methods (front surround or tension cables).
Ensuring the metal flue box top surface is covered with 50mm of mineral wool insulation.
Procedure for checking flue draught using smoke pellets, ensuring proper ventilation.
Steps to check the piezo ignition system, spark generation, and electrode lead connection.
Detailed method for installing a concealed gas supply pipe, including template use and entry points.
Procedure for connecting the gas supply pipe from the side, with final installation details.
Steps include removing transit tape, detaching the burner, fitting 'U' seals, and preparing for concealed connection.
Crucial reminder to check the burner's aeration setting before proceeding with installation.
Instructions for fitting the self-adhesive foam seal to the convector box flanges.
Guidance on when to fit the flue restrictor and when not to, based on flue type and draught.
Detailed steps for fixing the convection box to the fireplace front surround using screws.
Steps for securing the convection box using tension cables and eyebolts.
Instructions for threading, tensioning, and securing the cables for convection box retention.
Steps for floor fixing the convection box and applying floor sealing tape for a secure installation.
Refitting the burner unit, connecting the supply line, and performing gas soundness checks.
Checking pilot ignition, burner lighting, and flame control from HIGH to LOW.
Step-by-step guide to lighting the pilot and main burner, including safety checks.
How to operate the control knob for HIGH, LOW, and pilot ignition settings.
Checking the inlet pressure with a gauge and testing for gas soundness at the test point.
Locating lugs, swinging the surround into place, and securing it with screws.
Placement of the rear base coal on the ledges of the burner unit.
Placement of the front base coal, locating it behind the front rim of the firebox.
Instructions for placing type 'A' coals correctly between the base coals for optimal flame effect.
Instructions for placing type 'B' coals correctly between the base coals.
Placement of type 'A' coals against the centre of the rear base coal.
Placement of the final type 'B' coal at the right side of the firebox.
Placement of remaining type 'A' coals for best flame effect, ensuring correct spacing.
Instructions for fitting the front casting, including screw adjustment and placement.
Placement of the bottom front cover casting below the fire front casting.
Ensuring control operation is fully rechecked with ceramic fuel effect in position.
Repeat of burner lighting procedure after installation, checking pilot and main burner function.
Testing burner operation from HIGH to LOW and checking pilot flame stability.
Detailed steps for performing the spillage test using a smoke match tube.
Checking spillage with doors open, fan operation, and actions for unsatisfactory tests.
Checking the operation of the pilot unit's auto shut-off system for flame failure or low oxygen.
Advising customer on operation, safety systems, new appliance odours, cleaning, and flue priming.
Recommending annual servicing, cleaning practices, and handing over documentation.
Always turn off the gas supply before commencing any servicing.
Recommendation for annual disconnection and checking/clearing of debris from the fireplace opening.
Safe handling procedures for RCF materials during servicing, including dust minimization.
Checking the appliance is clean and that gaps are not blocked by soot or debris.
Checking that soot or debris is not impairing the electrode spark or pilot burner.
Ensuring soot or debris is not blocking any holes in the main burner.
Making sure ceramic rear wall and coals are replaced correctly after servicing.
Always performing gas soundness and spillage tests after servicing the appliance.
Important check to ensure the aeration setting is correct for proper burner operation.
Step-by-step instructions for removing the fire front surround and cover casting.
Steps to remove the burner unit, including disconnecting the supply pipe and removing screws.
Procedure for removing the pilot unit, including detaching pilot pipe, thermocouple, and electrode lead.
Important note that the pilot unit must be replaced as a whole assembly.
Steps to remove the gas valve, including detaching components like the thermocouple and inlet pipe.
Steps for detaching injector pipe, electrode lead, control knob, thermocouple, and gas valve.
Steps for replacing the burner unit, including supporting the injector and removing screws.
Steps to remove the main burner injector, including removing the burner and clamping screw.
Procedure for removing the appliance, involving detaching the burner unit and releasing retention methods.
List of key components with corresponding descriptions and part numbers for ordering spares.
| Venting | Direct Vent |
|---|---|
| Heat Settings | Variable |
| Remote Control | Yes |
| Timer | Yes |
| Power Source | 120V AC |
| Fuel Type | Natural Gas (NG) or Liquid Propane (LP) |
| Thermostat | Yes |
| Color Options | Black |