Series 075 MAINTENANCE
11. Remove seals (10), (11), (12), (14), (15), (18) from their position, see drawing below for
details, use O-ring removal tool.
12. Clean and lubricate all grooves for all seals removed in the previous step.
13. Put new seals (10), (11), (12), (14), (15), (18), taken out of the actuator service kit, into
the appropriate grooves.
14. Clean and lubricate the pneumatic cylinder walls in the actuator body.
15. Assemble the door in reverse order
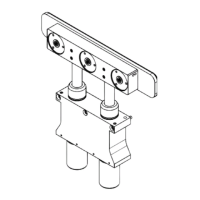
Make sure that both O-rings (70) are in the correct position before the
pressure plate is mounted on the actuator shafts.
16. Tighten the 3 (Type U) or 4 (Type V) screws (99) with a torque of 6 Nm.
Figure 6-2
17. Connect electrical power supply.
18. Connect compressed air supply.
19. Perform one cycle, see chapter «4.5 Initial operation»
Door is ready for use.
 Loading...