MAINTENANCE Series
6.4 Replacement of gate
NOTICE
Wrong tightening torque
Door body and screws may get damaged.
Use tightening torque according to size of the screws.
NOTICE
Contamination
Product may get contaminated.
Always wear cleanroom gloves when handling the product.
NOTICE
Inappropriate tools
Sealing surfaces may get damaged.
Do not use sharp-edged tools.
1. Vent chambers.
2. Open the door.
3. Disconnect electrical power supply.
4. Disconnect compressed air supply.
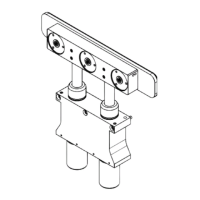
5. Remove the 4 set screws (68); see «Figure 3-1», on the back of the pressure plate.
6. While pulling the pressure plate from the shafts, make sure that the 2 O-rings (70) stay
on the shaft or put them back in position right after removing the plate.
7. Remove the 3 screws (75) and washers (61); see «Figure 6-3», and remove gate.
Never use the old, used screws (75) again. If a screw is removed, it has to be
replaced by a new one with fresh adhesive coating; otherwise no safe lock is
guaranteed.
8. Clean or replace gate.
9. Use only the new screws (75) supplied with the spare gate or ordered separately to
reassemble the gate.
10. Before reassembling the gate to the pressure plate, make sure that all the pistons and
washers are at the correct position according to the assembly drawing.
11. Tighten the 3 screws (75) with a torque of 9 Nm; see «Figure 6-3».
 Loading...