MAINTENANCE Series
6.3 Replacement of actuator pneumatic seals
NOTICE
Wrong tightening torque
Door body and screws may get damaged.
Use tightening torque according to size of the screws.
NOTICE
Contamination
Product may get contaminated.
Always wear cleanroom gloves when handling the product.
NOTICE
Inappropriate tools
Sealing surfaces may get damaged.
Do not use sharp-edged tools.
The item numbers in brackets refer to «Figure 3-1» on page 8.
1. Vent chambers.
2. Open the door.
3. Disconnect compressed air.
4. Disconnect electrical power supply.
5. Remove the 4 set screws (68) on the back of the pressure plate.
6. Remove pressure plate assembly from the actuator shafts, also remove the 2 O-rings
(70) from the actuator shafts; place these parts in an area where they are protected
from contamination and damage.
7. Remove the screws (99).
8. Remove the actuator assembly from the system.
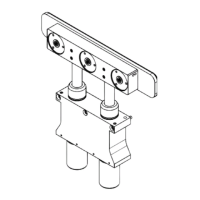
9. Remove the 4 dowel pins (20) (2 per actuator shaft) and pull the bushing out of the
actuator body «Figure 6-2».
Make sure that the bushings do not get damaged during this action.
10. Remove the actuator shafts from the actuator body.
 Loading...