_________________________________________________________________________________________________________________________________________________________
The pictures may differ depending on the type of PersonalScope
11
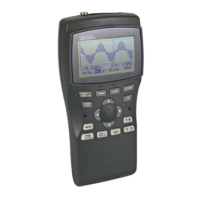
• A dot grid divides the screen into reference points. (Fig. 11)
• A full grid divides the screen into reference lines.(Fig. 12)
• Markers: Moveable markers in order to measure the signal (Fig. 13).
• A cross inserts a coordinate system into the screen. (Just for HPS10)
G Notes:
• The number of readout-digits depends on the selected display layout.
• At dynamic display mode (see display setup), the display layout changes for best fitting by shifting the
markers or x-position.
• When no markers are displayed, the cursor keys are set for changing the time base or input sensitivity
when no keys are pressed during 10 seconds.
• Markers can also be accessed directly by pressing the ‘Marker 1-2’ key.
SETUP MENU
Long press: Shows a setup menu for changing the operation mode, the default power-off timer, the
display mode (and RS232 transmit setup è Only for HPS40).
1. Select the highlighted item with a short keypress of the setup-key and the cursor keys.
2. Keep the setup-key pressed to exit the setup-menu and to apply the selections.
G Note:
• A Checkmark indicates the current selection.
• Leaving the mode menu with the ‘power off’ key will cancel the selection.
• If no key is pressed during 10 seconds, the selection will be cancelled; the unit returns to it previous operating
mode and the cursor keys are set for changing the time base or input sensitivity.
1. Operating mode
Scope: normal operation mode
Demo: Scope goes into demo mode; several animated
screens are displayed one after the other.
Y-cal.: To calibrate the centre of the signal; Use this only if the Y
position is incorrect during Auto set-up mode. (Just for HPS40)
About: Version information of the scope software is displayed
G Note:
• Hiding the version screen can only be done by long keypressing of the ‘Setup’-key and choosing a
different operation mode.
• Most of the keyboard functions are disabled.
Fig 13
Fig 12
Display
Setup
Fig 14
1