Do you have a question about the Velleman Personal Scope HPS50 and is the answer not in the manual?
Lists the main capabilities and functions of the HPS50 handheld scope.
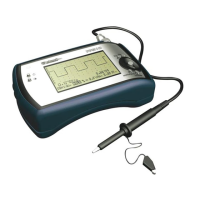
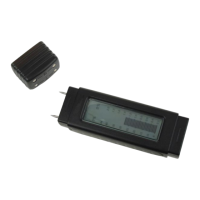
Lists the accessories provided with the HPS50 unit.
Explains safety symbols found on the device for user protection.
Lists important safety information and precautions for proper device use.
User must charge unit for at least 10 hours before first use or full discharge.
Describes the "Low Bat" message and its implication for measurements.
Details powering the HPS50 via AC adapter or internal battery.
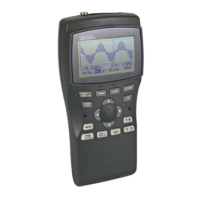
Identifies and describes the device's input/output connectors and controls.
Explains the various elements and data displayed on the HPS50 screen.
Instructions for turning the Personal Scope on and off.
How to adjust screen brightness and contrast settings.
Describes how to select different screen layouts for optimal viewing.
How to view or hide markers and grid on the screen for measurements.
How to access and select options within the device's setup menu.
Explains different operating modes like Scope, Demo, Y-cal, and Help.
Allows setting the automatic power-off timer or disabling it.
Explains Dynamic and Manual display modes for the screen.
Configures how data is sent via USB (ASCII or Binary).
Guides users on selecting and configuring measurement readouts for meters.
How to convert measured voltage to power for different loads.
How to set the probe to x1 or x10 for accurate measurements.
Instructions for calibrating the x10 probe for accurate readings.
How to use movable markers to measure intervals and amplitudes.
Explains the displayed information related to signal markers.
How to move the signal on the screen using X/Y position controls.
How to select AC, DC, or GND input coupling for measurements.
Setting the DC zero reference for measurements.
How auto-setup automatically adjusts settings (On/Off modes).
Adjusting the vertical scale (V/div) for signal display.
Adjusting the horizontal scale (time/div) for signal display.
How to access and configure trigger modes, slope, and position.
Explains Normal, Auto, Once, and Roll trigger modes.
Freezing the displayed waveform on the screen.
How to save, retrieve, and transmit screen captures.
Instructions to reset the unit to factory settings using the reset button.
Solutions for blank screens, no signal, or incorrect display.
Reasons for inaccurate RMS, frequency, or voltage readings.
Details the two-year warranty period and its terms.
Guidelines for cleaning and maintaining the unit.
Key performance metrics like sample rate, bandwidth, and impedance.
Details on voltage measurement, trigger modes, and input settings.
Specifications for the LCD screen, power, battery, and physical dimensions.
| Channels | 1 |
|---|---|
| Connectivity | USB |
| Input Coupling | DC, AC, GND |
| Trigger Modes | Auto, Normal, Single |
| Trigger Sources | CH1 |
| Input Impedance | 1 MOhm |
| Vertical Sensitivity | 10 mV/div to 10 V/div |
| Weight | 200 g |