EasyManua.ls Logo

Vertilux VTi CELTIC DC - User Manual

Default Icon
10 pages
Print Icon
To Next Page IconTo Next Page
Loading...
VTi
®
CELTIC DC
CORD LIFT MOTOR WITH
ELECTRONIC LIMITS
vertilux.com
PROGRAMMING INSTRUCTIONS

Questions and Answers

Summary

Initial Programming Sequence

Pairing the Motor with the Remote Control

Connects the motor to the remote control for basic operation and programming.

Checking and Setting Motor Rotation

Verifies and adjusts motor rotation direction before setting operational limits.

Setting Shade Limits

Guides on establishing the upper and lower operational positions for the shade.

Advanced Programming Functions

Intermediate Limit Programming

Details how to set an optional intermediate limit for the shade.

Managing Limits and Remotes

Covers adding remotes, changing operational modes, and deleting channels.

Resetting the Motor

Explains how to reset the motor to its factory default settings.

Troubleshooting Guide

Overview

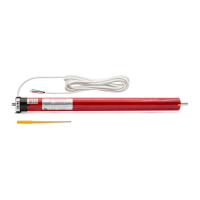
The Vertilux VTi® Celtic DC Cord Lift Motor with Electronic Limits is designed for cellular shades, offering advanced control and integration capabilities. This motor is suitable for both single cellular shades and day-and-night configurations, with the latter requiring two motors.

Function Description:

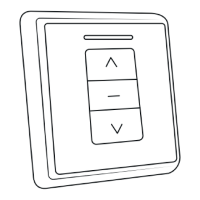
The VTi® Celtic DC Cord Lift Motor provides electronic setting of upper, lower, and intermediate limits, allowing for precise control over shade positioning. It operates via 433.92 MHz radio frequency communication, ensuring reliable wireless control. The motor supports an intermediate limit that can be preset for convenience. Users can easily adjust limits and other settings electronically. The system also allows for checking and changing the direction of motor rotation, which is useful during initial setup or if the shade moves in an unexpected direction. The motor can be paired with a remote control, and additional remotes or channels can be "cloned" for multi-device control. For specific operational needs, the motor can be switched to "tilt or jog mode," which initiates short motor movements with brief button presses, or continuous movement with longer presses. The system includes features for erasing intermediate limits, readjusting existing limits, deleting individual motors or channels from the remote, and resetting the motor to factory default settings.

Important Technical Specifications:

  • Radio Frequency: 433.92 MHz
  • Motor Type: DC (direct current), low voltage motor
  • Power Sources:
    • Low voltage wired with a DC transformer
    • Wire-free experience with an external rechargeable battery pack
  • Maximum Weight Capacity:
    • Single shaft motor (6-700-CL-SSE06): 3.2 kg (7.0 lb)
    • Dual shaft motor (6-700-CL-DSE08): 3.8 kg (8.4 lb)
  • Compatibility:
    • Suitable for indoor use only.
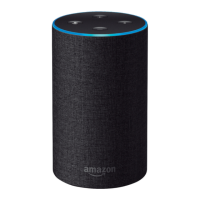
    • Smart control with VTi® Smart Hub (anytime, anywhere).
    • Compatible with leading brands of Home Automation Systems.
  • RoHS Compliant: Yes
  • Warranty: 5 years

Weight Capacity and Shade Dimensions:

The motor's weight capacity and compatible shade dimensions vary depending on the model (single or dual shaft) and shade configuration (single cellular or day & night cellular).

  • Single Shaft Motor (6-700-CL-SSE06):

    • Single Cellular Shade:
      • Min. Size: 2 Drums: 0.5x3.0 m (20x118 in)
      • Max. Size: 3 Drums: 1.8x3.0 m (70x118 in)
    • Day & Night Cellular Shade:
      • Min. Size: 4 Drums: 1.0x3.0 m (40x118 in)
      • Max. Size: 4 Drums: 1.8x2.8 m (70x110 in)
  • Dual Shaft Motor (6-700-CL-DSE08):

    • Single Cellular Shade:
      • Min. Size: 2 Drums: 0.5x3.0 m (22x118 in)
      • Max. Size: 4 Drums: 2.0x3.0 m (80x118 in)
    • Day & Night Cellular Shade:
      • Min. Size: 4 Drums: 1.0x3.0 m (40x118 in)
      • Max. Size: 4 Drums: 2.0x2.8 cm (80x110 in)

Note: Maximum weight capacity is calculated under optimal circumstances; actual results may vary. Specifications are subject to change without notice.

Usage Features:

  • Initial Programming Sequence:

    1. Select Remote Control and Channel: Choose the desired channel on the remote.
    2. Pair Motor: Connect the motor to power while holding the "up" button on the remote for 3 seconds until the motor "jogs." Release and press "up" again until the motor "jogs" to confirm pairing.
    3. Check Rotation Direction: Verify the motor's rotation. If incorrect (e.g., "up" button makes shade go down), press and hold the "stop" button for 5 seconds until the motor "jogs," then release and press the "down" button for 2 seconds until it "jogs" again to change direction.
    4. Set Upper Limit: Move the shade to approximately 4 inches below the desired upper limit. Press and hold the programming button on the back of the remote until the motor "jogs." Then, move the shade up to the desired upper limit and press and hold the programming button again until it "jogs."
    5. Set Lower Limit: Move the shade to approximately 4 inches above the desired lower limit. Press and hold the programming button on the back of the remote until the motor "jogs." Then, move the shade down to the desired lower limit and press and hold the programming button again until it "jogs."
  • Optional Functions:

    • Setting Intermediate Limit: Move the shade to about 4 inches from the desired intermediate position. Press and hold the programming button until the motor "jogs" (Opening Program). Then, move the shade up or down to the desired intermediate limit and press and hold the programming button until it "jogs" again (Closing Program).
    • Erasing Intermediate Limit: Move the shade to the intermediate limit you wish to erase. Press and hold the programming button for approximately 7 seconds until the motor "jogs" twice.
    • Readjusting Lower or Intermediate Limit: Move the shade to the limit to be readjusted. Press and hold the programming button until the motor "jogs." Move the shade to the new desired position and press "stop." Then, press and hold the programming button until the motor "jogs."
    • Adding an Additional Remote or "Cloning" a Channel: Using a previously programmed remote, select the channel and press and hold the "stop" button for 5 seconds until the motor "jogs." Then, on the new remote, select the desired channel and press the "up" button until the motor "jogs."
    • Changing to Tilt or Jog Mode: Press and hold the "stop" button for 5 seconds until the motor "jogs." Release the "stop" button and press it again for 2 seconds until the motor "jogs" again. In this mode, brief presses of "up" or "down" cause short movements, while holding for 3 seconds initiates continuous movement to limits.
    • Deleting a Single Motor or Channel: Select the desired channel on the remote and press and hold the "stop" button for 5 seconds until the motor "jogs." Then, press and hold the programming button for 2 seconds until the motor "jogs."
    • Resetting the Motor to Factory Default: Press the "stop" button for approximately 5 seconds until the motor "jogs." Then, press and hold the programming button for about 7 seconds. The motor will "jog" once, then "jog" two more times after a few seconds, unlinking it from the remote control.

Maintenance Features:

  • Troubleshooting Guide:
    • Motor not responding/working: Check power supply connection and remote control battery.
    • Motor sluggish/stopping: Verify motor's weight capacity for the load and check proper installation of motor accessories and components.
    • Motor not jogging when programming button pressed: Move the shade slightly up or down (approx. 10 inches) and try again.
    • Intermediate limit cannot be set (limits too close): Ensure the motor has made at least 2 full turns from the preceding limit before attempting the "Opening Program" sequence for setting an intermediate limit.
    • Motor stops suddenly: The motor may have exceeded thermal overheat protection. Wait approximately 15 minutes for it to cool down.

For additional information or support, contact your Vertilux representative or Authorized Dealer.

Vertilux VTi CELTIC DC Specifications

General IconGeneral
BrandVertilux
ModelVTi CELTIC DC
CategoryHome Automation
LanguageEnglish

Related product manuals