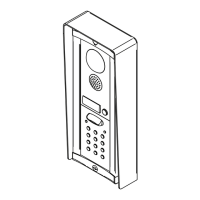
EasyManua.ls Logo

Videx 6256 - User Manual

Videx 6256
16 pages
Print Icon
To Next Page IconTo Next Page
Loading...
66251130 - V2.0 - 31/05/18
- 1 -
6200 Series
Art.6256 - Installation instructions
Art.6256 3.5" colour videophone
27 mm 144 mm
182 mm
Fig. 1
+V
-
1
2
V1
V2
24Vac
0Vac
SW1
SW2
PT3 PT2
PT1
SW1
LB
SB
LD
2A
3A
4A
5A
A
D
B
C
E
GF
Fig. 2
DESCRIPTION
Surface mount videophone incorporating a 3.5” Hi-Res full
colour active matrix LCD monitor specic for “6 wire videokit
(VK4K, VRVK and VK8K range). It includes 4 buttons: camera re-
call”, “open door , “service” and “privacy”.
2 LED’s* indicate the privacy activated and open door. Program-
mable privacy duration and number of rings. Intercommunicat-
ing call and door call. Adjustments: call tone volume switch (3
levels), picture hue, contrast and brightness.
* The operation of some LED’s and the functions described may require additional cabling
LEGEND
A
Connection terminals
B
8 Way dip switch bank
C
2 Way dip switch bank
D
Contrast adjustment trimmer
E
Hue adjustment trimmer
F
Brightness control
G
Call tone volume switch
PUSH BUTTONS
Service push button
Shorts the “SB terminal to GROUND (open collector 24Vdc 100mA max) while the button remain pressed.
Camera recall button
Pick up the handset then press the button (Press once for door/gate 1, twice for 2 and so on up to a maximum of 4 entranc-
es): the relevant LED switches ON and the monitor switches on showing the video from the door panel. The speech is also
live and the door can be opened by pressing .
Door-open / intercommunicating call button
With the handset lifted and speech lines open to the entrance panel, press this button to open the door. If the terminal “LD”
is properly connected the relevant LED remains switched ON until the door is closed.
Intercommunication only works when the system is in stand-by condition.
Switch 4 of the SW1 dip-switch selects the type of intercommunication:
OFF Intercommunication between two apartments - pick up the handset and press the key button to call the videophone(s)
in the other apartment. A busy tone will signal that the other videophone is in conversation with the door station and
so cannot be called.
ON Intercommunication between videophones in the same apartment
- pick up the handset and press the key button one, two, three or four times to call videophone with extension address 1, 2,
3 or 4 (Set on dip-switch 2&3 of SW1).
Any intercommunicating conversation is always interrupted by an external call (i.e. External calls take priority).
Privacy ON-OFF button
When the system is in stand-by, the pressing of this button activates (LED switched on) or disables (LED switched o) the
“privacy” service. The service is automatically disabled when the programmed privacy time expires. When the service is
enabled the videophone does not receive calls.

Other manuals for Videx 6256

Questions and Answers

  • E
    efisherSep 4, 2025
    Why is there noise over the speech line during Videx 6256 conversation?
    • M
      Michael HunterSep 4, 2025
      If you are experiencing noise over the speech line during a conversation on your Videx Intercom System, it could be due to the 6 common wires being cabled together with 230 or 380Vac power lines, or with 24Vac videophone power supply wires. To resolve this, separate the 6 common wires from the high voltage cables. Also, separate the 6 common wires from the two 24Vac wires, or cable them together only for a short distance.
  • S
    Stacey ReedSep 3, 2025
    What to do if Videx 6256 local call doesn't work?
    • B
      Brooke SantosSep 3, 2025
      If the local call does not work on your Videx Intercom System, it could be due to a wrong connection or a broken call button. Check the connection or replace the button.
  • P
    petersonhollySep 2, 2025
    How to fix bad video quality on Videx Intercom System?
    • R
      Ryan HoldenSep 2, 2025
      If the video shown on the monitor of your Videx Intercom System is of bad quality and the image is distorted or double, it could be due to several reasons: * V1, V2 signals unconnected, reversed, or shorted. * The switches of the two-way dip-switch are not both in the ON position. * V1, V2 of the last Art. 316N (if present) not closed with a 75 Ohm resistor. To solve this: * Check that the wires are not broken or shorted. * Set both switches to the ON position. * Use 2x 75 Ohm resistors to connect V1 & V2 to 0V.
  • R
    Ronald JacksonSep 1, 2025
    What to do if Videx Intercom System door won't open but key LED is on?
    • P
      Patrick RodriguezSep 1, 2025
      If you are unable to open the door during a conversation, but the key LED on the door station switches on for the programmed time on your Videx Intercom System, there could be a few reasons: * Incorrect position of J2 jumper. * Electric lock wires unconnected or in short. * Wrong electric lock type. To solve this: * Check J2 position on the door station. * Check the wire connection. * Ensure that the electric lock type (AC or DC) is suitable for the J2 position chosen.
  • L
    Linda PopeAug 31, 2025
    How to fix Videx Intercom System when it's not possible to open the door during conversation?
    • V
      Valerie MooreAug 31, 2025
      If you can't open the door during a conversation on your Videx Intercom System, the cable size might be too small. Increasing the cable size or doubling up using two wires for each signal may resolve this issue.
  • T
    Thomas RichAug 30, 2025
    What to do if Videx 6256 door station doesn't call the extension?
    • S
      Sarah BeckAug 30, 2025
      If the door station on your Videx Intercom System isn't calling the extension and the bell LED is on for 2 seconds, the issue might stem from several causes: a wrong connection between the door station and the videophone, a cable size that's too small, an incorrect programmed videophone address, or changing the videophone address without powering down the system. To address this: * Check the 6 common wire connections, especially wire “1” (speech line/data). * Increase the cable size or double up using two wires for each connection. * Verify the videophone address on the dip-switches. * Power down the system and then power it up again to detect the new videophone address.
  • A
    Alex MillerAug 29, 2025
    How to fix Videx Intercom System door station not calling the extension?
    • C
      Christina JonesAug 29, 2025
      If the door station on your Videx Intercom System isn't calling the extension and the bell LED is on for two seconds, it could be due to a few reasons: a wrong connection between the door station and videophone, the cable size being too small, an incorrect programmed videophone address, or changing the videophone address without powering down the system. To fix this: * Check the six common wire connections, especially wire 1 (speech line/data). * Increase the cable size or double up using two wires for each connection. * Check the videophone address on the dip-switches. * Power down the system and then power it up again to detect the new videophone address.
  • W
    William GordonAug 28, 2025
    Why is the local call not working on my Videx 6256 Intercom System?
    • F
      Frank ColeAug 29, 2025
      If the local call feature is not working on your Videx Intercom System, it may be due to a wrong connection or a broken call button. Check the connection or replace the button.
  • B
    Brandon McgeeAug 28, 2025
    What to do if door won't open during Videx Intercom System conversation but key LED is on?
    • M
      Meredith HollowayAug 28, 2025
      If you can't open the door during a conversation with your Videx Intercom System, but the key LED on the door station lights up for the programmed time, it could be due to: * Incorrect J2 jumper position: Check the J2 position on the door station. * Unconnected or shorted electric lock wires: Check the connection. * Incompatible electric lock type: Ensure the electric lock type (AC or DC) matches the chosen J2 position.
  • M
    Michelle ClarkAug 27, 2025
    What to do if it's not possible to open the door during Videx Intercom System conversation?
    • K
      Kevin WeaverAug 27, 2025
      If you can't open the door during a conversation on your Videx Intercom System, the problem might be due to a cable size that is too small. To fix this, increase the cable size or use two wires for each signal.

Summary

6200 Series Art. 6256 Videophone Overview

Product Description and Features

Details the 3.5" Hi-Res LCD, 4 buttons, and programmable functions.

Push Button Functionality

Explains the operation of service, camera recall, door open, and privacy buttons.

LED Indicators, Controls, and Settings

LED Indicator Functions

Explains the Door Open LED and Privacy ON/OFF LED indicators.

User Controls and Adjustments

Details controls like SW1 dip-switch, brightness, hue, and contrast trimmers.

Configuration, Terminals, and Specs

Covers dip-switch settings, terminal signals, technical specs, and memory board info.

Wall Mounting Procedure

Cover Removal and Opening

Step-by-step guide to safely remove and open the videophone cover.

Base Installation and Wiring

Instructions for marking, drilling, wiring, and fixing the base to the wall.

Final Assembly and Testing

Covers connecting terminals, testing the system, and closing the unit.

Videx 6256 Specifications

General IconGeneral
BrandVidex
Model6256
CategoryIntercom System
LanguageEnglish

Related product manuals