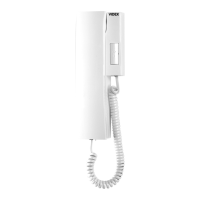
Art.6286 3.5" colour display videophone
27 mm 144 mm
182 mm
Fig. 1
SW
BUS1
BUS2
GND
+12VM
GND
+VAUX
C
NO
-DOL
+DOL
AL-LB GND
LB
AL
6 7 8
1
2
3
5
4
ON
SW1
1
2
3
4
ON
SW3
6 7 8
1
2
3
5
4
ON
SW1
1
2
3
4
ON
SW3
PT3 PT2
VR1
PT1
SW1
Fig. 2
DESCRIPTION
An intelligent Videophone using 3.5” full colour active matrix LCD monitor for VX2300. Including 4 buttons “service”, “privacy/bus
relay activation”, “door- open/intercommunicating call” and “camera recall” plus 3 LED’s for visual indication of all functions. Adjust-
ments & programmable options: call tone volume on 3 levels (low, medium, high), picture hue, brightness and contrast, call tone
melody, number of rings, privacy duration and address. Also includes a local bell function. The Art.6286 is surface mount.
PUSH BUTTONS, LEDS AND CONTROLS FIG. 1
Service push button.
When pressed it links internally the terminals “C” and “NO” on the connection terminals.
Privacy ON-OFF push button.
To enable the function press this button when the videophone is in stand-by. The service is automatically disabled when
the programmed time expires (the privacy duration time can be programmed) or manually by pressing again the button.
Activate bus relay board Art.2305 push button.
To activate a bus relay, during a conversation, press this button quickly as many times as the address value of the relay.
Door open push button.
Press this button to open the door when you are in conversation.
Intercommunication push button.
For an intercommunicating call, pick up the handset and press as many times as the extension or address value to
call (see SW3 Intercommunication Settings).
Camera recall push button.
Pick up the handset and press as many times as the DEVICE N. of the door station to switch on.
Camera switch push button.
If the door station uses the Art.4303N plus the Art.4330N, pressing this button during a conversation switches the
video signal coming from the camera module to the video signal coming from the caMera module input for external
camera. During the conversation, press and keep pressed the button until the camera switches. Repeat the opera-
tion to switch back to main camera.