This document is a user manual for the VisionTek VT1000 and VT1100 Dual Display Docks, providing comprehensive information on their features, setup, and driver installation for both Windows and macOS operating systems.
Function Description:
The VisionTek VT1000 and VT1100 are USB 3.0 Dual Display Docking Stations designed to connect to any host computer with USB-A 3.0 or newer ports. They provide a fully backward-compatible docking solution, allowing users to connect up to two additional monitors through a single USB-A cable. These docks extend the connectivity of laptops and desktop computers by adding multiple display outputs, USB ports, audio jacks, and a Gigabit Ethernet port, enhancing productivity and workstation capabilities.
Important Technical Specifications:
General Features:
- Compatibility: Compatible with both USB-A 3.0 Laptops and Desktop Computers.
- USB Speed: SuperSpeed USB 3.0, supporting data transfer speeds up to 5Gbps, and backward compatible with USB 2.0/1.1.
- Ethernet: Built-in Gigabit Ethernet RJ45 for increased network performance (10/100/1000 Mbps).
- Audio: Combo microphone input and audio output via a 3.5mm connector.
- Display Modes: Supports Extend and Mirror Display Mode.
- Power: AC Power Adapter - 20W.
- Connectivity to Host: USB 3.0 USB-B to USB-A Cable (1M).
- Security: Kensington Security Slot for securing the docking station.
Display Specifications (VT1000):
- Single Display Resolutions:
- DisplayPort 1.2: 2560 x 1440 @ 60Hz
- HDMI 1.4: 2560 x 1440 @ 60Hz
- VGA: 1920 x 1080 @ 60Hz
- Dual Display Resolutions:
- DisplayPort 1.2: 2048 x 1152 @ 60Hz
- HDMI 1.4: 2048 x 1152 @ 60Hz
- VGA: 1920 x 1080 @ 60Hz
- Supported Dual Display Configurations: Supports up to two 1080p displays (1920 x 1080 @ 60Hz) when using DP + HDMI/VGA.
Display Specifications (VT1100):
- Single Display Resolutions:
- DisplayPort 1.2 (DisplayLink 2): 2560 x 1440 @ 60Hz
- HDMI 1.4 (DisplayLink 1): 2560 x 1440 @ 60Hz
- VGA (DisplayLink 1): 1920 x 1080 @ 60Hz
- Dual Display Resolutions:
- DisplayPort 1.2 (DisplayLink 2): 2560 x 1440 @ 60Hz
- HDMI 1.4 (DisplayLink 1): 2560 x 1440 @ 60Hz
- VGA (DisplayLink 1): 1920 x 1080 @ 60Hz
- VT1100 Specific Note: If an HDMI display and a VGA display are connected at the same time, displays will be cloned. For 2 extended displays, connect to DisplayPort + HDMI or DisplayPort + VGA. VT1100 DisplayLink 1 video outputs (HDMI and VGA) are shared; when connecting both, output video is cloned with a maximum resolution up to 1920 x 1080 @ 60Hz. For two independent displays, connect Display 1 to HDMI or VGA and Display 2 to DisplayPort, using only one video port per DisplayLink stream.
System Requirements:
- Compatible Devices: Laptop or Desktop Computer with USB-A 3.0 port.
- DisplayLink USB Graphics Software for Windows:
- Windows 11 (64-bit edition)
- Windows 10 (32-bit and 64-bit edition)
- Windows 8.1 Update 2015 (32-bit and 64-bit editions)
- Windows 8 (32-bit and 64-bit editions)
- Windows 7 (32-bit and 64-bit editions)
- DisplayLink USB Graphics Software for macOS:
Port Layout:
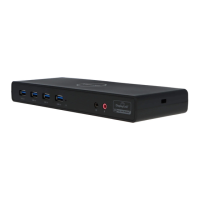
- Front Panel:
- USB-A Ports (supports 5Gbps transfer speeds)
- Audio Jack (3.5mm connector for headphones, headset, or other audio devices)
- Power LED (LED Status Light)
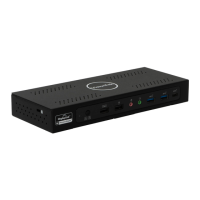
- Rear Panel:
4. VGA Port (DisplayLink 1 - for Display 1, up to 1080p@60Hz)
5. HDMI 1.4 Port (DisplayLink 1 - for Display 1, up to 1440p@60Hz)
6. DP 1.2 Port (DisplayLink 2 - for Display 2, up to 1440p@60Hz)
7. RJ45 Gigabit Ethernet (10/100/1000 Mbps)
8. USB-A Port (supports 5Gbps transfer speeds)
9. USB-B Host Upstream Port (connects to laptop or PC with USB-A 5Gbps port)
10. DC Power Input (connects to included power cable)
- Side Panel:
11. Kensington Security Slot
Usage Features:
Docking Station Setup:
- Connecting Power: Plug the power adapter into the DC In port on the back of the dock and the other end into a power outlet.
- Connecting Systems: Connect the included USB-B to USB-A cable to the USB-B Host port on the back of the dock and the other end to your host laptop or PC. The VT1000/VT1100 adds DP, HDMI, and VGA outputs to your system, supporting resolutions up to 1440p @ 60Hz depending on connected monitors.
- Single Display Setup: Connect your monitor to either the Display 1 (HDMI/VGA) or Display 2 (DisplayPort) port.
- Dual Display Setup:
- Connect Display 1 to the Display 1 HDMI or VGA port.
- Connect Display 2 to the Display 2 DisplayPort.
- For VT1100, if HDMI and VGA are used simultaneously for DisplayLink stream 1, they will be cloned. For two independent displays, use DisplayPort + HDMI or DisplayPort + VGA, ensuring only one video port per DisplayLink stream is used.
Driver Installation (Windows):
- Downloading Drivers: Visit displaylink.com/downloads and download the latest DisplayLink software compatible with your operating system (Windows 11, 10, 8.1, 8, 7 in 32-bit or 64-bit editions).
- Installation Process:
- Double-click the downloaded file to begin the installer.
- The installer will verify system compatibility.
- Click "Install" to proceed.
- Once "Finish" appears, the installation is complete. A reboot may be required to finalize the driver installation.
Windows Setup (Audio and Display):
- Audio Setup (Windows 10):
- Click the DisplayLink icon in the system tray and select "Audio Setup."
- Under the Playback tab, select "Speakers" USB Audio and click "Apply."
- Under the Recording tab, select "Microphone" USB Audio and click "Apply."
- Display Setup (Windows 10):
- Click the DisplayLink icon in the system tray and select "Video Setup."
- In "Display" settings, select the desired display to adjust.
- Click and drag the selected display to your preferred arrangement.
- Scroll down to "Multiple displays" and select the desired mode (e.g., "Extend these displays").
- To adjust resolution, select "Advanced display settings."
Driver Installation (macOS):
- Downloading Drivers: Visit displaylink.com/downloads and download the latest DisplayLink software compatible with macOS 10.12 or later.
- Installation Process:
- Double-click the downloaded file (e.g.,
DisplayLink Manager Graphics Connectivity1.6.1-EXE.pkg).
- Click "Continue" to start the installation.
- You may be prompted to enter your account password; click "Install Software."
- After installation, restart your system. If the dock is not working, ensure the DisplayLink Manager application is running by searching for "DisplayLink" in Finder and launching it.
- Navigate to "Applications" and open "DisplayLink Manager."
- Click the DisplayLink Manager application icon in the notification area to open its window, confirming proper installation and running status.
DisplayLink Manager Configuration (macOS):
- Enable Automatic Launch: In the DisplayLink Manager window, select "Launch automatically after login" for the software to start every time you log in.
- Enable Screen Recording:
- For display output using DisplayLink technology, Screen Recording may need to be enabled. Navigate to "System Preferences" and select "Security & Privacy."
- In "Security & Privacy," select the "Privacy" tab.
- Scroll to "Screen Recording" in the list on the left.
- Tick the "Screen Recording" permission for DisplayLink Manager.
- If a notification appears stating "Screen Recording Permission Request," click "Quit & Reopen" to restart the DisplayLink Manager app. (Note: In Catalina 10.15.x, select "Sign Out Now." In macOS Big Sur or later, the application will automatically restart upon reopening from Finder).
- Reopen DisplayLink Manager from the application Finder.
- DisplayLink Setup should now be complete and working properly.
Display Settings (macOS):
- When a new display is connected, it defaults to being extended to the right of the main display.
- To configure display settings, select "Displays" from "System Preferences." This opens the "Display Preferences" window on each display.
- Display Preferences include: Display Resolutions, Rotating a Display, Display Positions, Display to Mirror mode, Display to Extend, Using both extended and mirrored displays, and Changing the main display.
- Arranging Displays: Click on the "Arrangement" tab to configure mirrored or extended displays.
- Moving Displays: Click and drag a display in the arrangements window to reposition it.
- Changing Primary Display: Click on the small bar on top of the main monitor and drag it onto the monitor you want to set as primary.
Maintenance Features:
Safety Instructions:
- Always read the safety instructions carefully.
- Keep the User Manual for future reference.
- Keep the equipment away from humidity.
- If any issues arise (exposure to moisture, obvious signs of breakage, malfunction), have the equipment checked by a service technician immediately.
Warranty / Support:
- Warranty: VisionTek Products LLC offers a Three (3) Year warranty to the original purchaser, covering manufacturing defects in material under normal usage. The product must be registered within 30 days of purchase to receive the 3-year warranty; otherwise, a 1-year limited warranty applies.
- Liability: VisionTek's liability is limited to repair or replacement of defective manufacturing material.
- Support: For questions or assistance, call support at 1 (866) 883-5411.
- Registration: Full warranty disclosure and product registration information are available at www.visiontek.com.
Regulatory Compliance:
- FCC Statement: The device complies with Part 15 of the FCC Rules. Users are warned that changes or modifications not expressly approved by VisionTek Products, LLC could void their authority to operate the equipment. The equipment has been tested and found to comply with Class B digital device limits. If interference occurs, users are advised to reorient/relocate the receiving antenna, increase separation between equipment and receiver, connect to a different circuit, or consult a dealer/technician.
- IC Statement: The device complies with Industry Canada license-exempt RSS standard(s), subject to not causing interference and accepting any interference received.