The VisionTek VT2900 is a dual system KVM (Keyboard, Video, Mouse) docking station designed to connect to hosts with Type-C connectors that support DisplayPort over USB-C, offering a future-proof docking solution. It allows users to connect up to two additional monitors, three USB Type-A accessories, and two USB Type-C accessories through a single USB-C cable.
Key Features:
- Compatibility: Compatible with both USB-C DP Alt Mode Laptops and Desktop Computers.
- Display Support: Supports resolutions up to 4K (3840 x 2160 @60Hz) and offers both Extend and Mirror Display Modes.
- KVM Switching: Enables seamless KVM switching between two connected systems (PC1 and PC2). PC2 is the default host device selected on device startup.
- USB Ports: Features SuperSpeed USB 3.0 USB-A and USB-C ports with transfer speeds up to 5Gbps. It also includes USB BC 1.2 ports for fast charging devices (up to 7.5W, 2.4A charging on supported Apple devices for front ports, and up to 4.5W for the rear USB-A port).
- Ethernet: Built-in Gigabit Ethernet RJ45 for increased network performance (10/100/1000 Mbps).
- Power Delivery:
- USB-C Power Delivery up to 100W to PC2 with the included power supply.
- USB-C Power Pass-through up to 100W to PC1 with a user-supplied USB-C power supply (5V/1A – 5V/20A fast charging).
System Requirements:
- Compatible Devices:
- System with a USB-C port that supports DisplayPort over USB-C (DP Alt Mode MST) for video.
- MacBook with a USB-C port that supports DisplayPort over USB-C (DP Alt Mode SST) for video.
- For USB-C charging, a system with a USB-C port that supports USB-C Power Delivery 3.0 is required.
- Operating System: Windows 11, 10, 8.1, 8, 7, or macOS 10.12 or Later.
- Optional Additional Hardware: USB-C power adapter 5V/1A – 5V/20A for Power Pass-through to PC1.
Package Contents:
- VT2900 USB-C KVM Dock
- Power Adapter
- 2 x USB-C to USB-C Cable
- 3.5mm Switch
- User Manual
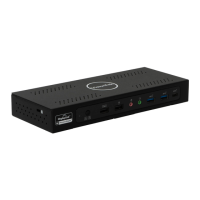
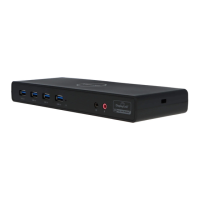
Docking Station Ports Overview:
Front Panel:
- Audio Jack: Connects headphones, headsets, or other 3.5mm devices.
- USB-C Port: Connects a USB-C device, supports 5Gb/s transfer speeds, BC 1.2 battery charging up to 7.5W, 2.4A charging on supported Apple devices (12W).
- USB-A Port: Connects a USB-A device, supports 5Gb/s transfer speeds, BC 1.2 battery charging up to 7.5W, 2.4A charging on supported Apple devices (12W).
- PC1 LED: PC1 LED Status Light.
- PC2 LED: PC2 LED Status Light.
- Power / Switch Button: Long press (3 seconds) to power on/off; short press to switch between connected hosts.
Rear Panel:
- DC Power Input: Connects to power using the included power cable.
- USB-C PC2 Upstream Port: Connects to a laptop or PC (PC2), supports data transfer up to 5 Gb/s, Power Pass-through charging up to 100W.
- USB-C PC1 Upstream Port: Connects to a laptop or PC (PC1), supports data transfer up to 5 Gb/s, Power Pass-through charging up to 100W*.
- Switching Port: Connects the 3.5mm switch button, which has the same function as the power button.
- DP 1.4 Port: Connects a display with a DisplayPort to stream video up to 4K@60Hz.
- HDMI 2.0 Port: Connects a display with an HDMI port to stream video up to 4K@60Hz.
- RJ45 Gigabit Ethernet: Connects to a network router or modem at 10/100/1000 Mbps.
- USB-A Port: Connects a USB-A device, supports 5Gb/s transfer speeds, charging up to 4.5W.
- USB-C PD Port PC1: Connects a USB-C power supply for Power Pass-through to PC1, supports 5V/1A – 5V/20A fast charging (USB-C power adapter not included).
Supported Resolutions:
Single Display (DP or HDMI):
- Host System DP 1.2 HBR2 MST: 3840 x 2160 @ 30Hz / 2560 x 1440 @ 60Hz / 1920 x 1080 @ 60Hz
- Host System DP 1.4 HBR3 MST: 3840 x 2160 @ 60Hz / 2560 x 1440 @ 60Hz / 1920 x 1080 @ 60Hz
- macOS (Intel, M1, M2) SST: 3840 x 2160 @ 60Hz / 2560 x 1440 @ 60Hz / 1920 x 1080 @ 60Hz
Dual Display (DP + HDMI):
- Host System DP 1.2 HBR2 MST: 2560 x 1440 @ 60Hz / 1920 x 1080 @ 60Hz
- Host System DP 1.4 HBR3 MST: 3840 x 2160 @ 60Hz / 2560 x 1440 @ 60Hz / 1920 x 1080 @ 60Hz
- macOS (Intel, M1, M2) SST: 3840 x 2160 @ 60Hz / 2560 x 1440 @ 60Hz / 1920 x 1080 @ 60Hz (1 Extended + 1 Cloned).
- Note for macOS: Supports 1 extended display and a duplicate of that display. Before connecting two monitors, it is suggested to lower the resolution.
Docking Station Setup:
-
Connecting Power:
- Plug the power adapter into the DC In port on the back of the dock.
- Connect the other end to a power outlet.
- Press and hold the power button until the LED turns on.
-
Connecting Systems (PC2):
- Connect the included USB-C cable to the PC2 upstream port on the back of the VT2900.
- Connect the other end to your host laptop, PC, or Mac.
- Connect your display(s) to the DP and/or HDMI outputs on the VT2900.
-
Optional - Additional System (PC1):
- Connect the included USB-C cable to the PC1 upstream port on the back of the VT2900.
- Connect the other end to your secondary laptop, PC, or Mac.
- To provide power pass-through to PC1, connect a user-supplied USB-C Power Supply (5V/1A – 5V/20A) to the USB-C PD Port PC1.
KVM Switching:
To switch between connected hosts, quickly press the Power/Switch button on the top of the dock. All connected displays and accessories will switch between host devices. PC2 is the default host device selected on device startup.
Optional Accessories:
- General Accessories: Connect additional items such as a keyboard, mouse, headset, USB flash drive, or external storage to the available USB-A and USB-C ports.
- Switch Button: Connect the included 3.5mm switch to the switching port on the back of the dock. This button functions identically to the Power/Switch button on the top of the dock.
Display Setup (Windows):
- Right-click on the desktop and select "Display Settings."
- In "Display," select either monitor 1 or monitor 2. Click and drag the selected display to your preferred arrangement.
- Scroll down to "Multiple displays" and select the desired mode (e.g., "Extend these displays") from the drop-down list.
Display Setup (macOS):
- When a new display is connected, it defaults to being extended to the right of the main display. To configure settings, select "System Preferences" > "Displays."
- Click on "Arrangement" to change the position of currently connected displays.
- To use mirror mode, check the "Mirror Displays" box below the central icon.
- To change the primary display, click on the small bar on top of the main monitor and drag it onto the monitor you want to be primary.
Maintenance and Safety:
- Always read safety instructions carefully and keep the User Manual for future reference.
- Keep the equipment away from humidity.
- If the equipment has been exposed to moisture, shows signs of breakage, or is not functioning, have it checked by a service technician.
- The manufacturer does not make any representations or warranties regarding the accuracy and completeness of the document and is not liable for any loss of profit or commercial damage.
- Changes or modifications not expressly approved by VisionTek Products, LLC could void the user's authority to operate the equipment and the product's FCC compliance.
- To ensure FCC compliance, shielded interface cables or specified accessories must be used.
Warranty:
VisionTek Products LLC provides a warranty against manufacturing defects for two (2) years with normal and proper usage. To receive the 2-year warranty, the product must be registered within 30 days of the original purchase date. Products not registered within 30 days will receive a 1-year limited warranty. VisionTek's liability is limited to the repair or replacement of defective parts. The warranty does not apply to any software components. Full warranty disclosure is available at www.visiontek.com. For questions or assistance, contact support at 1 (866) 883-5411.