SECTION
IV
SERVICE
Caution:
Make
sure the
main manual,
combination
valves
and
main
power
switch are turned
off before opening burner
or
removing any
parts
for
service.
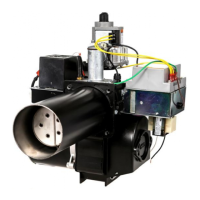
A. BURNER HEADAND
ELECTRODE/S
EN SOR
ASS
EMBLY
The
burner
head,
electrode, sensor
probe,
combination
valve, orifice housing
and
housing
cover
are
part
of the
gas
train assembly which can
be
removed
as one unit.
(See
Figure 15)
1. Disconnect
gas
line from
combustion
gas
valve
inlet, flame
sensor
lead
wire from
gas primary
gas
valve lead wires
lrom
gas
valve
operator
and
(orange)
ignition lead wire
from ignition
transformer
ignition
lead wire.
2. Remove
the two 1/4"
(6.35mm)
hex
slotted
screws
on
the top
front
of the housing cover and
the two
5/16"
(7.9375mm)
hex
slotted
screws
on the
left
and
right
side
back
of the
housing
cover.
3.
To remove
gas
train assembly,
gently
lift
up
rear
of housing cover
pulling
rearward
slightly on
the
drawer assembly
gradually positioning
the
rear
of the drawer assembly upward
90 degrees
(1.57RAD).
Gently
extract burner head
and
electrode/sensor
assembly out opening
in
housing taking extreme care to not
dislocate or
damage electrode or sensor
probe
4. When
servicing, clean burner head
ports,
electrodes and sensor
probe.
Inspect the
sensor
probe
and electrode wires
and
porcelain
insulators carefully for hairline
cracks
which
might
provide
an electrical leak
path
that could
short out
the ignition
spark, or flame signal.
5. Examine the electrode
and sensor
probe
for
any serious corrosion or deterioration
of
metal
at the tips. Check for
proper
dimensional
settings
of the
sensor
probe
and electrode
(see
Figure 13). Adjust
and/or
replace
these
assemblies as
necessary.
Make
sure
that the
ignition and
sensor
probe
wires
go
to the
correct
electrodes
and the
ignition
wire boot is
in
place
over
the electrode
porcelain.
6. Make sure that the burner
tube end
is
properly
positioned
in the
combustion chamber entry. lt
must be
set
'112"
(12.7mm)
short of the inside
face of the
combustion chamber as
shown
in
figures 4,
5 or 6.
B. AIR PROVING
SWITCH
The
air
proving
switch is mounted to
the
housing
cover with
(2)
#6
self tapping screws under the
gas
valve. A
clear
plastic
tube,
protected
by a spring
cover, is connected to
the barbed fitting
on the
pressure
switch while the
other end is
connected to
a brass barbed fitting. The
plastice
tube allows
pressurized
air
from
the blower housing
to travel to
PAGE 15
the
pressure
switch
causing the diaphragm contacts
to
close
thus completing the circuit.
The function of
the air
proving
switch
is
to ensure
sufficient combustion air
is
being developed by the
blower
motor
and blower
wheel.
Should the blower
motor fail
or the blower
wheel malfunction.
the
burner
gas
valve will
shut
off.
1. The air
proving
switch should
never require
maintenance. However.
should
nuisance
lockouts
occur, the
pressure
switch can be
checked. This is
done
by disconnecting the
yellow
and white leads
from
the
Air
Proving
switch and
jumpering
the
leads
together. lf the
burner
functions
correctly, the switch
needs
to
be replaced.
WARNING: lf a
jumper
is
used
to
check the switch
it
must
be removed or an unsafe condition
can
occur
resulting in
death or
property
damage.
2. As mentioned
above,
the
switch should
never
require maintenance. However a
pinched
tube
will
shut off the
flow of
pressurized
air to the
diaphragm creating a
failure made
similar to
bad Air Proving
switch.
Always
check to ensure
that the clear tubing
is not
pinched.
Make
sure
the spring cover is reinstalled over tube.
3. Switch is mounted in the horizontalposition with
terminals up from factory. Final burner mounting
should
maintain horizontal
switch
position.
WARNING:
Damage to
internalcomponents
of
burner
may result, if
burner
is mounted in
other
than
horizontal
position.
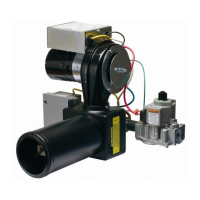
C. COMBUSTION AIR BLOWER AND MOTOR
1.
Cleaning of the combustion air blower is
indicated if
the blades show an accumulation of
dust and
lint,
or if the character of the flame
indicates
a deficiency of combustion air.
2. The
side
plate,
motor
and blower wheel are
removed
as one assembly.
Disconnect
the
motor wire inside the
junction
box beneath the
ignition
transformer.
Remove
the
four
(4)
5116"
(7.9375mm)
hex
slotted screws securing
sideplate to fan housing.
CAUTION:
Do not remove
blower
wheel from motor
shaft during
periodic
cleaning.
3. Should
removal
of the blower wheel be
necessary for
cleaning
or replacement
of it or
the motor, the
blower
wheel must
be
positioned
correctly on the motor
shaft.
(Figure
16)
HSG200
blower
wheel
pln
21664 is
positioned
21/16"
(52.3875mm)
measured from
the blower
wheel inlet ring
face to the
side
plate
face.
HSG400
blower
wheel
pln
21642 is
positioned
23116"
(55.5625mm)
measured from
the blower
wheel inlet
ring face to the
side
plate
face.
SECTION IV
SERVICE
Caution: Make sure the main manual, combination
valves and main power switch are turned
off before opening burner or removing any
parts for service.
A. BURNER HEAD AND
ELECTRODE/SENSOR ASSEMBLY
The burner head, electrode, sensor probe,
combination valve, orifice housing and housing
cover are part of the gas train assembly which can
be
removed as one unit. (See Figure 15)
1.
Disconnect gas line from combustion gas valve
inlet, flame sensor lead wire from gas primary,
gas valve lead wires from gas valve operator
and (orange) ignition lead wire from ignition
transformer ignition lead wire.
2.
Remove the two 1/4" (6.35mm) hex slotted
screws
on
the top front of the housing cover and
the two 5/16" (7.9375mm) hex slotted screws
on the left and right side back of the housing
cover.
3.
To
remove gas train assembly, gently lift up rear
of housing cover pulling rearward slightly on the
drawer assembly gradually positioning the rear
of the drawer assembly upward 90 degrees
(1.57RAD). Gently extract burner head and
electrode/sensor assembly out opening in
housing taking extreme care to not dislocate or
damage electrode or sensor probe.
4.
When servicing, clean burner head ports,
electrodes and sensor probe. Inspect the
sensor probe and electrode wires and porcelain
insulators carefully for hairline cracks which
might provide
an
electrical leak path that could
short out the ignition spark, or flame signal.
5.
Examine the electrode and sensor probe for
any serious corrosion or deterioration of metal
at the tips. Check for proper dimensional
settings of the sensor probe and electrode (see
Figure 13). Adjust and/or replace these
assemblies as necessary. Make sure that the
ignition and sensor probe wires go to the
correct electrodes and the ignition wire boot is
in
place over the electrode porcelain.
6.
Make sure that the burner tube end is properly
positioned
in
the combustion chamber entry.
It
must
be
set 1/2" (12.7mm) short of the inside
face of the combustion chamber as shown
in
figures
4,
5 or
6.
B. AIR PROVING SWITCH
The air proving switch is mounted to the housing
cover with
(2)
#6 self tapping screws under the gas
valve. A clear plastic tube, protected by a spring
cover,
is
connected to the barbed fitting on the
pressure switch while the other end is connected to
a brass barbed fitting. The plastice tube allows
pressurized air from the blower housing to travel to
PAGE 15
the pressure switch causing the diaphragm contacts
to close thus completing the circuit.
The function of the air proving switch
is
to ensure
sufficient combustion air
is
being developed by the
blower motor and blower wheel. Should the blower
motor fail or the blower wheel malfunction, the
burner gas valve will shut off.
1.
The air proving switch should never require
maintenance. However, should nuisance
lockouts occur, the pressure switch can
be
checked. This
is
done by disconnecting the
yellow and white leads from the Air Proving
switch and jumpering the leads together. If the
burner functions correctly, the switch needs to
be
replaced.
WARNING: If a jumper is used to check the switch it
must
be
removed or
an
unsafe condition
can occur resulting
in
death or property
damage.
2.
As mentioned above, the switch should never
require maintenance. However a pinched tube
will shut off the flow of pressurized air to the
diaphragm creating a failure made similar to
bad Air Proving switch. Always check to ensure
that the clear tUbing
is
not pinched. Make sure
the spring cover
is
reinstalled over tube.
3.
Switch
is
mounted
in
the horizontal position with
terminals up from factory. Final burner mounting
should maintain horizontal switch position.
WARNING: Damage to internal components of
burner may result,
if
burner
is
mounted
in
other
than horizontal position.
C.
COMBUSTION AIR BLOWER AND MOTOR
1.
Cleaning of the combustion air blower is
indicated
if
the blades show
an
accumulation of
dust and lint, or if the character of the flame
indicates a deficiency of combustion air.
2.
The side plate, motor and blower wheel are
removed as one assembly. Disconnect the
motor wire inside the junction box beneath the
ignition transformer. Remove the four
(4)
5/16"
(7.9375mm) hex slotted screws securing
sideplate to fan housing.
CAUTION: Do not remove blower wheel from motor
shaft during periodic cleaning.
3.
Should removal of the blower wheel be
necessary for cleaning or replacement of
it
or
the motor, the blower wheel must
be
positioned
correctly
on
the motor shaft. (Figure 16)
HSG200 blower wheel pIn 21664
is
positioned
2 1/16" (52.3875mm) measured from the blower
wheel inlet ring face to the side plate face.
HSG400 blower wheel pIn 21642
is
positioned
23/16"
(55.5625mm) measured from the blower
wheel inlet ring face to the side plate face.
 Loading...